A hands-on rebuild saved both beast and budget
Issue 76 : Jan/Feb 2011
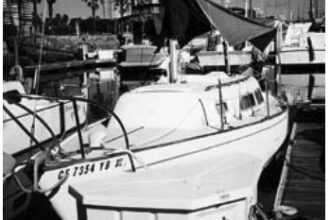
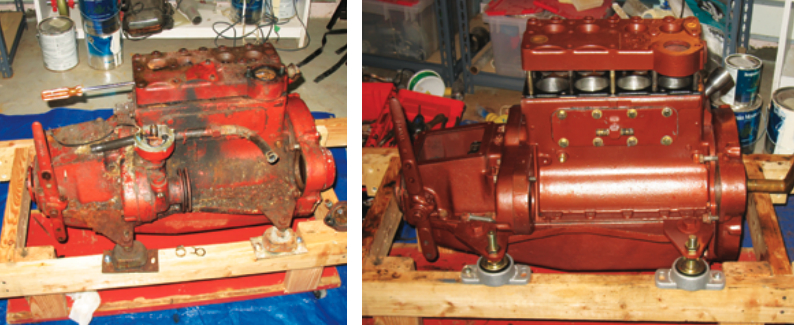
Our 41-year-old C&C Corvette, Trillium, has the distinction of being built originally as a gift to retiring Ontario Premier John Robarts from his Progressive Conservative Party. We bought her in 1996 knowing this illustrious history but also knowing full well that she was equipped with her original Atomic 4 gasoline internal combustion engine. In 13 years of cruising north Florida and south Georgia, and then the Hudson River and Long Island Sound, I can’t say the A4 gave us completely reliable service.
Indeed, during our Florida years, around Jacksonville, we established an excellent relationship with Wayne York and Robert, his mechanic, who saved our cruising bacon more than once, replacing burned out wiring and rebuilding carburetors. However, through all this I managed to keep at arm’s length from the mysterious metal beast corroding in the bilge. Just a look at the schematic of the carburetor was enough to discourage any exploration in that area. Ye Gods! Look at all those tiny pieces! Little did I know then that the carburetor has, in reality, only two moving parts.
However, like a lot of A4 owners, I came to a crucial crossroads in my relationship with this mysterious hunk of metal. Two years ago, while cruising on Long Island Sound, I ran her completely out of oil due to the failure of the oil seal on the water pump. I not only ran her out of oil, but I continued to run the engine in that condition for a considerable number of hours. Only when I noticed that the engine was beginning to sound like 200 individual parts rattling together did I actually shut it down to investigate. Needless to say, by then the damage was done. Cruising buddies Jim and Lee Luce helped me sop the spilled oil out of the bilge, and I was able to rebuild the water pump with spare parts we had aboard. But, from then on, the engine was never quite the same. Specifically, she was burning an inordinate amount of oil . . . so much so that we always bought two or three quarts at every fuel fill. She also left a cloud of blue smoke in her wake and a rainbow-colored scum on the water under the exhaust.
This was a situation that should not continue. The general diagnosis was that the piston rings were shot, allowing oil to leak into the combustion chambers, burn with the fuel, and shoot out the exhaust. The fact that the cylinder compression was still high only complicated this diagnosis. However, no matter the cause, oil was disappearing from the system rapidly, and it wasn’t ending up in the bilge. So the choices were:
- Replace the A4 with a diesel
- Replace it with a “new” rebuilt A4
- Rebuild the engine myself
An economical choice
We deemed the first option too expensive as it would cost more than the then 39-year-old boat might be worth in resale value. We still sail with 12-year-old sails, so spending money on the boat does not come easily. Have I mentioned we’re cheap?
Rebuilt units are available from Moyer Marine, but this option was still slightly more expensive than I’d like.
As to the third choice, why not? I am a mechanical engineer and a naval architect, so I am quite familiar with the theory behind the internal combustion engine. I’ve also been in the boating industry for a good many years. Surely, I should be capable of doing this, shouldn’t I? It’s not rocket science. I wouldn’t begin to know how to rebuild a computer, and the molecular reaction that takes place in curing resin is well beyond my comprehension, but even I could understand the interactive and interdependent systems at work in a pre-computerized 1950s-era internal combustion engine.
I had already replaced the rudder, replaced all the chainplates and knees, rebuilt bulkheads, and installed opening ports. It was now time I finally addressed the long ignored and neglected iron beast in the bilge. It would no longer suffice to simply cross my fingers and hope for the best. The current situation was expensive (more oil), and embarrassing (smoke and oil slicks), not to mention the adverse environmental impact that a sailboat should not be inflicting on the world. Besides, if completed successfully, this could be a very rewarding experience. I’d built International 14 dinghies over past winters and enjoyed the process. I needed another winter project.
I also have to admit that driving the decision was the need to remove and replace the gas tank, which was beginning to cause me concern. The only way to get the fuel tank out was to pull it forward though the engine compartment. Obviously, this was more easily achieved if the engine weren’t there. Therefore, I made the fateful decision in the early fall of 2008 to pull the engine, rebuild it over the winter, and reinstall it before launching in the spring.
Moral and material support
I should mention at this point that I had no intention of embarking on this journey on my own. Anyone who has lived with an Atomic 4 is familiar with the online advice and service that Don Moyer and Moyer Marine provide to us, sometimes reluctant, devotees. It was to Don’s Universal Atomic 4 Service and Overhaul Manual that I immediately turned and that I depended upon and followed throughout the winter project.
Earlier in the year, I had attended one of Don’s superb seminars where he demystified the workings of the A4 and gave probably the best explanation of how the coil works that I have ever heard (though I admit that I have not heard many). He gave this seminar at the workshop of his Amish collaborators just outside Lancaster, Pennsylvania. These superb machinists produce the replacement castings and components that keep this venerable engine going into the 21st century. And they do this in a machine shop that is exceptionally well equipped . . . and runs on hydraulic, rather than electric, power. Attending the seminar showed me that I could probably do this and that I had access to skilled and knowledgeable machinists. Best of all, I learned I could deliver the pieces to Don and his Amish machinists for a complete rebuild if I found myself beyond my depth. Always have a Plan C.
Extracting the engine
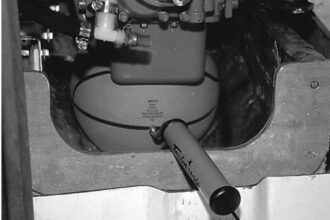
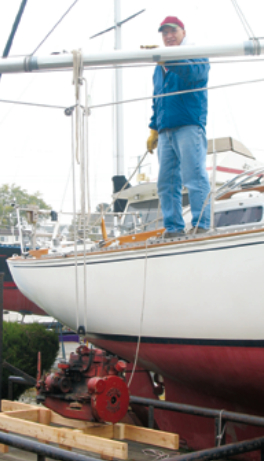
Trillium was hauled early in the fall and blocked for winter storage in the boatyard. The C&C Corvette has a reasonably accessible engine space. However, the first question was how to hoist this 350-pound lump of metal out of the bilge and onto a trailer. Fortunately, the rig was still in the boat and the boom was positioned in its usual place over the companionway. Hmmm, could I hoist the engine with the boom, slide it aft along the boom through the companionway into the cockpit area, swing the boom outboard, and lower the engine onto the trailer without breaking the boom or capsizing the boat on her jack stands?
I remembered a mainsheet system I always liked that had a traveler car that moved independently of the mainsheet, so the car could move without altering the tension on the sheet. If this theory could be turned upside down and used on the boom, then I could have a system to lift the engine by leading the mainsheet to a two-speed winch. I would be able to move the hoisting point aft by using the reefing lines, also led to a winch. After swinging the boom outboard, we could use the same mainsheet to lower the engine onto the temporary beds on the borrowed trailer.
To reduce friction on top of the boom, I duct taped a strip of Mylar in place where the lifting blocks were tied off to the boom. To further support the boom, we rigged a bridle at the extremes of the required range of travel supported by the main halyard. The ends of the boom were supported by the topping lift aft and the gooseneck forward. We also ran the spinnaker halyard from the masthead to the trailer hitch on my Outback on the opposite side of the boat from the trailer to help counter any tipping moment as we swung the boom over the trailer. This all sounded great in theory but was yet to be proven in practice.
The first step was to remove all the rusted and surprisingly small lag screws holding the engine mounting pads to the wooden beds. At that point, we removed the larger chunks of metal to reduce the weight that would need to be lifted. This included the starter motor, alternator, and exhaust manifold. After disconnecting the engine from all its systems, we took up the weight of the forward end with a loop around the flywheel housing, then slid the engine slightly uphill on the beds far enough forward into the cabin that the lifting eye on top of the engine was accessible to a clear lift to the boom.
At this point, we lowered the flywheel end onto a short transverse 6 x 6 to take the weight of the engine, and transferred the 2:1 tackle and snatch block to the lifting eye. Then, as I guided the engine around the centerboard pendant tube, helper Joe Pantalone cranked on the cockpit two-speed primary winch to take the weight of the engine on the boom. Amazingly, the engine began to levitate off the beds and 6 x 6 as the mainsheet took the full weight. However, even at 2:1, the amount of cranking and the load on the winch was more than we anticipated, as evidenced by the puffing and panting emanating from Joe in the cockpit.
As the engine cleared the beds, we used the reefing lines to pull the attachment point on the boom farther forward to pull the engine completely clear of the engine compartment and to one side, clear of the centerboard pendant tube. Once the engine was positioned far enough forward and to one side to clear all obstructions, we continued lifting, watching for any untoward deflection in the boom. The lifting had to continue until the engine was located just under the boom so it could be slid aft through the companionway opening over the bridge deck, into the cockpit, and high enough to clear the coamings as it was swung outboard over the trailer. This entailed even more puffing and panting on Joe’s part. Have I mentioned yet that Joe was the recent recipient of a heart transplant? Like every part of this improvised apparatus, his new heart was really being put to the test!
Finally, the engine reached its maximum height and we re-rigged the reefing lines to pull it aft. Much to our relief and amazement, that’s exactly what happened. As they say, it’s great when a plan comes together. After the engine was over the cockpit, we swung the boom outboard past the coamings and lowered the engine and secured it to the temporary beds built for it on my other helper, Pete Moltzen’s, borrowed trailer. Amazing!
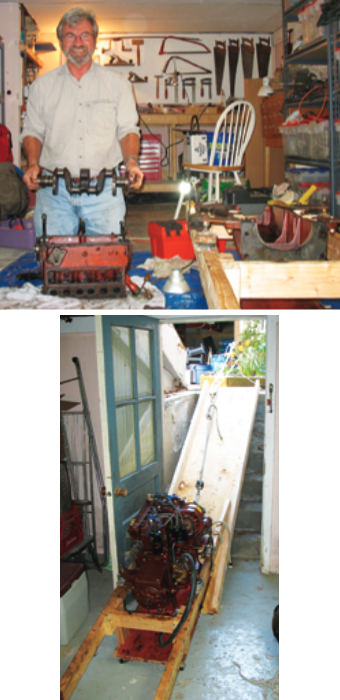
When the engine arrived in the driveway at home, we lifted the engine on its temporary beds onto Joe’s borrowed dolly, secured it, and slid it off the trailer and down the ramp. Then, with block and tackle, we lowered it into the basement. Phase One was completed.
The dismantling
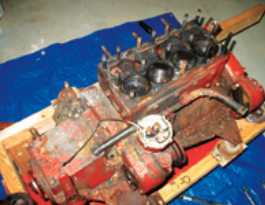
The first piece I removed from the engine was the cylinder head, which came off surprisingly easily. Now the studs themselves would need to be removed. Not wanting to spend money on a stud remover (I’m cheap, remember), I borrowed a technique I picked up on the Internet and used two stud nuts locked together and a ratchet wrench that I encouraged with taps from a wooden mallet. All this was after soaking the studs with penetrating oil. It was a dicey process trying to break the studs free without breaking them off in the block.
Just as I felt I had this licked, the A4 brought me back down to earth. The second-to-last stud to be removed refused to budge and one or two slightly more aggressive taps with the mallet sheared it off. Removing the side cooling-water plate produced two more sheared studs. Once I learned that the Moyer machinists charged only $15 to remove a broken stud, my cheapness gave way to expediency. The broken studs could wait until I delivered the block to the Amish for machining.
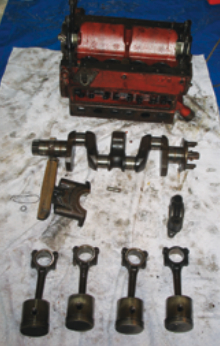
Next, the valves came out (I only lost two valve retainers that went flying across the basement), then the reverse gear. At this point, Don’s book states that if you decide to progress to the next stage, the culmination would be holding the crankshaft in your hands. After I separated the block from the oil pan and removed the connecting rods and pistons, that is exactly what happened! It was not much of an exaggeration to say I felt like a surgeon holding a beating heart in his hands. It was that satisfying.
The rebuild
Now that the engine was dismantled, someone more expert than I would need to determine what had to be re-machined. We discovered a broken bearing sleeve on the crankshaft end of the connecting rod for the #2 cylinder and, using Plastigauge, found that two other sleeves were well outside the required tolerances. My initial communication with Ken Seigh at Moyer was somewhat confusing since he said his machinists didn’t determine what needed re-machining, but rather that they would only machine what I told them to. However, once I got all the pieces to them, Ken came back with detailed recommendations. The whole crankshaft would need machining, which would require fitting the next arger bearing sleeves. Also, all the cylinders would need to be re-bored, which would lead to larger-diameter pistons and rings.
However, the Amish did take their time, and even though the pieces were delivered to them well before Christmas, the machining wasn’t completed until early April. Friends who live in Lancaster picked up the amazingly clean, painted, and polished components for me. Compared to the oily, greasy, and rusty pieces that had been delivered, the transformation was remarkable.
Following Don’s book to the letter I reassembled the pieces in reverse order of disassembly.
Spring reawakening
Come spring, we hauled her out of the basement to the garage, reconnected her to the panel and wiring that had been removed from the boat, and hooked her back up to the battery and fuel. The moment of truth had arrived. After all that work and effort, would she run? Would she even start? Well, not initially. But after I tracked down a fuel problem, she immediately leapt to life, surprising me and spraying my wife with cooling water spewing from the Vetus muffler. I adjusted the timing and oil pressure and felt an immediate sense of relief and satisfaction.
Now that the engine was operational, I still needed to remove the old fuel tank. I emptied it and, in the process of manhandling it, put my finger through the bottom . . . I slid the new custom aluminum tank from Klacko in place after repainting the whole area. While the tank and engine were out of the way, I also replaced the old cockpit drain valves with new larger Forespar seacocks and completely rebuilt the old engine beds, fitting aluminum caps to take 3⁄8-inch-diameter stainless-steel machine screws rather than mild-steel lag screws. All that delayed reinstalling the engine into late May.
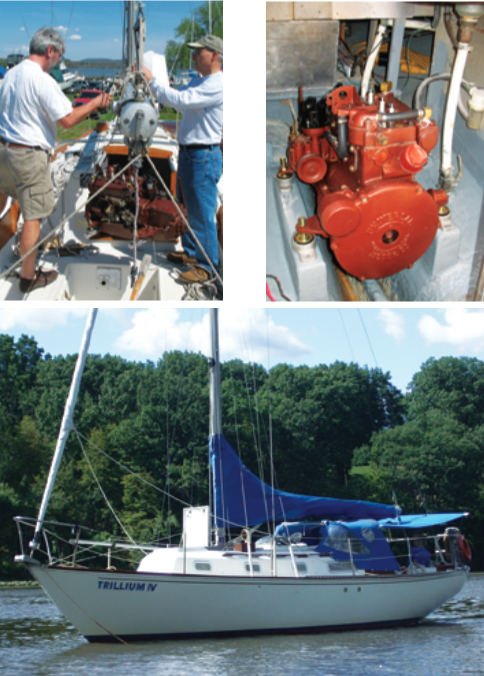
Once again, we loaded the engine on Pete’s borrowed trailer, called Joe, and made the trek back to the boat. Running the film in reverse, we lifted the engine off the trailer, swung it over the coamings into the cockpit, slid it forward on the boom through the companionway, lowered it past the centerboard pendant, and on to the forward portion of the rebuilt beds and the 6 x 6. We removed the snatch block from the lift bracket, repositioned the mainsheet at the flywheel housing, and eased the engine aft to its original position.
Over the next few days, I realigned the engine and screwed the mounts to the aluminum straps glassed to the tops of the beds. I reconnected the fuel and reinstalled the panel and wiring and the shaft coupling, throttle, and choke. As in the garage, we again breathed a sigh of relief when the engine started and ran.
During our first season, the engine ran all summer and the oil at the end of the season was still an amber color, not the black sludge we had to endure for the two previous years. She started every time, burned cleanly, and ran smoothly even at a low idle. She is showing every indication of being ready for another 39 years of reliable service.
A Zen-like experience
Right off the bat, I gained respect for the internal combustion engine and the A4 in particular. This experience was very much “Zen and the Art of A4 Maintenance.” With the A4, unlike computer chips and chemical reactions, you can actually see and understand how the engine works. You can also see how human thought was translated into a working machine. The whole thing just makes sense. The internal combustion engine relies on the interaction and cooperation of separate and disparate — but totally interdependent — systems. Timing is everything between the electrical, fuel, cooling, exhaust, and mechanical systems. If one of these systems malfunctions or interacts improperly with the others, the whole ceases to function. How’s that for an appropriate allegory for life? It’s also impressive to see that much power emanating from so few moving parts.
Taking the engine apart and putting it back together again, and having it actually perform better than it did originally while also eliminating the problems that initiated the rebuild, was a confidence-building experience. I am now comfortable in my ability to deal with any problem this engine may present in the future. Bring it on!
Having confronted and overcome this psychological barrier, I’m ready to move on to the next challenge in a 39-year-old boat. Let’s have a crack at the 12-volt electrical system and figure out why that battery won’t hold a charge.
Would I recommend this process to anyone else? Absolutely, but with caveats. Someone once told me, “Never rebuild an engine that doesn’t need rebuilding.” In my case, the inordinate consumption of oil demanded attention. However, “If it ain’t broke, don’t fix it” would seem to always be good advice.
Rob Mazza designed for C&C Yachts for 15 years, Mark Ellis Design for seven years, and Hunter Marine in Florida for almost four years before moving to the supply side of the marine industry. A job with Baltek took him to New Jersey and Rob and his wife of 40 years, Alexandra, now sail Trillium out of the Nyack Boat Club on the Hudson River in Nyack, NY.
Thank you to Sailrite Enterprises, Inc., for providing free access to back issues of Good Old Boat through intellectual property rights. Sailrite.com