Here’s a hard-bottom inflatable you can create in an afternoon for less than $600
Issue 15 : Nov/Dec 2000
When I bought Millennium Falcon, my 44-foot Bruce Roberts-designed steel sailboat, she came with an 8-foot Boston Whaler dinghy. This is a fine boat, and it’s unsinkable, but it weighs more than 150 pounds, and my transom is four-and-a-half feet above the water. I could manhandle it aboard, but it was impossible for my wife to do it. Since the time may come when she has to do everything to get us home (I sincerely hope not, but I believe in being prepared), I wanted to have a dinghy she could handle in my absence or incapacity.
So I traded that Boston Whaler for an isolation transformer and started looking for a lighter dinghy. I found a nice 8-foot pram called the Basic 8, designed and built by Joe Garbutt. (I didn’t know at the time that he lived just three doors down the street.) The skipper of a boat in the next slip had one for sale, and the price was right at $300 with oars.
The Basic 8 weighs less than 50 pounds with a carrying capacity of about 400 pounds. I bought it. I didn’t think about what would happen when two people who together weighed about 375 pounds got in with 50 pounds of gear and supplies. I hadn’t put an outboard on the transom, and already I was over the dinghy’s capacity.
I never got to test its load-carrying capacity. First, I took it to the dock to try it out. As I climbed in, it tipped. I fell on my back in the little boat while shipping about 30 gallons of water over the side. My wife cannot swim a stroke, and I realized that a very tender tender wasn’t for us. This would be especially true with only a few inches of freeboard in an open and choppy anchorage. So far, my solution was not the solution I’d hoped for. My wife could get the dinghy aboard, but she wasn’t going to get into it for a trip to shore. A dinghy you’re afraid of is no dinghy at all.
Too heavy
Now I was faced with the realization that a hard dinghy large enough to handle the two of us and gear was going to be too heavy for her to manage alone. A dinghy light enough to manage would not be stable enough. The search went on.
The best solution seemed to be a hard-bottom inflatable. Soft-bottom inflatables were too difficult to stand up in. I began the search for an affordable hard-bottom dinghy but went into sticker-shock when I discovered that the least expensive hard-bottom inflatable would set me back more than $2,000 with a warranty for only four years. That meant a possible cost of $500 a year. Stability, weight, and now cost. It was hard to determine which factor was most important.
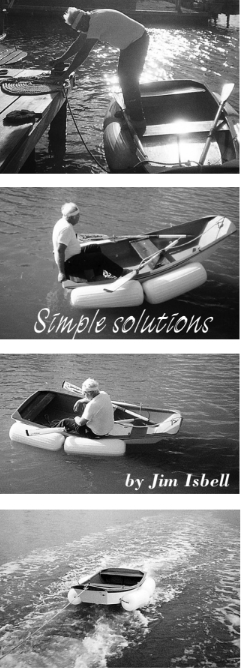
At the time, I was reading The Cost-Conscious Cruiser, by Lin and Larry Pardey, in which they tried a product called Add-A-Buoy on their hard dinghy. This is an inflatable tube they tied around the gunnel of the dinghy and thus added a bit of stability and some flotation in case the dinghy swamped. I went on an Internet search for the product, only to learn the company had been out of business for many years. But in the process, I found a newer product called Dinghy Dogs. This is a pair of inflatable tubes that can be fastened to the sides of the dinghy to improve the stability. Finally, I had what I wanted, but the $450 price tag caused me to create my own solution using fenders.
I wanted the add-on fenders to be easily removable so they could be used as fenders when at a dock. Since there is no need for a dinghy while tied to a dock, it does not compromise the dinghy to remove the flotation. To make them easy to remove, I use fast eye snaps on the ends of the 3/8-inch rope that goes through the center of each fender. I could have used snap shackles, which would have made mounting them somewhat easier, but I was trying to keep the solution to the lowest cost.
Center hole
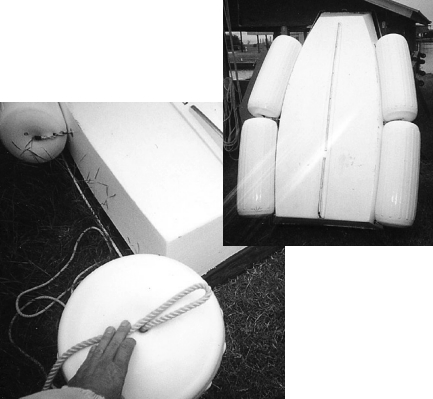
The fenders I chose are the type with the hole through the center. A piece of 3/8-inch rope is run through the center, and a fast eye snap is spliced to the end of the rope. Then the rope is pulled into the fender until the fast eye snap stops it from going through and out the other end. Lay the rope out to the diameter of the fender and back in again. Cut the rope even with the center tube, and mark the place where it loops back. This is where you will want the fast eye snap to rest when you splice it onto this end. After it is spliced in place, center the rope in the fender, and it’s ready to use.
Mounting the fenders on the dinghy is just as simple. I used 5/16-inch stainless-steel eyebolts fastened through the hull with a large fender washer, a nut, a lock washer on each side, and a liberal dab of caulking under each washer before tightening the nuts. You must have three eyebolts on each side of the hull placed low on the side, about 34 inches apart so two fenders can be snapped into place on each side.
I found that to place the fenders on the boat I had to slightly deflate them before snapping them to the eyebolt. After snapping all four fenders in place I re-inflated them to 2 pounds per square inch. This is the recommended pressure for the fenders in normal use. Over-inflating them will distort them and shorten their life without significantly increasing their buoyancy. It will probably void that lifetime warranty also.
I started out with a basketball pump for inflating the fenders. As it turns out, fenders are a lot bigger than a basketball. After 30 minutes spent re-inflating the first one, I went to the trunk of the car and got my 12-volt tire pump. In less than five minutes the remaining three fenders were filled to capacity.
Any outboard
The picture, at left, of my full 195 pounds sitting on the transom proves that any outboard will be supported. But bear in mind that the transom of the Basic 8 is not designed for anything bigger than a 5-hp outboard. My 5-hp Seagull will be large enough to push the dinghy as fast as I want to go, and it will make the dinghy into a nice emergency tug when lashed alongside, complete with large fenders to prevent it from scratching the topsides.
This tender rows with so little effort that I can’t convince myself it’s a valid way to get exercise. And the towing resistance is so light I can pull it toward the boat with two fingers on the towrope while towing it at 9 knots. Furthermore, it tows in a straight line. We towed it for more than 30 minutes while doing some maneuvering, and it never wandered. You have to make sure it stays on the top of the first swell aft of the transom, as you would with any towed dinghy. When you slow down, you need to watch that it does not submerge the bow; this, too, is normal with any dinghy on a towline.
When you get back to the shore and want to load it on top of your car, it only takes 10 minutes from water to car top fully lashed down with the fenders in the trunk. You don’t need to deflate the fenders to get them off, and if you use snap shackles you won’t have to deflate them to put them on. The fast eye snaps require a slight deflation for mounting because they must be pushed past the position they will occupy when snapped.
When I started this project, people drove by, looked at the boat shed, and shook their heads. They must have thought I’d been sitting in the sun too long. But after it was finished and on the water, several asked for plans.
If you build the Basic 8 yourself, a job that will take less than three weekends, the total cost of the project can be less than $400. If you already have a dinghy and want to stabilize it, the cost is even less. But even if you buy the dinghy and place your own fenders on it, as I did, the cost will be less than $600, and you have an inflatable with a lifetime warranty on the air chambers. Where can you get a deal like that?
Jim began sailing at age 33, crewing on a Thunderbird. He then bought a 12-foot fishing-sailer, abandoning his racing career and frustrating his sailing mentor. Next he built a 32-foot plywood sloop and bought a Balboa 20 and a 26 before purchasing his 44-foot steel ketch. Sometimes “the rest of the story” is more compelling than the formal bio. As this issue went to print, Jim put the ketch in our classified ads. His wife has decided, much to Jim’s chagrin, she’s not a cruising sailor. They are buying a powerboat.
Thank you to Sailrite Enterprises, Inc., for providing free access to back issues of Good Old Boat through intellectual property rights. Sailrite.com