A seagoing ketch gets a brand-new steering system
Issue 73 : Jul/Aug 2010
Over the past nine years, my partner, Magali, and I have been steadily modifying our ketch, Sigfrid, to turn her into a practical and enjoyable sailing boat. Among the most important modifications have been the changes we made to the steering.
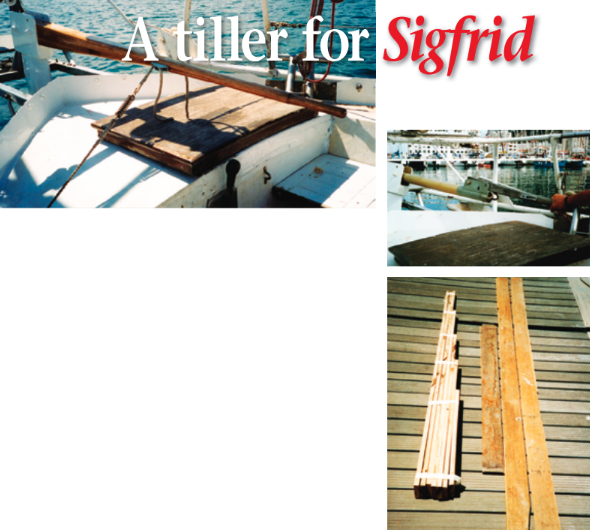
When we bought her in the summer of 2000, she was fitted with a curious dual setup involving both a wheel and a tiller. The boat’s previous owner, the creator of the system, explained the logic behind it. When he was at sea, he preferred the wheel, but for close maneuvering in a harbor, he found it unsatisfactory. He would, therefore, on the final approach before continuing into his berth, unship the wheel, disconnect the steering cables from the short steel tiller, and fit in their place a wooden extension.
Although we were immediately dubious about his ideas, we decided to give them a fair trial by sailing from Toulon, France, where she had been kept, to Gibraltar, about 700 miles away, before making any modifications. In practice, it was all as unsatisfactory as we had feared. If we steered with the tiller, the helm was very heavy, while the wheel could not put the rudder fully over. On top of this, the steering cables, which ran down through the aft deck and underneath the cockpit floor to the steering pedestal, were arranged in such a way they channeled rain or seawater directly onto the engine.
A preference for a tiller
We needed to give our boat some sort of proper steering system, either a well-designed setup using a wheel or a more powerful tiller. In recent years, Magali and I had been sailing on smaller boats, so we were both inclined toward the idea of a tiller, but we were concerned that, at 34-foot 6-inches long and displacing 9 tons, Sigfrid might be too large for this.
After a lot of thought, we decided to trust the boat’s original drawings. These showed a tiller, but it was over one-and-a-half times the length of the one we had been using. As the tiller is basically just a lever, we reasoned that reverting to the designed length should cut the weight of the helm by about one third and perhaps make our boat pleasurable to steer.
The simplest way to make our new tiller would have been to cut it from solid lumber, but this had two drawbacks. First — as it needed to be 5 feet 8 inches long and measured 5 1⁄4 x 2 1⁄2 inches at the rudder head — it would be hard to find a large enough piece of good-quality hardwood in Gibraltar. Second, even if we could get hold of anything suitable, the high level of waste, due to the shape and taper, would make it expensive. We had, however, been given a supply of secondhand oak floorboards by a local building company, so we decided to laminate the tiller from these.
Due to the shape of the stern and the layout of the cockpit, we chose to make the top of the tiller straight. In width it would taper steadily, from 2 1⁄2 inches where it fitted into the rudder head down to 7⁄8 inch at the end to form a comfortable handhold. For the underside, we chose a gentle concave curve, again reducing the size, from 5 1⁄4 inches at the rudder head to 7⁄8 inch.
Seven laminations
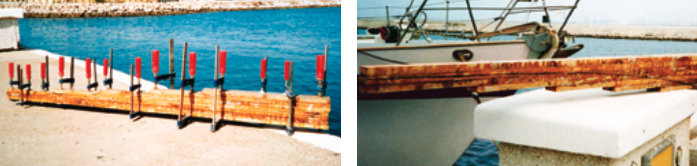
As the floorboards were 3⁄4 inch thick, it took seven pieces to create the required thickness. Of these, we made the first three full-length and the remaining four progressively shorter to create a shape approximating the desired curve. We also cut the taper on each piece, allowing an extra 1⁄4 inch for shaping up later. Finally, we planed the faces of the boards clean before scoring them with a knife and roughening them with 40-grit sandpaper to provide a good tooth for the glue.
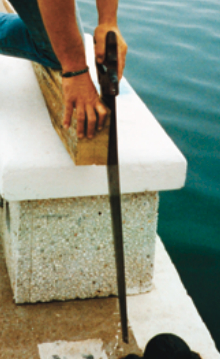
Although it seems very simple, gluing and clamping a stack of laminations like this can be surprisingly tricky. Once coated with glue, the wood becomes very slippery and the pieces will try to move out of alignment as the clamps are tightened. To try to keep this process as trouble-free as possible, we first spread plastic sheeting over the bench to catch the inevitable drips and squeezed-out glue. On this we placed a couple of blocks of lumber.
We laid the first full-length lamination, which would end up as the top of the tiller, across the blocks and applied the glue. We used epoxy, first spreading on a straight mix to thoroughly wet out the timber, then a second coat thickened with microfibers. We spread the remaining pieces in turn with glue and laid them on top, making a multi-layer wood-and-epoxy sandwich. Once all the pieces were in place, we started to put on the clamps. The blocks on which we’d assembled the tiller allowed us to put the clamps in place around the stack of laminations without moving it. By starting the clamping-up at the small end where we only had three laminations, we reduced the slipping and sliding between the layers.
Alignment assured
When the glue was dry, we removed the clamps and smoothed the top surface of our new tiller with a plane. We then drew a centerline along the planed surface. By marking out the width from this centerline, we ensured that, when our new tiller was held amidships, the rudder would be straight.
The next step was to mark the bottom curve on one side. To create a fair curve, we flexed a thin wooden batten to a shape we liked and drew around it with a marker pen. For this technique to work well, it’s essential that the batten have a regular cross-section and be free from knots. We then cut the curve using a jigsaw, and cut the width by hand.
We made the final shaping with a smoothing plane, spokeshave, and sandpaper. Wherever we could, we used the plane, as the length of its base helps to ensure a fair result without any dips and hollows. Where the curves were too severe for the plane, we used the spokeshave. We reserved the sandpaper for the final cleaning up.
Once the shaping and sanding was complete, we varnished the tiller before fitting it. Our tiller sits in a sort of U-shaped yoke on the rudder head and is secured with bolts. We drilled the bolt holes with the tiller in place, using the existing holes in the rudder head as guides and taking great care to hold the drill perpendicular to the rudder head. We drilled the holes in two stages — working from both sides of the rudder — to ensure that any slight mismatch would be in the center of the tiller.
We are delighted with our new tiller. We now have a simple, straightforward steering system that gives the helmsman plenty of feedback and, as we had hoped, the extra length makes the rudder far easier to manage. Having said that, with a boat of this size and weight, the helm can quickly become hard work if she is badly balanced. This encourages us to reef the mizzen early when the wind freshens and to think carefully about sail trim to keep her sailing well.
Richard Toyne and his partner, Magali Bellenger, live aboard Sigfrid while they explore the western Mediterranean, financing their voyages by carpentry work, both ashore and on boats (Richard), writing for magazines, and by the sale of handmade jewelry produced on board (Magali).
Thank you to Sailrite Enterprises, Inc., for providing free access to back issues of Good Old Boat through intellectual property rights. Sailrite.com