Integrating lazy-jacks with a sailcover

Issue 73 : Jul/Aug 2010
I love my mainsail when it’s doing what it’s supposed to do: powering my boat. But since I am often a singlehanded sailor, there are times — such as when it’s time to furl several hundred square feet of Dacron neatly by myself — that our relationship becomes a bit more complex. I’m not the first sailor to fantasize about a mainsail that would suddenly appear when needed and then magically vanish when the fun is over.
Recently, several companies have begun offering lazy-jack systems that are integrated with specially designed sailcovers. Marketed under names like Stack Pack and Lazy Bag, they use a sailcover that’s suspended by the lazy-jack lines. This cover is mounted permanently, so there’s no need to remove it before sailing or replace it upon returning to port.
The technology behind these systems is not that complicated. The design features are not patented, as most have been used in one form or another for some time. I discovered that a boatowner with access to a sewing machine can create his own low-cost lazy-jack/sailcover system. I have a good friend who can do wonders with her sewing machine. Installing such a system takes a little bit of work but can provide a nice upgrade to a good old boat.
How the system works
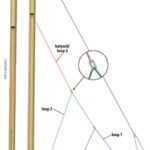
The lazy-jack part of the system is not complex. One line is attached to either side of the mast, usually somewhere a little above the spreaders. These lines descend in parallel until they meet a series of stainless-steel rings or small blocks which, in turn, are connected to shorter lines leading directly to the boom. This allows the lines to branch out to and hold the sail at several points along its length. The end result looks a little like a river branching out through a delta, creating the web that prevents the sail from flogging all over the deck while being hoisted or lowered.
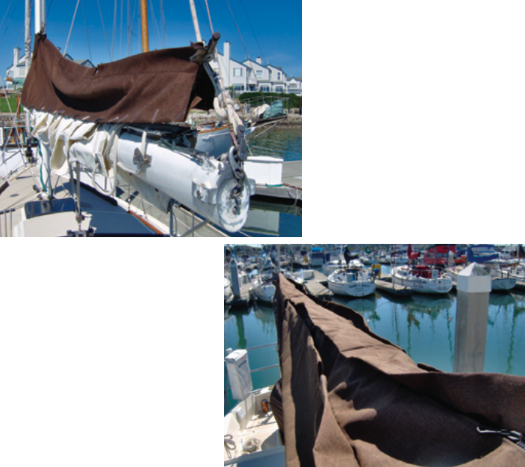
Lazy-jack systems such as these are nothing new. The genius is in the addition of an integrated and permanently mounted sailcover. Instead of being draped over the boom like a conventional sailcover, this cover is positioned upside down, with the opening on the top. This gives the cover a shape, a little like a taco shell, that uses gravity to help the sail flake down neatly inside. Once the sail has been lowered, the crew needs only to remove the halyard and zip up the top of the “taco” to protect the sail from the elements. The lazy-jack lines are attached at several points along the top of the sailcover, which helps the cover keep its proper shape when the sail is raised and the sailcover would otherwise be empty.
Constructing the system
This system works best when all lines are led aft to the cockpit, removing the need for any rigging concerns at the mast. For our boat, I moved a mast winch to the coachroof and then shopped for the necessary blocks, deck organizers, and rope clutches to finish the job. While not absolutely necessary, it’s also helpful to rig a single-line reefing system that runs to the cockpit.
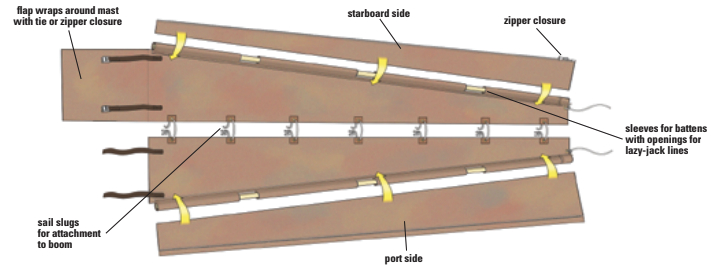
Sunbrella is the fabric of choice for this kind of project. It has good UV-resistance and holds up well, but remember to reinforce it well at any chafe points. Although this sailcover appears to be constructed of a single panel (hence the taco comparison), it is really composed of two large side panels roughly the length of the boom. The panels are irregularly shaped, similar to those in a conventional sailcover. The forward end of the cover is as tall as necessary to cover the sail slugs at the mast track. The panels can be much narrower at the aft end since they only need to cover the clew of the sail.
The two panels are jointly connected at the bottom to sail slugs on the boom sailtrack and the split between them allows rainwater to drain and makes it possible to rig reefing lines as needed.
You can transfer the slides from the sail, as the sail needs to be loose-footed to allow the system to fit. The panels are attached to the sail slides by nylon straps anchored in grommets on the panels. If you don’t feel comfortable installing grommets yourself, any sign shop that makes vinyl banners can probably install them inexpensively. It works best to sew small patches of nylon webbing in the locations where the grommets will go, to provide a better purchase for them and as reinforcement.
Although they look symmetrical, the side panels are not identical. One of them must extend around the front of the mast to close the system. This wraparound section, which connects to the other side panel with a zipper, gives the sailcover a neater overall appearance and prevents the sailcover from flogging in the wind.
In addition to the side panels there is a two-part top panel. One side of this panel is sewn to each of the large side panels and they are joined by a long zipper the length of the boom. A weather flap over the zipper helps protect the stowed sail and the zipper itself from the elements. Add a lanyard of some type for the long zipper, as it may be difficult to reach in the closed position.
The attachment points for the lazy-jack lines require special attention as the sides of the sailcover need to be supported so they don’t sag or flap in the wind. This is done through the use of rigid battens inserted into sleeves sewn along the top of each side panel. In commercial systems, the battens are usually made of some form of fiberglass rod, which you can purchase from a sail loft. Another option is to use small-diameter PVC pipe available from any big-box building-supply store.
Sew a sleeve into the top of each side panel to accommodate the battens. Leave one end of each sleeve open for inserting and adjusting the battens during installation. Since the batten is enclosed in the sleeve, you need to provide small openings every several feet so you can tie the lazy-jack lines to the battens.
Installing the sailcover
During construction, it’s helpful to test-fit the panels to the boom to confirm accuracy before completing all the sewing. I found an odd combination of clothespins and Vise-Grip pliers helped hold the panels in position while I confirmed their fit. If something doesn’t fit, now is the time to change it.
Once the final sewing has been completed and the two panels are stitched together, it’s time to begin installation. Drape the two connected side panels over the boom and under the loose foot of the mainsail so the insides of the panels are facing up. Feed the sail slides into position on the sailtrack so the panels will be properly anchored to the boom when assembly is complete.
Next, install the battens. Trim the battens so they’re short enough to fit in the sleeves without wiggling or shifting. Use sandpaper or a file to smooth the ends of the battens to prevent damage to the chafe-prone Sunbrella cover. It’s also helpful to pad the ends of the battens in order to protect the ends of the sleeves. On our system, I used scraps of nylon webbing folded and duct-taped over the ends of the battens to cover the fiberglass edges. This doesn’t have to be pretty; the important thing is to make sure you have a sacrificial layer to prevent the batten ends from chafing through the fabric. Once the battens are properly fitted, stitch the sleeves closed. Raise the side panels and zip them together over the sail to help hold them in place.
Rigging the lazy-jacks
Now that the sail cover is complete, you need to rig the lazy-jacks with which to hold it up ready to receive the dropped sail. It’s time to haul out the bosun’s chair for the overhead work.
Begin by mounting a small pad-eye to each side of the mast a few feet above the spreaders. Using any light, low-stretch line, rig a line to each pad-eye so it can reach a little over halfway to the boom. Tie small stainless-steel rings to the lower ends of both these lines and use additional lengths of line to create the web of lines spreading to the attachment points on the battens. Running the lines from one attachment point up to a stainless-steel ring and down to another batten or ring makes it possible to anchor each side to several points along the battens. For a typical 30-foot boat, three attachment points should be sufficient. (Note: See Lazy-Jacks 101 in the September/October 2009 issue of Good Old Boat and the article on Page 38 of this issue for ideas on how to rig lazy-jacks. –Eds.)
This process of rigging lazy-jack lines involves some trial and error; make sure you’re on good terms with your bosun’s chair. Your goal should be to have the upward force evenly distributed along the battens with the side panels lying smoothly and the lazy-jack lines neatly parallel. It’s helpful to have messenger lines so if a line slips out of your grasp you can retrieve it easily. While you’re up the mast, take a few moments to lubricate your sailtrack to give yourself an advantage when raising the sail and to help gravity when lowering it.
Once the lazy-jack lines are positioned, use a short length of light line to anchor the aft end of the sailcover to some attachment point at the end of the boom. This prevents the sailcover from creeping forward while in use. On our boat, the topping lift provides an ideal point to tie this off.
Once the lazy-jack lines are holding everything in place, it’s time to test your system. Remember to head straight into the wind when raising and lowering the sail to avoid snagging a sail batten on a lazy-jack.
Ron Vanderwell tries to have the most fun-per-dollar possible. That’s why he owns a good old boat, Clio, a Cal 31 charter boat based in San Francisco Bay. When he’s on land, he’s a husband, a father to three boys, and a pastor to two start-up churches.
Thank you to Sailrite Enterprises, Inc., for providing free access to back issues of Good Old Boat through intellectual property rights. Sailrite.com