Installation, operation, and maintenance
Issue 73 : Jul/Aug 2010
In the May/June issue of Good Old Boat, Randy Baker described how to build an inexpensive reverse-osmosis watermaker. In this second and final article he offers advice on where to locate it in your boat and how to operate and look after it.
For the most part, assembling and installing the components of your watermaker is fairly routine. If you are handy with tools and familiar with plumbing and wiring, you’ll find the process straightforward. One aspect that will present a challenge if you are using the engine to drive the high-pressure pump is how and where to mount the pump.
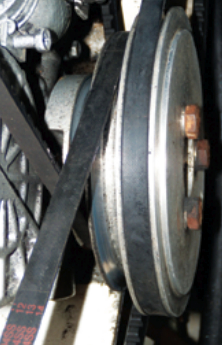
The pump has to be attached to the engine in a way that allows it to be aligned with a drive pulley, and you’ll have to provide a means of adjusting belt tension. Whatever the design of the mount, it must be firmly attached to the engine and only to the engine. If it were to be mounted where it could move independently, induced belt flap would cause all kinds of problems from exploding belts to over-stressed pump bearings and broken mounting bolts. Flexible engine mounts exacerbate these problems.
This is an area where every installation is different, so it’s not possible to give specific advice. If you don’t feel comfortable designing the mount yourself, consult someone familiar with engine mechanics and aftermarket equipment. It shouldn’t be technically difficult.
We decided to bolt a “table” of 1/2 -inch steel plate to the engine mounting rails, under the front of the engine. We then mounted the high-pressure pump to the starboard side of the table and a high-output alternator (purchased at a bargain price from an online hot-rod supply outlet) to the port side. In this way, we can make a lot of electricity and water at the same time, maximizing the efficiency of our engine running time. This is especially beneficial when operating the systems at idle speed with the gearbox in neutral because it gives the engine more work to do — good for a diesel. It also allows the two belts to load the engine pulleys from opposing directions, avoiding side-loading the engine bearings. This is an example of how a little planning can sometimes solve more than one problem at a time.
After the design stage is complete, you will improve the prospects of the mount fitting properly if you take an accurate wooden or cardboard mock-up, rather than a drawing, to the machine shop or welder.
Pulley diameters
Unless you have an unused engine pulley of the correct diameter already in place, you will need to have a bolt-on attachment machined. This is simple work for a machine shop, especially if you make it from aluminum, but make sure it’s a high-grade alloy.
It’s important at this stage to do some planning and calculations, in order to decide at what speed you want to run the engine when making water and what pulley sizes you will need to do it. The formula is ESM = (PSM x PPD)/EPD where ESM is maximum engine speed, PSM is maximum pump speed, PPD is pump pulley diameter and EPD is engine pulley diameter.
If your pump has a maximum speed of 1,750 rpm and you use a 6-inch pulley on the engine matched to a 7-inch pulley on the pump, you will be able to run the engine at a maximum speed of 2,041 rpm. If you want to run the engine faster, you could use a 5-inch engine pulley, which would allow you to run at speeds up to 2,450 rpm, and so forth. It’s best, for greater longevity, not to run the pump at maximum speed. You can juggle the formula to solve for different variables. Pumps are not as sensitive to low-speed constraints but you really should run them above 800 rpm (some say 1,000), which would mean a minimum engine rpm of 934 in the first instance.
Location of components
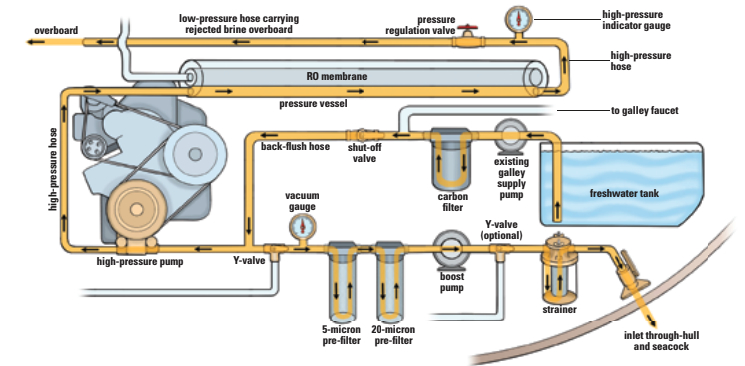
You will have to decide where to locate the pressure vessel and control panel. I like the idea of short hose runs, so we mounted everything in the engine compartment. Some people are of the opinion this is a bad idea because of the heat, but two different vendors of complete systems have told me they do it routinely and I have had no problems with the approach. Because of the high flow rates of the water, there is no chance of the membrane being overheated while in use. Our pressure vessel/membrane is mounted right over the engine under the cockpit sole.
The control panel should be mounted in a location that’s easily accessible and not too difficult to view when the engine is running. Otherwise, the only consideration is the length of the hose runs. If you make the panel attractive, you might want to mount it somewhere in plain view. Or you might prefer to fit it just inside an access door to the engine compartment, as we did.
The location of the boost pump and pre-filter housings will probably be dictated by what space is available. Other than the control panel, the pre-filters are the only components that will need to be easily accessible. You won’t have to change them too often, but they will need more maintenance than any other component, with the possible exception of tensioning the drive belt.
Operation
With the engine running at your preferred speed (normally between 1,000 and 2,000 rpm), open the inlet seacock and check that the product-water Y-valve diverter is set to the sample position. Then switch on the boost pump and check to see that the vacuum gauge shows positive pressure.
If you have clear pre-filter housings, do a visual check for air in the housings. If you see air, slowly unscrew the housings and bleed the air off while the boost pump is running, then re-tighten. Check to make sure the pressure-regulation valve (or needle valve) is turned all the way to open (no back-pressure).
Switch on the electro-magnetic clutch to start the high-pressure pump. Check the vacuum gauge again to make sure you have positive or neutral pressure. If it indicates negative pressure, shut down the high-pressure pump and locate the restriction.
While watching the high-pressure indicator gauge, slowly turn up the pressure with the regulating valve until the gauge reads 800 psi. Watch the flow meter to see when fresh water production begins. When operating in brackish or fresh water, use product-water flow as the limiting factor. Never allow the output to rise above 24 gallons per hour, even though the pressure will be much lower than 800 psi. It is generally safe to run the system at pressures up to 900 psi in seawater. This will increase output marginally but, again, never let output rise above 24 gallons per hour.
If the membrane is new or has been chemically pickled, let the watermaker run for half an hour before diverting the output to the tanks. After the first running, you should be ready to divert to the tank after a couple of minutes of run time.
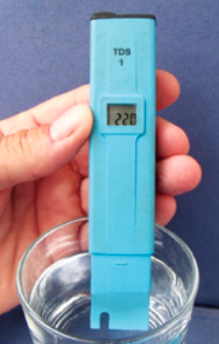
Before switching over to the tank, taste the water for salt or test it with a TDS meter, which measures the concentration of total dissolved solids in parts per million. Water from a new membrane will typically test between 150 and 250 PPM. Pocket TDS meters are available for a reasonable price. Wateranywhere sells the HM Digital TDS-4 for $24. I found the Hanna TDS1 meter on eBay.
To shut down the watermaker, first switch the diverter back to the sample position. Then, turn the pressure-regulation valve all the way down (no back-pressure). The freshwater flow will stop. Next, switch off the clutch driving the high-pressure pump, then switch off the boost pump and close the intake seacock.
Oil and petroleum product residues can damage the membrane. Never operate the watermaker if there is visible oil in or on the surface of the water. Even though the oil may be floating on the surface and your intake may be 3 feet deep, it’s not possible to know if there is emulsified oil beneath the surface and it’s not worth the risk. For the same reasons, don’t use petroleum-based thread compounds or sealants during assembly.
Maintenance
Membrane makers claim that if you run the watermaker again within three days, you don’t have to back-flush with fresh water. I think it’s good practice to back-flush after each use to get corrosive and organism-laden seawater out of the system. This is good for the membrane, pre-filters, and pump.
If you plumbed the galley supply pump into the system as recommended, open the shut-off valve between the pre-filters and the high-pressure pump, letting the fresh water flush through the pump, hoses, and membrane for a short time. The exact time necessary for this depends on the length of the hose runs and the flow rate of the galley pump.
The first few times you back-flush, test the water exiting the brine outlet with your TDS meter and use a stopwatch to measure the run time before it turns fresh. A few seconds longer should do the job.
After the high-pressure pump and membrane have been flushed out, and with the galley pump still running, open the inlet seacock and let the pre-filters, boost pump, and strainer flush. The resistance of the high-pressure pump and membrane is greater than that of the pre-filters and boost pump, so most of the water will now flow out the intake. An additional minute should be plenty to flush all the remaining seawater through the intake. Then close the intake seacock and the back-flush valve.
You can now safely leave the watermaker shut down for a week. After seven days, you will need to either run the unit again (followed by back-flushing), back-flush the system again, or pickle the membrane with a biocide chemical solution. If you’re in a dirty harbor and don’t want to run or pickle the watermaker, you can continue to back-flush weekly.
You must never use water that contains any chlorine for back-flushing. Only use rainwater or water you have made. Never add chlorine to the tank if the tank water will later be used for back-flushing.
Pickling for storage
If you will not be able to back-flush weekly, such as when the boat is in long-term storage, you must pickle
the system to save the membrane from deterioration. After pickling with biocide, the membrane can be stored for up to a year.
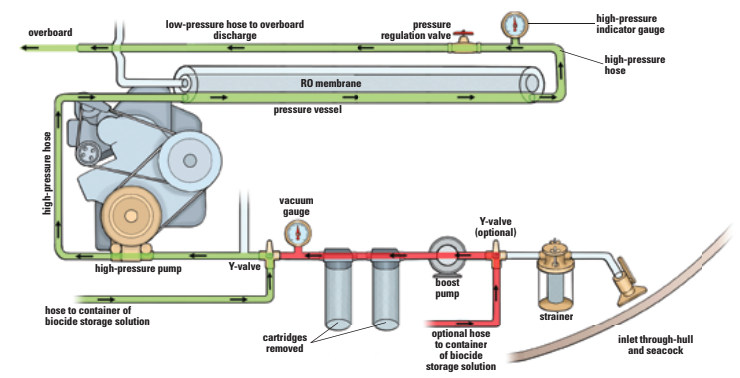
To pickle the system, first back-flush in the regular way, then close the seawater inlet seacock and remove the pre-filter cartridges.
Mix 2 1/2 gallons of fresh, unchlorinated water with 100 grams of sodium metabisulfite biocide in a clean plastic container. For $25, you can purchase10 pounds (more than you will ever need) from The Chemistry Store www.chemistrystore.com.
Run a hose from either the first or second cleaning/storage diverter valve (depending on your preference or which was installed) to the container. Switch the valve to the cleaning/storage position. Switch the sample/tank diverter valve to the sample position. Open the pressure regulation valve all the way (no back-pressure). Pump the solution through the system using either the booster pump or by running the high-pressure pump at its slowest speed until the container is nearly empty, then shut down the pump. Do not allow air to enter the system by running the container dry.
Ongoing maintenance
You should inspect and/or clean the raw-water strainer and pre-filters every 100 hours or whenever you see a negative reading on the vacuum gauge. You can usually clean the pre-filters a few times with a pressurized water nozzle (a garden hose nozzle connected to a deck washdown pump for example) before you have to replace them. If they’re blackened, you can soak them in a chlorine solution after cleaning to whiten them, but make sure they are completely dry before re-installation.
The carbon back-flush filter should be changed every six months.
Change the high-pressure pump oil after the first 50 hours of operation and every 200 hours thereafter. Pressure Washer Parts sells a pint of General Pump crankcase oil for $5.50.
With a little attention given to the details of operation, diligence in back flushing after each use, and a minimal level of routine maintenance, your watermaker should provide years of service and add a touch of luxury to your cruising lifestyle.
Randy and Cheryl Baker have been living aboard and cruising Caribee, their 1968 Nicholson 32 sloop, since 1992. They completed a major three-year refit and upgrade in Trinidad in 2004. After 16 years of cruising the Caribbean, they transited the Panama Canal and sailed across most of the Pacific in 2008. Caribee spent the 2009/2010 cyclone season in Tonga and at press time was bound for Fiji.
Thank you to Sailrite Enterprises, Inc., for providing free access to back issues of Good Old Boat through intellectual property rights. Sailrite.com