Vent dryers bar moisture from fuel tanks
Issue 93 : Nov/Dec 2013
Our marina has a regulation that prohibits us from refueling our boats from jerrycans while tied up in our slips. The trouble is, I like to keep my tanks full to minimize the amount of water that condenses inside them. As the fuel is used and the level inside a tank drops, the amount of condensation that forms on the insides of the top and the walls increases with the volume of air in the tank. It drips down, sinks to the bottom of the tank (because it is heavier than the fuel), and provides an environment for microbes to grow and eventually clog the fuel filters.
To keep the tanks topped up, I would rather use a jerrycan occasionally than make a special trip to the fuel dock for a small amount of diesel. Our Passport 42 has two 65-gallon tanks and there is a great temptation to empty a tank before going to the fuel dock to fill up. However, unless we are off on a long cruise, it takes a long time to use up a tank. That would leave a long time for condensation to form and collect in the bottom of a fuel tank that is gradually getting emptier.
Water can also enter the fuel from contamination of the fuel dock’s storage tanks or splash through a poorly protected vent fitting, but in our cruising grounds in the Pacific Northwest, the more likely source is condensation inside an empty tank. This is especially true in summer, when the air is warmer and able to hold more moisture. Our tanks are below the waterline and the seawater is always cool. Warm moist air plus cool tank equals a good environment for moisture to condense and contaminate the fuel.
Water also causes rust in black-iron tanks like mine. After a couple of episodes with rust-clogged filters at inopportune times, I decided to do something about it. If I could get this little “distillery” to produce bourbon, I might feel differently about it . . . but clogged fuel filters are not as fun.
My solution was to lower the humidity of the air in the tank.
Silica gel solution
A Google survey brought up several industrial methods for de-humidifying air. On a smaller scale, it appeared that silica gel desiccant (like the little packets in medicine bottles) would be a good solution. A vent dryer that uses this desiccant subsequently came on the market, so that validated the choice. Had I known this would be available, I would probably have purchased one, rather than going to the time and trouble of reinventing the wheel. However, for the DIYers among us, I will describe how I made the vent dryers with parts available online and in hardware stores. (Note: If you don’t want to go to the trouble to make your own, go to www.H2Out.com. –Eds.)
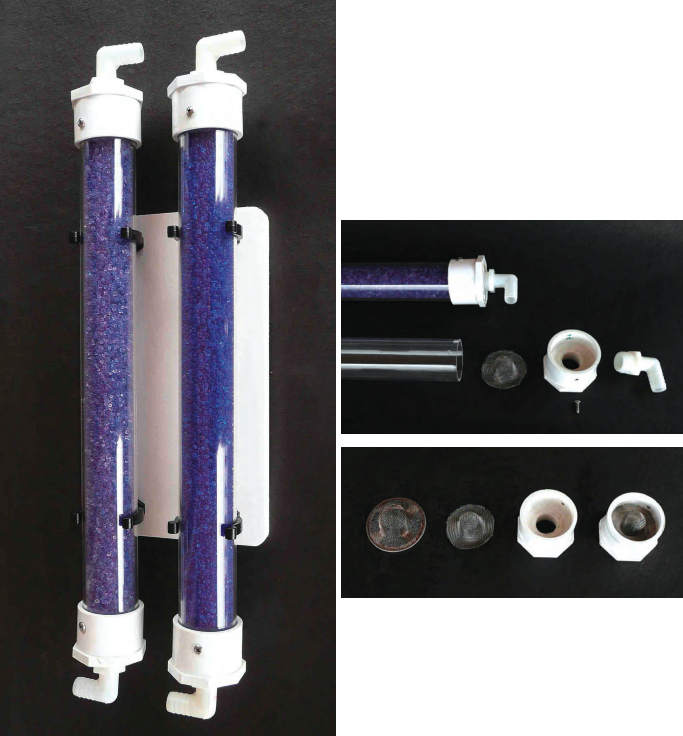
The basic concept is to fill a rigid tube with silica gel and insert it into a tank vent line, forcing any air that flows into and out of the fuel tank through the vent to pass through the desiccant and give up its moisture. That includes air that enters from the outside to replace the volume of fuel used from the tank, air moving with the daily “breathing” of the tank as air expands and contracts with changing temperatures, and air that moves into and out of the tank due to changes in barometric pressure.
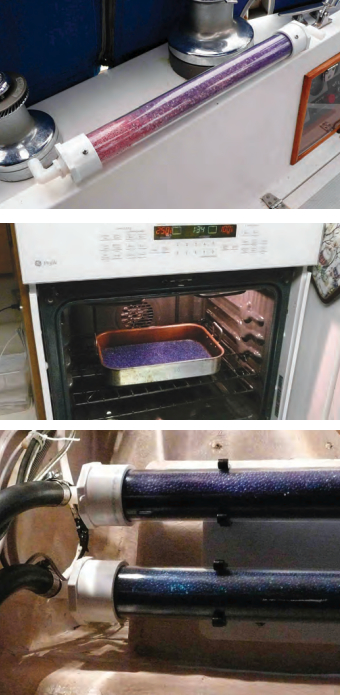
As the air passes through it, the silica gel absorbs water but does not become “wet.” More correctly, it adsorbs water onto its surface, but most of the surface area is internal to the silica gel granules due to their very high porosity. It can remove up to 40 percent of its weight in water, depending on the temperature and relative humidity, and “blue indicating” silica gel changes color from blue to pink as it adsorbs water. When it becomes pink, the gel is saturated and must be removed from the tubes and rejuvenated by baking in a 250-degree oven for 2 hours. As it bakes, if you open the oven door and stir it occasionally, you will feel a blast of hot, moist air (fogs your glasses), attesting to the moisture escaping from the beads. It gradually returns to its blue color and, after it cools, can be replaced in the tubes.
Testing the concept
Like many boat owners, I am a seat-of-the-pants engineer. I am sure there is a way to calculate the most efficient diameter and length of housing to contain the silica gel beads, but my approach was more by guess and by gosh. I wanted to have the largest tubes with the greatest volume of silica gel that were practical for my available space. I reasoned that a larger volume of silica gel would remove a larger volume of moisture and take longer to become saturated. That way, I would have to regenerate the silica gel in the oven less often. For a first pass, I decided to try two 3-foot-long, 2-inch-diameter tubes, one for each tank.
I filled a 3-foot-long clear acrylic tube with silica gel beads, fitted end caps on the tube, and blew through it with a lung full of air. It seemed to restrict the flow too much, so I cut it in half and tried the same thing with an 18-inch tube. The level of resistance seemed to be more reasonable. Most good old boats with only one fuel tank will only need one vent dryer.
Resistance to airflow is not as critical to the small amounts of air that flow as the tank breathes or as fuel is consumed by the engine. However, when the tank is being filled with fuel, the fuel displaces air in the tank at a more rapid rate and the vent tube must be able to accommodate that. My plan evolved from two 3-foot tubes to two 18-inch tubes. If this still proved to be too restrictive when the tank was being filled, it would be easy enough to make them a little shorter or to put two 18-inch tubes in parallel for each vent line, thereby doubling the airflow capacity.
Step by step
- Most good old boats have only one fuel tank, so one vent dryer will suffice.
- Cut the 2-inch acrylic tube to length with a table saw or hacksaw. Make these cuts as square are possible.
- Test fit the PVC adapters to the 2-inch tube.
- If the fit is too tight, sand the insides of the PVC adapters until a snug fit is obtained.
- Mark each PVC adapter in the side for drilling the retainer screws.
- Drill each PVC adapter (in place on the tube) with the 9⁄64-inch bit.
- Remove the PVC adapters and tap the holes in them for the 8 x 32 threads.
- Drill out the matching holes in the 2-inch tube with the 11⁄64-inch bit.
- Trim the stainless-steel drain screens with tin snips to 2-inch diameter and fit them inside the PVC adapters.
- Fit the nylon barb fittings to the PVC adapters using Teflon tape to seal the threads.
- Fasten one end cap on the 2-inch tube with a 1⁄2-inch #8 x 32 screw and fill the tube with silica gel beads.
- Fasten the opposite end cap in place with a 1⁄2-inch #8 x 32 screw.
- The vent dryer canister is now complete and ready for mounting.
- Cut the 1⁄2-inch StarBoard to size.
- Drill the StarBoard for the 5⁄8-inch #8 screws to mount the 2-inch Beckson pole holders.
- Mount the 2-inch pole holders to the StarBoard pad.
- Mount the StarBoard pad to its location in the boat.
- Press the completed vent dryer into the pole holders.
- Couple the 5⁄8-inch diameter vent line to the barb fittings on the ends of the vent dryer.
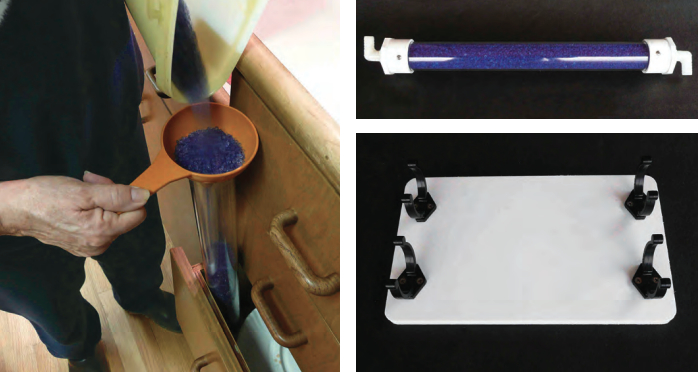
Materials and tools for two 18-inch-long vent dryers
Materials
- 2-inch OD x 1 3⁄4–inch ID clear acrylic tube, available in 5- or 6-foot lengths
- 4 each 2-inch PVC x 3⁄4-inch NPT adapters
- 4 each nylon barb fittings, 3⁄4-inch NPT to 5⁄8-inch barb, straight or elbow
- 4 each stainless-steel drain screens
- 4 each 1⁄2-inch #8 x 32 pan head cap screws for end caps
- Silica gel: 2- to 5-mm bead size, approximately 1 pound per 18-inch vent dryer. (Smaller 1.5- to 3-mm bead size is available, but do not mix the two sizes as this will allow the beads to pack more tightly and further restrict airflow.)
- 8 each 5⁄8-inch #8 x 32 flat head sheet-metal screws for mounting pole holders to StarBoard backing board
- Teflon tape
- 4 each 2-inch Beckson pole holders
- 1⁄2-inch StarBoard, 7 x 12 inches
The material cost for two vent dryers was about $175 (not including the 5⁄8-inch replacement vent hose). This was enough material to make four 18-inch-long canisters, although I only needed two in the final analysis. The 2-inch acrylic tube and the silica gel beads are the major expense and the acrylic tube is only available in 5- or 6-foot lengths, so I initially bought materials for 6 linear feet of vent dryer.
Tools
Most DIY boat owners will have the tools needed for this project, except perhaps the thread tap and the tin snips. I used a table saw to cut the acrylic and the StarBoard, but hand saws would work perfectly well.
- Tape measure
- Table saw or hacksaw and hand saw
- Screwdriver
- Sandpaper
- Tin snips
- Drill and drill bits (11⁄64-inch and 9⁄64-inch)
- Thread tap (#8 x 32)
- File
- Funnel (for filling tubes with silica gel)
Assembling the dryers
For end caps, I used PVC adapters, which are very nearly a perfect fit to the 2-inch acrylic tube. I sanded the insides very slightly to make assembly a little easier, but they still hold a pretty good seal.
My simple method of retaining the caps on the acrylic tube was to drill and tap a hole for a #8 x 32 machine screw in the side of each end cap and a slightly larger matching hole in the acrylic tube (not tapped). A 1⁄2-inch #8 stainless-steel cap screw keeps each end cap in place. A 3⁄8-inch screw would be long enough, but I used 1⁄2-inch screws and sharpened the ends slightly to form a point that would help to line up the holes during assembly.
I drilled the holes in the same position on both ends of both tubes so the end caps would be interchangeable. The end caps need to be removable (at least on one end) so the silica gel can be extracted and replaced. I used one fastener in each end rather than two. This allows the end cap to “cock” slightly, rather than sit square to the tube, which bothers my discerning eye a little bit, but a good seal is still maintained and one screw is easier to work with and align when fastening the end caps to the tubes.
To prevent the silica gel beads from draining out of the tubes through the end fittings, I used stainless-steel-screen sink strainers I found at the hardware store. They were a little too large and had stainless-steel bands around their perimeters. I cut the bands off with tin snips and trimmed the screens to 2 inches to fit inside the end caps. The “bump” on each strainer protrudes into the acrylic tube (away from the end cap) and provides more surface area at the interface for the air to pass from the silica gel beads into the 3⁄4-inch opening of the end cap. To complete the assembly, I screwed nylon barb fittings into the end caps to couple with the tank vent hoses.
I mounted my two vent dryers on a board, then mounted the board in the boat. (As it’s located in the damp cockpit locker, I used StarBoard.) Beckson 2-inch plastic pole holders were a perfect fit to secure the acrylic tube canisters to the board — the canisters snap right in and are easy to remove.
To regenerate the silica gel, I remove the vent lines from the vent dryer canisters, pull them out of their mounts, and take them home. I remove the end caps and empty the silica gel into a shallow roaster pan and place it in the oven for a couple of hours at 250°F.
After a season of use, the vent dryers have worked as expected. We drew fuel out of one tank over a period of nine months and the silica gel granules turned pink on the intake end of the canister. The granules for the unused tank remained blue throughout. Refilling the tank also went as expected, with no noticeable back pressure in the vent line.
Gary Wilson built his first boat in 1962 at age 15 (an 8-foot hydroplane) followed by a 14-foot plywood sailboat while still in high school. This boat went with him to college in Santa Barbara, California, where he met his wife, who just happened to have a Jeep with a trailer hitch, and they’ve been sailing together ever since. Their current boat is a 1985 Passport 42 that they sail out of Olympia, Washington, and into British Columbia in the summers.
Thank you to Sailrite Enterprises, Inc., for providing free access to back issues of Good Old Boat through intellectual property rights. Sailrite.com