An easier way to ward off Jack Frost’s fingers
Issue 74 : Sept/Oct 2010
Northern sailors have two seasons: sailing season and maintenance season. One of the primary goals when preparing a boat for the winter maintenance season is to protect its plumbing systems from freeze damage. When water freezes, it expands and can break whatever encloses it: engine blocks, pipes, hoses, toilets, and tanks. In addition to the damage caused by freezing, a boat with parts broken during a winter freeze can sink immediately after launching in the spring.
We northern sailors normally end up doing our winterizing just as a cold front is coming in, our fingers cold, and our rubber and plastic hoses stiff. We end up with cuts and bruises as we struggle to loosen hose clamps and to get hoses off and on hose barbs.
Since this has to be done every year, it makes sense to modify our plumbing systems to simplify the task. Over the years, I have done this on my 1964 Rhodes Reliant. Freeze protection is now an easy, quick, one-person job, and I can use a minimum of antifreeze. While each boat and plumbing system is a little different, some of the modifications I’ve made may also work on your boat.
The head
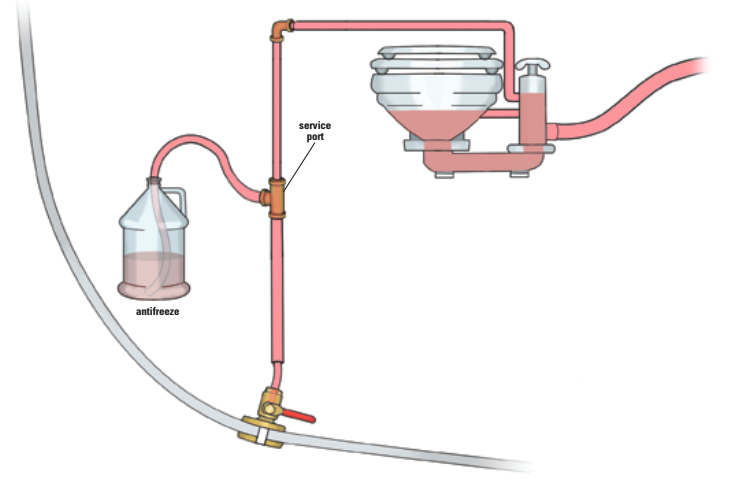
The idea is to install a service port that will introduce antifreeze easily to the intake side of a device. Using a service port is far easier, faster, and safer than having to wrestle a stiff hose off a seacock’s hose barb. Since the plumbing on the intake side of the head on my boat is below the waterline, the service port must be made of the most reliable hardware: a bronze tee, two bronze hose barbs, and a bronze plug. I installed these in the intake hose close to the seacock.
To protect the head, I first open the head seacock to drain out whatever water is in it. Then I close the seacock. Next, I take out the plug in the service port, screw in a hose barb (for 1/2-inch hose), and slide on a piece of hose 2 to 3 feet long. I put the hose into a bottle of antifreeze (here and throughout the boat I use the non-toxic, potable water systems, RV-type antifreeze), and pump the head.
Very soon, the head will pull antifreeze through the intake line, through the intake valve, into the toilet bowl, out the output line, and into the bottom of the holding tank (which is always emptied before haulout). This process will use roughly a half gallon of antifreeze. I then take the hose barb off the service port and reinstall the plug. The head is finished in 15 minutes. (Note: If your boat is hauled out, leave all seacocks open after winterizing. –Eds.)
Freshwater system
The freshwater system is a bit more complicated but the core idea is the same. My boat has two water tanks.
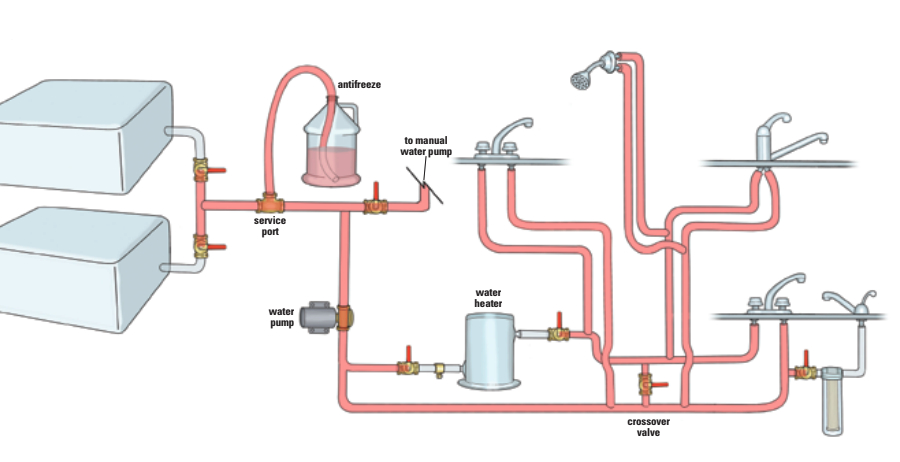
Each connects to a service valve and the service valves join at a tee. I installed a service port for winterizing just after the tee. I drain both water tanks and close the service valves so antifreeze will not get into them. Many boat water tanks do not drain completely, so if antifreeze gets into them, it’s very difficult to get it all out again. (If I allow any antifreeze in the tank, when I commission the boat in the spring, my wife complains sharply. It takes many flushes of the tanks to get rid of the odor and taste.)
The small amount of water left in the tanks has not caused a problem on my boat because the tank sides are sloped and the expanding ice slides up the slope instead of breaking the tank. Make sure that if any water remains in your tanks it will not cause harm. If in doubt, vacuum the residual water out through the cleanout port.
I prepare my system by shutting off the pump and isolating the hot-water tank by closing the inlet and outlet service valves. I then empty the hot-water tank by removing the drain plug. I also close the service valve to my Seagull water filter; I don’t want antifreeze to flavor the filter. I remove the filter, sterilize it with bleach, and store it at home in a warm place.
At this point, it’s very simple to get antifreeze to flow through all parts of the hot and cold freshwater system. ! connect a barb and hose to the service port, put the hose in a jug of antifreeze, and start the pump. This pulls antifreeze into the pump and pushes it into the system. A crossover valve between the hot and cold water systems allows the pump to push antifreeze into the hot and cold sides without it having to flow through the hot-water tank. With pressurized antifreeze in the system, I simply open the faucets in the shower and sinks until the flow comes out pink.
Finally, I go back to the water heater and open the valves a little to let antifreeze fill the tank inlet and outlet pipes. This step may not be necessary on all boats and it would be desirable to skip it in order to keep antifreeze out of the hot-water tank if this can be done. I pump the emergency manual freshwater pump until it discharges antifreeze. Then I turn off the electric pump and close the crossover valve.
Protecting the freshwater system can take a full hour after the tanks have been pumped out. I use about 2 gallons of antifreeze for this system.
Deck-wash/seawater pump
My boat has a deck-wash pump that supplies a hose on the foredeck for washing the anchor and also supplies seawater to the galley for rinsing dishes. The system has a Y-strainer on the input line. Rather than installing a separate service port, I procured a second top for the Y-strainer and installed a hose barb in it.
To protect this system, I close the seacock, take off the top of the Y-strainer, install my special top with a hose barb, put a hose from the hose barb to the jug of antifreeze, turn on the pump, and open first the deck valve and then the galley valve until each flows pink. I then replace the normal top of the Y-strainer and open the seacock to drain residuals. This takes 15 minutes and 1/4 gallon of antifreeze.
Bilge
The bilge pump(s) cannot pump the bilge in the winter, of course, because any water that collects in the bilge, and the pump, might be frozen at least part of the time. For this reason, a boat needs a garboard drain plug. With this, the boat will drain its water and water cannot accumulate (from leaks on deck, hatches, ports, and so on). I have been astounded at how much damage boats suffer from water accumulating in their bilges, all for lack of a simple plug. Garboard drain plugs should be made of bronze. Perko and Buck Algonquin both make suitable hardware.
Bilge pumps
My old manual Navy bilge pump is drained by unscrewing a drain plug in its base. This lets water drain out of the pump cylinder.
My boat also has a large PAR electric diaphragm bilge pump. Over the years, I have noticed that the valves in this pump have not weathered winter well. Some combination of back pressure on the valves and chemicals in the antifreeze leads to deformation and premature failure of the valves. It’s simple enough to disassemble the pump (four accessible bolts), remove the valves, and put them in a safe place where they will not be exposed to pressure or chemicals.
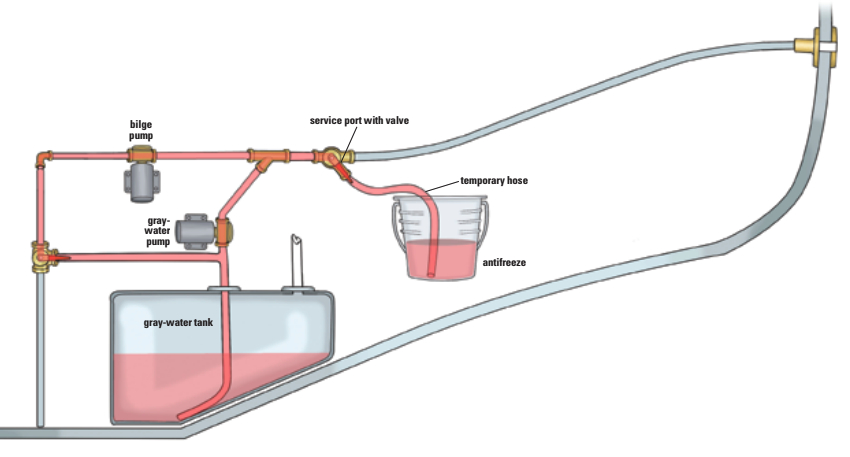
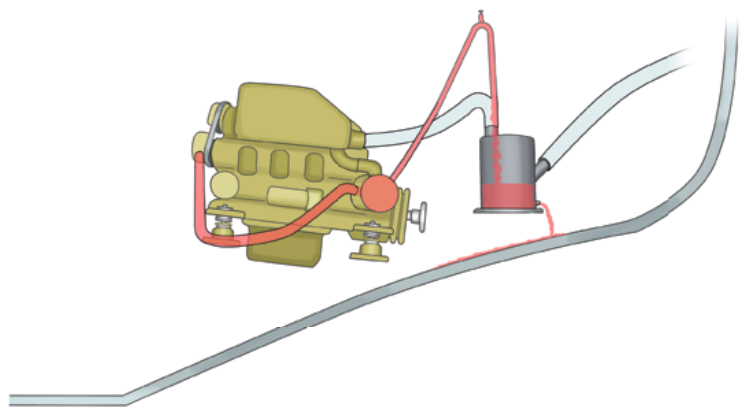
But there is a problem. The discharge hose to the transom is upward and long, so it holds a lot of water. Disassembling the pump results in quite a bit of water draining out into the locker that houses the pump. To catch the water before it spills, I have a service port with a valve on it, located where the discharge hose leaves the pump. I can put a hose barb on, add a hose, and put the end of the hose in a bucket. Then I open the valve and the hose drains into a bucket, rather than into the locker where it’s difficult to sponge up.
Gray-water tank and pump
An electric pump empties my gray-water tank. I get the tank as empty as possible and then add antifreeze to it. On my boat, the simplest way to get anti-freeze into the gray-water tank is through the shower drain. This gray-water pump has the same problem as the bilge pump — a long, upward discharge hose that holds a lot of water — so I have the same solution: a service port with a valve and a temporary hose that enables me to drain the discharge hose neatly into a bucket. I then run the gray-water pump until pink water flows from the discharge service port/hose into the bucket.
Protecting these systems takes 30 minutes and 1/2 gallon of antifreeze.
Engine
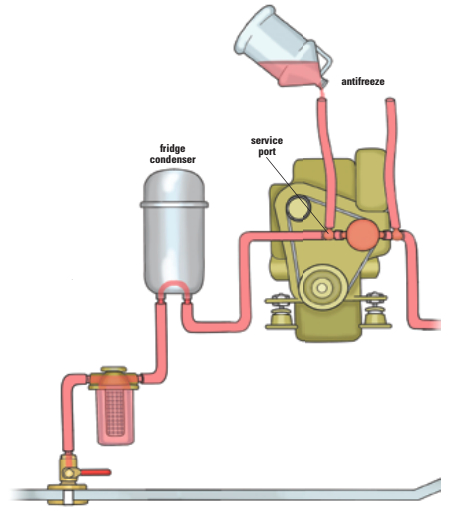
My boat has a fairly conventional engine installation. A sealed coolant circuit cools the engine. Seawater is pumped through a heat exchanger to cool the coolant and then injected into the exhaust system to cool the exhaust. The part of this system that needs protection from freezing is the seawater plumbing.
I protect the engine seawater system in two segments. First, I have placed a service port just before the intake side of the seawater pump. I remove the plug, put in a hose barb, and install a hose going upward. Then I open the seacock and the seawater strainer and blow out the hose, pushing as much water out of this plumbing as possible. After a few blows, most of the water is out. Then I pour antifreeze into the hose and blow it through the hoses back to the seacock. When I see antifreeze coming out there, I know that segment of the plumbing is protected. Among other things, the refrigerator condenser is cooled by this segment of plumbing, so the antifreeze protects it as well. I close the seawater strainer so I won’t have to remember it in the spring. (Caution: while pink antifreeze, which is propylene glycol, is considered safe as a food additive, some people are allergic to it; see sidebar. –Eds.)
Seawater circuit
When I’ve done the intake side, I turn to the segment of the engine cooling that goes from the seawater pump discharge to the heat exchanger, up to the siphon break, and down into the waterlift muffler.
I start by removing the drain plug in the bottom of the muffler. I then loosen a hose clamp and slide off the rubber hose that comes from the seawater pump discharge. This is the only place where I remove a hose for the freeze-protection process.
I twist the hose so it points up and pour antifreeze into it, then blow it back through the heat exchanger, up past the siphon break, and down into the muffler. I can clamp in a hose going upward to make it easier to pour in antifreeze and easier to blow the antifreeze through the heat exchanger and over the siphon break. (Caution: Unless you are absolutely certain that you do not react to propylene glycol, you may wish to use Ben’s alternate solution, in which the engine is run briefly to pump water through the system. –Eds.)
Eventually, as I blow antifreeze into the system, the water coming out of the muffler drain turns pink. At this point, I know the system is protected. I have done this alone. There is no need for someone to turn on the engine or go below to watch the muffler drain. And I have used the least amount of antifreeze possible. This system takes one hour and one gallon of antifreeze.
The last thing I do is remove the water pump impeller so it doesn’t take a set during the winter. Jabsco makes an elegant (and expensive) impeller puller. I finally decided to buy one as I use it at least once a year. By the time I am ready to remove the impeller, I feel I deserve the treat of a special tool instead of the frustration of struggling with various pliers and other tools.
I also have a service port in the seawater intake line near the seacock. It’s possible to put in a barb and hose going to a container of antifreeze and turn on the engine for a few seconds to suck antifreeze through the system into the muffler. I haven’t done it this way because I end up doing everything myself. To run the engine, I would need a helper to start and stop the engine while I monitor the flow of antifreeze, and potential helpers are busy with their own boats on these cold afternoons. If you can start and stop your engine from below, or you have a helper, this would work fine.
Prepare before haulout
If you live in the north, you will have to protect your boat’s plumbing systems every year. You will make life easier for yourself if you add service ports and drain plugs in critical places. Start making the changes soon after you have winterized the old way, while you remember the difficulties you experienced.
The details will be different in each boat and plumbing system. My boat’s freshwater plumbing system is made of simple reinforced PVC tubing with brass pipe fittings. Plumbing below the waterline is all heavy hose and bronze fittings. It was very simple to cut the hoses and create service ports from standard brass or bronze pipe fittings. If your boat is plumbed with quick-connect fittings, you’ll have to review what combination of tees, shutoff valves, and adapters you need. Similarly, if you have a lot of rigid PVC pipes or copper tubing, you’ll have to figure out what fittings you’ll need to accomplish the same objectives.
However you do it, you’ll be delighted that freeze protection will be faster, simpler, and less wasteful. Who needs complicated problems of freeze protection when it’s getting dark, the wind is howling, and the thermometer is on its way to 22 degrees?
Ben Stavis has been the “maintenance guy” on his family’s Rhodes Reliant, Astarte, since she was new 45 years ago. He is constantly trying to make maintenance easier and service intervals longer. His sailing season is in southern New England and northern Chesapeake Bay. The long maintenance season is on the hard in Delran, New Jersey.
Thank you to Sailrite Enterprises, Inc., for providing free access to back issues of Good Old Boat through intellectual property rights. Sailrite.com