Easing into the fuel dock with a light wind aft, the skipper shifted into reverse and applied a little engine power for a perfect landing. The throttle lever moved . . . but the engine didn’t respond. Time accelerated as the boat seemed to surge toward the dock. Fast line handling on the mate’s part saved the day.
Once the boat was safely secured to the dock, a quick inspection confirmed the skipper’s suspicions: operating the throttle lever had no effect on the throttle control on the engine. The throttle cable was still clamped securely and the throttle was connected; apparently the cable had broken at the helm control and would have to be replaced. A new cable would take three days to arrive. Unfortunately, the crew had an aggressive delivery schedule to keep that didn’t allow for a three-day wait at the marina.
Several phone calls later, they learned that Atlantic Yacht Basin in Chesapeake, Virginia, a two-day trip up the Atlantic Intracoastal Waterway from their present location, had a selection of Morse cables in stock. They just had to get there. How do you move a boat with a working engine but no throttle?
The crew had two-way headsets aboard, and withthem were able to communicate between the helm and the “engine room.” The helmsperson called out the power needs and the “engineer,” sitting next to the engine, made the appropriate adjustment on the engine throttle linkage. The skipper reversed the engine’s throttle return spring so it held the throttle open, which allowed the mate to be topside for the long hours of motoring at a constant speed along the ICW.
For the next two days, as we traveled north in their company, we were pleased to see everything go smoothly for them, including anchoring.
At Atlantic Yacht Basin, the crew selected a cable using information from their boat’s builder. We took it to the boat to install it.
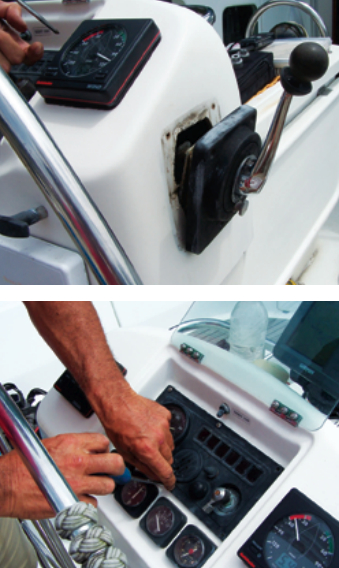
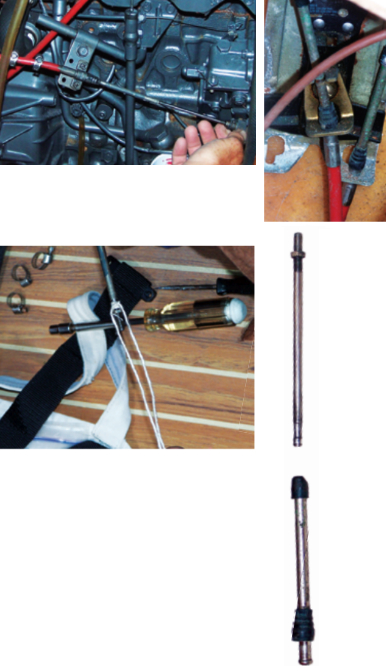
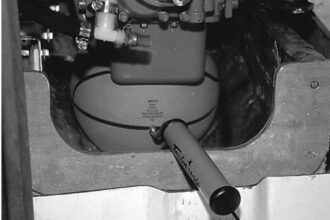
Getting to the problem end of the throttle cable, at left, entailed removing the engine instrument panel, at bottom.
A simple procedure . . .
In theory, this should have been a simple task: remove the cable locknut at the engine, unscrew the retainer on the engine throttle arm, remove the cable clamp at that location, access the throttle at the helm, remove the pivot in the throttle arm, release the cable locknut, unscrew the pivot, and disengage the cable from the control assembly. Reverse the procedure to install the new cable — nothing to it.
Detaching the connections at the engine went smoothly. We tied a messenger to the end of the cable with which to pull the new cable into place.
So far, the task was going to plan, but at the helm, however, we faced a challenge. Access was the issue. How you disassemble a control varies between makes and models. If we’d had a manual, that would have given us a great start. We didn’t. (We later learned that manuals are available online from Teleflex/Morse.)
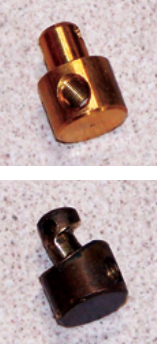
We inspected the control head to see if it could be disassembled. That route barred, we removed the three screws that held the control head to the helm pedestal so we could retract the head part way and access the linkage. That didn’t work because the hole in the helm pedestal was too small for the linkage. Next, after removing the engine instrument panel, we found we could just reach the throttle linkage with one hand. With one person working through the control head mounting hole and the other through the panel opening, we were able to remove the cotter key that held the throttle cable end fitting (pivot) in place. Once that was free, it was an easy matter to remove the pivot. The bad news: it was too worn to reuse. The good news: Atlantic Yacht Basin had one in stock.
Disconnecting the throttle cable from the engine was easy, at right. Getting to the lever end was a different matter, at far right. The break occurred where the cable joined the telescoping rod, at lower far right.
Stubborn cable
We pulled the cable out through the instrument panel opening until we reached the messenger. It was harder to pull out than we had expected. Surprise! The cable was twice as long as the replacement we had obtained. Back to Atlantic Yacht Basin where they found one that matched the original. (Cables are measured tip to tip, rounded to the next highest foot. A poor cell phone connection led to the wrong cable being selected in the first place.)
As both ends of the cable are identical, we chose one and tied the messenger to it. Now all we had to do was pull the new cable into place. Nope, we could only get about 3 feet of the 20-foot cable in. It was time to start pulling up the panels under the aft berth. Did I mention the boat was enroute to a major refit and the berth was stacked with equipment and supplies?
The worn pivot at the throttle-lever connection contributed to the failure of the cable.
Half an hour later, with the berth access panels removed, we saw that multiple plastic wire ties around the messenger were preventing us from pulling the new cable through. The throttle cable had been used as a convenient support for electrical wiring (a practice not uncommon in my experience as a surveyor). Using a three-person team of pusher at the helm, guider in the berth, and puller at the engine, we routed the new cable. While feeding the new cable, we reattached the wire ties to ribs and bulkheads in case the cable ever needed to be replaced again.
With the cable in place, reassembly went smoothly. We applied light grease to the pivot where it passed through the throttle arm to protect against premature wear, corrosion, and binding. Before closing up our access, we checked both throttle and shift ranges to make sure we hadn’t inadvertently changed linkage adjustments. Job done! We’d accomplished a half-hour task in only three hours.
Formulas for failure
Why did the cable fail? On an older boat, it’s often fatigue after thousands of cycles. Sometimes, corrosion on the wire inside the cable jacket causes binding and undue stress on the ends. In this case, lack of lubrication had led to a worn pivot binding. This caused the wire to bend, which led to metal fatigue and failure. With the new cable in place, lubricated, and properly adjusted, the owners can expect years of trouble-free service. In the last 18 years, on my own vessels, I’ve only had one cable fail. It was seven years old on an engine with 1,500 hours (see sidebar on page 46).
An effective jury rig
The couple with the cable failure had a good communications setup and the experience to comfortably act as helmsman and engineer. Several years ago, we had a throttle cable fail at the engine on our 1991 Hunter Legend 35.5. Parts weren’t going to be available for a week, we needed to get home to our jobs, and we were a day’s run from our home port. Engine noise and the distance between the helm and the engine made it impossible for us to communicate by voice between the two locations — and we had no alternative means of communication. After examining the cable and finding that it and the engine linkage moved freely, I decided to try a temporary fix.
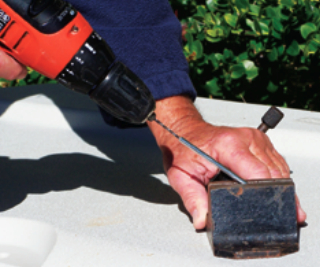
First, I had to drill the broken wire out of the throttle linkage tube. Not having a micrometer with which to measure the wire’s diameter, I loosely tightened the drill chuck over the wire then selected a cobalt drill bit to fit the chuck. I clamped the disconnected throttle linkage tube securely in a small machinist’s vice I carry on board and, with the drill, machined a 3⁄4-inch deep hole down the central core of the linkage tube.
Next, I abraded the wire end protruding from the cable jacket with 600-grit paper to facilitate a good bond, applied a two-part 5-minute epoxy (designed for metal adhesion) to the wire and into the hole in the fitting, and inserted the wire. After letting the assembly cure for 3 to 4 hours, I reassembled the cable end fittings to the engine and adjusted the throttle stroke. We gingerly tested the repair, cycling the throttle several times. It seemed secure, so we headed home. The control lasted the trip.
Our parts arrived a week and a half later — late and wrong. We had to reorder them. While waiting for the right parts, we used the repair for several days more, gaining comfort in the “temporary” fix to the extent that my wife wondered aloud if we should replace the cable when the new parts came or keep the new parts as spares. I replaced it.
When will it fail, other than at the worse possible time? It could go in the first year, in the case of a poor installation, or after five to six years of service, due to fatigue, lack of lubrication, or corrosion. Engine hours aren’t a good indication, since frequent use and proper maintenance often result in longer life. I have 3,500 hours on my current, original cables. I said cables, as the transmission shifter and throttle have similar cables (though not necessarily the same length).
Prevention
To minimize failure, check annually for binding in the cables and grease the pivots. Examine the rubber boots on each end of the cable for cracks or deterioration. The most common failure points are the cable ends; look for bending or misalignment — the cable’s telescoping sections should be in a straight line. Tighten clamps and locknuts as necessary. If the cable seems to bind or feels stiff in use, replace it.
Be prepared for a cable failure by knowing your cable length (write it down somewhere), the manufacturer, and routing. Know the thread and diameter of the end fittings (10 x 32, typical of a Teleflex Morse 3300/33C type, is a common sailboat size, though 1⁄4-inch and 5⁄16‐inch diameters are used on larger engines). Know how to access both ends of the cables. Discuss with your crew how you’d handle the loss of throttle or shift control. Know how to safely throttle and shift using the linkage at the engine. Establish a means to communicate should you need an “engineer” stationed in the “engine room.” Headsets work well, hand signals might also work, or consider a three-person party line. You can’t shout over the engine noise.
Should you carry spares? My philosophy is to favor flexible temporary repair solutions over spares. Spares age and corrode in a marine environment. The spare cables you’re carrying could well be unusable by the time you encounter a failure. I prefer to have the means on board to make repairs (see sidebar) or limp to a port where parts are available.
Barry Hammerberg has been an avid boater for more than 50 years. Through careers in boatbuilding, marine surveying, and corporations, he has gained insights into boat design, operation, systems, and maintenance. Currently Barry and his wife, Ruth, are cruising along the East Coast with Buddy, their parrot, on Another Adventure, a Jeanneau Sun Odyssey 43.
Thank you to Sailrite Enterprises, Inc., for providing free access to back issues of Good Old Boat through intellectual property rights. Sailrite.com