It was another of those projects that took longer than anticipated
Issue 36 : May/Jun 2004
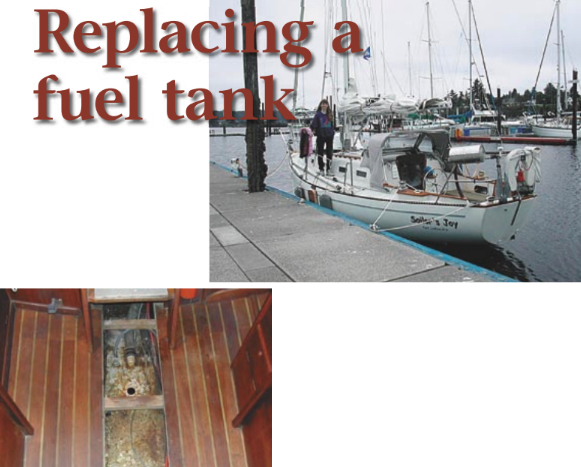
When I first looked at our 1978, 33-foot, Nor’West sailboat, I noted the fuel tank located in the keel below the cabin sole. It was partially visible through the narrow hatch running down the centerline of the boat. “What a good idea,” I thought. “It keeps the weight of the fuel low, is centrally located, and makes use of otherwise useless space.”
I also noted the bilge sump just forward of the tank, with some water in it and pretty inaccessible, along with the little-bitty bilge pump sort of dropped into it. The seller thought her late father had some problems with “stuff” in the tank plugging the filter when the fuel was low and the seas choppy and suggested that it probably needed cleaning.
The surveyor saw something else. “The tank needs to be replaced,” he said. He pointed out that it disappeared below the bilge water level and that an aluminum tank sitting in salt bilge water for 23 years means corrosion. He noted the ring of aluminum oxide that had welled up around the brass fitting into a doughnut about 1⁄4-inch high.
“Never use brass fittings with aluminum tanks; use stainless steel instead,” he noted. I think he was trying to emphasize that the builder had not thought out all the details of the tank installation as thoroughly as he should have. He predicted that at some point, probably soon, I would find the bilge filled with 30 gallons of diesel from a leaking tank. The vision of a Coast Guard citation for a major fuel spill in Puget Sound with a mega-dollar fine tempered my enthusiasm as I pondered the true value of the boat. The surveyor didn’t think tank replacement would be all that expensive or difficult and suggested that a fabrication shop could make a new custom tank for a reasonable fee. But he was somewhat skeptical of putting a new one in the same location and suggested abandoning the existing tank and installing a new one somewhere else. I liked the location and really didn’t want to give up valuable space elsewhere.
We purchased the boat. The surveyor’s recommendations on the fuel-tank replacement were a major negotiation point in setting the final purchase price of the boat. We made it through the summer and fall with our fingers crossed and without incident. In February we pulled the boat for major repairs to several systems, including the fuel tank. Email exchanges with a knowledgeable Nor’West 33 owner provided assurance that fuel-tank replacement was normal and gave valuable insight on how he had done the job. It proved to be somewhat worse than he indicated. I suspect that my tank was installed more securely than his had been.
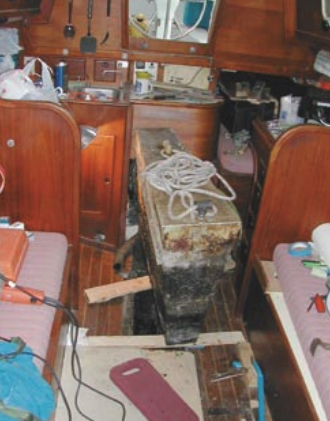
Removing the old tank
Our tank was long, narrow, and deep, and access was poor. The tank was larger than the opening in the floor. We pumped out the fuel in the tank using a Jabsco Water Puppy pump attached to a piece of polyethylene tubing shoved down into a tank opening. We pumped it into 5-gallon cans. The impeller of the used pump I bought for this job failed after the first 5 gallons. I replaced it with a nitrile impeller and pumped the rest of the diesel out without further incident.
The next step was to remove everything in the way. I disconnected the hoses, turned them back into the engine spaces, and tied them off. I cut out the center sections of the two crossbeams. Then I enlarged the floor opening at the forward end of the tank. I cut one more plank width out of the cabin sole on both sides so the tapered tank would clear the opening when lifted — or so I thought. I made the cut along the joint between the teak-and-white-oak strips in the plywood sole to facilitate final repair. This turned out to be unnecessary as I eventually decided the cabin sole could not be repaired unobtrusively and ended up replacing it instead.
The existing sole of 1⁄4-inch plywood screwed and glued to 3⁄8-inch plywood was cut using a saw blade in a Fein detail sander. This was the technique suggested by the other Nor’West owner. It turned out to be a very effective tool, as the vibrating saw blade was very safe and neat, if rather slow. The cuts took about a half-hour and the flooring strips were set aside. I then determined that the tank was fiberglassed in place with tabbing around its entire periphery. Since much of the tabbing was hidden under 23 years of gunk and debris, it was not initially apparent. In addition, a sales brochure for the boat touted its “foamed-in-place fuel tank,” and the foam was visible in the bilge area. I started chiseling through the fiberglass mostly hidden about 12 inches below the cabin sole in an area about 2 inches wide on the side of the tank.
Breaking through
I spent eight hours with an assortment of chisels and pry bars cutting and breaking through all the glass tabbing. I purchased a steel bar from the hardware store, sharpened one end, and used it for the final cutting and separation of the tank from the foam. I attached a rope bridle through a fitting screwed into the forward end of the tank and under the L-shaped fuel fill on the aft end. I attached this bridle to a come-along fastened to a beam placed across the companionway opening. I lifted the tank until it visibly distorted, then cut and pried until it finally broke loose with a pop.
Trying to lift the tank out of the opening revealed that aluminum angle had been welded to the side of the tank to center it in the keel and that the opening was too small. I had to cut an additional pair of wedges out of the cabin sole at the aft end of the tank to get it free. The tank was then lifted out of the keel and set on wood scraps across the opening.
The tank was remarkably light and flimsy once it was free. It didn’t look all that bad at first glance, and visions of an unnecessary and difficult repair danced briefly through my head. However, once the tank was wrestled through the companionway and lowered to the ground, those visions disappeared. There were several hundred bumps that turned out to be encrusted piles of aluminum-oxide powder covering deep pits in the tank. In addition, there was clean etching covering vast areas of the lower tank where the aluminum had been almost totally eaten away. Since the aluminum tank was only 0.090-inch thick initially, it was near total collapse.
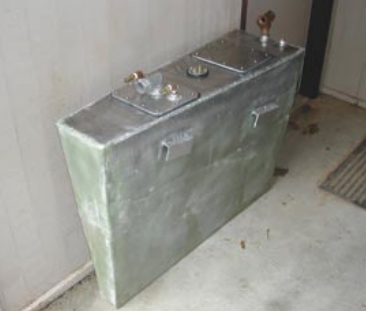
New tank installation
I took the tank to a fabrication shop where it was duplicated using a much heavier 3⁄16-inch 5052 alloy plate. We made several improvements in design, including a center vertical baffle with clean-out plates for each compartment. The fabrication cost was a very reasonable $485, considering the complex shape of the tank and the numerous fittings.
To discourage future corrosion, the entire bottom portion of the new tank was then cleaned, etched, and fiberglassed with two layers of 6-ounce cloth and epoxy, following the recommended procedures for bonding to aluminum. I brought the glass up almost to the top of the tank.
Before installation, I chiseled away the foam in the bilge sump immediately in front of the tank location. The new tank dropped into place easily. I replaced the beams I had cut away, using laminated teak beams wedged under the existing cabin sole and secured with epoxy and long stainless-steel screws into the mounting bosses. Wedges and teak blocks were fastened to hold the tank in place under the teak floor crossbeams and on the main fiberglass crossbeam just in front of the tank. The tank is prevented from moving up or forward by the wedges and aft by the original foamed recess. I fastened a bilge pump to the end of a teak handle and dropped it into the recess in front of the tank. This pumped the bilge to a level below the bottom of the tank so the tank remains dry.
I modified the hoses and attached them to the new tank. All that remained was to repair the cabin sole. But that is another story, one I will tell in a future issue of Good Old Boat.
Thank you to Sailrite Enterprises, Inc., for providing free access to back issues of Good Old Boat through intellectual property rights. Sailrite.com