The condition and tension of just six wires keep the stick up and the boat sailing well
Issue 6 : May/Jun 1999
We all know the rigging on a sailboat is necessary for supporting the mast (if it is not free-standing) and raising, lowering and controlling the sails. The rigging in support of the mast is called standing rigging while the sail halyards (raising and lowering) and sheets (sail control) are called running rigging.
Standing rigging may be made of rope or wire. On ships of the line in Nelson’s day, it was all-rope, set up with dead eyes. Running rigging likewise can be wire, rope, or a combination of both. Rope designed specifically for the purpose must be used. Dacron and other flexible low-stretch ropes are required. Nylon has too much stretch.
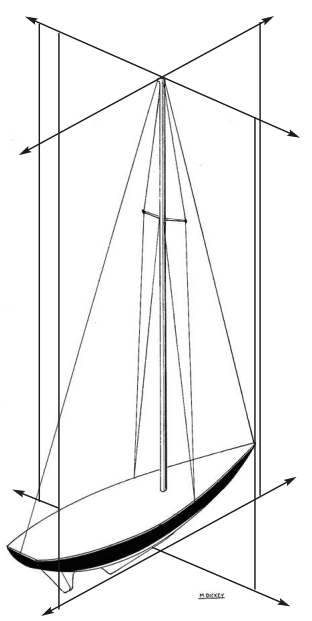
To help analyze the task of the standing rigging, visualize the boat bisected by two intersecting planes, fore-and-aft and athwart ships.
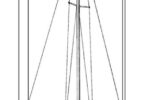
If we look at an athwartship slice of a boat at the chainplates, it would look like the illustration on the opposite page. Note that the combination of, keel, hull, deck, and rigging wires comprise the support structure for the mast.
When you inspect your boat, follow the load path from the masthead down the capshrouds (upper shrouds) to the chainplates. Continue following the load path from the chainplate into the hull. The chainplate is typically attached to a either a knee or a bulkhead, which is joined to the hull by tabbing. Follow the load path all the way to the keel.
Check for broken strands of wire or cracked fittings, inspect turnbuckles, toggles, rigging pins, and cotter pins. Inspect the hull along the load path just as carefully.
Mast supports are of particular concern because there is a very large compression load at the base of the mast. There are two types of mast supports: keel-supported and deck-supported. A keel-supported mast rests on a fitting that rests directly on top of the keel in a fiberglass boat with internal ballast or on the keel support structure or inside keel for boats with external ballast. Either way, the condition of the connection between the bottom of the mast and the top of the keel is important.
Builders of oceangoing boats may use a steel beam as a mast step or a custom-made stainless steel bracket that transfers the compression force of the mast directly to the keel.
Some keel-supported masts rest on wood or glass beams above the keel. These beams can and do rot, sag, crack, and warp. When we tighten the shrouds and stays which support the mast, we increase the downward force on the mast step. When the boat heels under press of sail the force also increases.
A deck-supported mast sits on the deck and does not penetrate it. Deck-stepped masts are supported by various structural elements within the hull. These can be bulkheads topped with a large wood or metal beam or they can be wood or metal compression posts that support the deck section, which, in turn, supports the mast. They can also be any combination of these. The section of the fiberglass deck on which the mast sits must be a solid structure. It can have solid plywood encapsulated into the deck that will not crack with the compression force, or it could be a solid fiberglass deck in that area. The bulkheads that support the mast must be solidly attached to the sides of the hull and keel to provide the strength required to support the mast beam. If a bulkhead rots along its bottom edge, it can allow the mast step to sag.
If you find it necessary to repeatedly tighten your rigging, you may want to look in the bilge for the cause of the problem. A bulkhead that sags a little will begin to break down each time additional stress is put on it by the tightening of the standing rigging. It fails little by little. Eventually, it will fail enough to become obvious. The mast step will have been pushed down with the deck until it sits in a hollow. The fiberglass covering the deck will crack, water will enter and rot will start. This is the beginning of a big repair project.
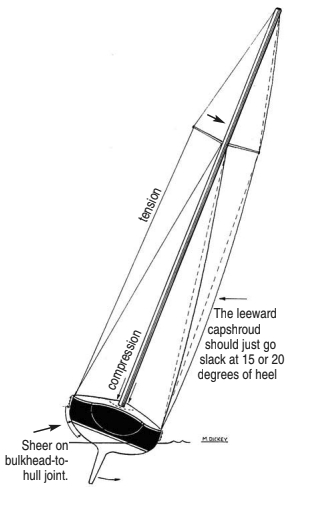
I had this problem with the deck-stepped mast on my Pearson Ariel. By the time I got the boat, it had sunk over 1 1/2 inches from its correct position. This was a boat that was raced hard with the rigging being tightened regularly. When I bought the boat, I had to loosen all the standing rigging and use a 4 x 4 vertical beam and two-ton hydraulic jack to force the mast step back to its correct position so I could sail the boat home. I placed 2 x 4s cut to length vertically from the inside top of the encapsulated keel to the underside of the deck to make sure I did not lose the mast from deck failure. After a complete deck step rebuild, the mast step was again structurally sound, but a lot of work went into the rebuild.
In the fore-and-aft plane of support, the attachment of the standing rigging to the bow and stern is also an area of concern. On racing boats, a backstay adjuster is sometimes used to rake the head of the mast aft and flatten the mainsail. On small boats, this may simply be a quickly adjustable turnbuckle. On medium-sized boats, it can be a turnbuckle controlled by a wheel. On larger boats, a hydraulic cylinder may be used to pull down on the backstay. All these devices are more powerful than the hulls to which they are attached. In a lightweight racing boat, it is possible to distort the hull into a banana shape, fore and aft, by overtightening the backstay. Chainplates have snapped, bolts have been sheared, and wire terminals have been deformed by careless use of these powerful devices.
Now let’s talk about the rig. Most modern rigs have at least one set of spreaders. Rig designers resort to spreaders when the angle of the shrouds with the mast is less than about 10 degrees. At these small angles, shrouds have tension loads that are too high, and the mast has a compression load that is also too high. With overlapping headsails, the shroud base must be kept intentionally narrow to allow these sails to be sheeted inboard. Spreaders allow these narrow support bases while keeping the loads on individual wires down. Unfortunately spreaders are another potential point of failure. If a spreader breaks or fails in some way it, too, can bring down the mast.
Some boats have an aluminum mast, wooden boom, and wooden spreaders. Wood is subject to compression failure, crushing, rot, and overstress. Even if our rigs are all-aluminum, the attachment point of the spreader to the mast must be inspected regularly. In many instances, it is an aluminum casting attached to the aluminum mast with stainless steel bolts, a combination inviting electrolysis, corrosion, and failure. My Pearson Ariel had hollow, round sockets on the mast to hold the round tube spreaders. This is not aerodynamic, but it works. The tubes were held in place by a stainless steel cotter pin through the socket. The socket was, in turn, attached to the mast with stainless steel machine screws tapped into the mast wall.
The outboard ends of the tubes were filled with a wood plug with a vertical groove to hold the upper stay. This wood was subject to cracking and splitting. It had to be inspected annually, re-secured to the tube and fitted at the ends with white rubber boots to protect the sails from chafe.
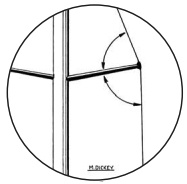
Even if the underside of wooden spreaders is varnished, the upper side should be painted with white or silver paint to better resist UV. Inspect spreader bases for cracks, and inspect the mast wall under the base for signs of failure. The spreader should not be perpendicular to the mast. The upper (cap) shroud should make equal angles with the spreader tip above and below. This allows the load on the spreader to be pure compression.
Wire
There are three basic ways to build, lay, or pre-form wire into standing rigging. Each type suits a particular purpose. The most common type of standing rigging is 1 x 19-strand wire. This is called non-flexible or rigid and is laid up in one strand consisting of 19 pre-formed wires of the same size. This wire provides the least stretch of any stranded wire combined with the highest strength-to-diameter ratio. In newer racing type boats, solid rod rigging is sometimes used in place of wire rigging. Another designation for wire is 7 x 7 cable. This is semi-flexible and is composed of seven strands of seven wires each pre-formed into a single cable. It provides increased flexibility over 1 x 19 with minimum elongation (stretch). Keep in mind that all wire stretches. Even rod rigging stretches. It is only a question of how much under what load.
On smaller boats and on trailersailers where stepping and unstepping of the mast is frequent, 7 x 7 cable is used, and some stretch in the wire is accepted. The other common designation is 7 x 19 cable. This is the most flexible of the cables and composed of seven strands of 19 wires each. In any boat application it would serve as wire halyards, running backstays, topping lifts, and guys. On large boats, it could be used as wire sheets. 7 x 19 cable is highly resistant to crushing and bending fatigue. Because it may be wound around a winch and through blocks and receives other punishment as well, the wire will generally wear out before corrosion will damage it.
Any of the above cables may be built of stainless steel of various grades or plain or galvanized steel. Galvanizing provides some corrosion protection to plain steel wire. Older boats and restorations or replicas, may use galvanized wire rigging rather than stainless steel for looks. The galvanized wire can be sluiced down with tar and pitch to look black like the rigging of old. Stainless steel would not hold the tar compound. Galvanized wire will last a very long time, if protected from corrosion, and it is much cheaper, too. Plain steel wire, coated with tar, will work as well, but watch your hands on a hot day when the tar comes off on everything. The downside of plain steel is that it is quickly subject to corrosion in those areas where the protective coating comes off.
There are several alloys from which the wire may be drawn. Each has particular characteristics. Not all stainless steel is suitable for making wire, and none is completely “stainless.” Water has the ability to corrode stainless steel. Salt water and acid rain can be very corrosive. Stainless steel acquires its protection from corrosion through its interaction with oxygen in the air. If stainless steel is sealed off from the air, it can quickly corrode.
A boat sailed in the Great Lakes might have bright rigging wire for years until it is moved to New England or Florida. Then its rigging will quickly show signs of corrosion. In selecting the type of stainless steel from which to form wire, 302 and 304 are the most common. This is a good compromise between strength, corrosion resistance, and price. For boats that sail in tropical seas or highly corrosive areas, 316 or nitronic stainless steel offers increased corrosion resistance at increased cost. The tensile strength of the 316 is less than that of the 304. It is also harder and more brittle. Generally one size larger wire is needed to compensate for the reduced tensile strength.
Over the years, various wire manufacturers have developed proprietary types of stainless steel in an effort to improve the qualities of stainless steel rigging wire. These are known by “brand names.” When shopping for wire, check the specifications. Don’t pay for a brand name made from the same material as the basic wire. Type 316 is good for Florida and the tropics while 302/304 is fine for most other areas unless your boat is docked near a source of corrosion such as a power plant with associated stack gasses.
The limited seasonal use of boats kept in northern climates limits the sailing stress placed on standing rigging. However, if the mast is left up during storage, the wire is in the weather and exposed to some cyclic loading from wind 12 months of the year, so it may corrode and fatigue more quickly than you might expect.
Terminals
Terminals create a mechanical connection between the wire and its attachment, i.e. a chainplate or mast tang. Basic terminal design consists of a fork or an eye. Specialty terminals are made to create studs for turn-buckles, antenna terminals, or other special-use items.
Terminals are designated by the method of attaching the terminal to the wire. Swaged terminals are the most common type found on sailboats. Swaging is the process of squeezing the pipelike barrel of the terminal tightly around the wire. There is no fusion of the terminal to the wire. It is strictly a mechanical grip created by the compression of the terminal barrel over the wire. Swaged terminals have proven themselves in thousands of miles of sailing, but they can fail.
The simplest swaging machine is the roll swager. This machine places the terminal between two dies and compresses the terminal tightly against the wire. Usually two passes of the terminal through the roll swage are used to assure maximum compression. If not done correctly, the terminal can assume a banana shape and have a seamlike line on the long axis of the terminal.
The rotary swage is a better swaging machine. In this machine, the compression of the terminal barrel is accomplished by many light hammer blows to the terminal in a rotary motion as the terminal is passed through the machine. This produces a more uniform swage with little or no distortion of the fitting. A rotary swage may be checked against standard military specifications to assure full compression of the fitting. Both forms of swaging are dependent on the skill of the machine operator for the quality of the swage. My father-in-law’s Gulfstar 42 lost its mast from a defective backstay swage. The wire was never fully inserted into the terminal barrel when the swage was made. Undetectable except through X-ray (not a usual inspection device), the fitting failed when the boat was only a few years old.
Swageless terminals are another alternative. They have proved themselves over time and offer several advantages over the swage terminal. Since they do not require a machine, they are easier to use. They are reusable, inspectable, adjustable in very small increments and easy to work with. The downside of swageless terminals is they cost twice as much as the swage variety. Some swageless terminals and a roll of appropriately sized wire are a good cruising spare to have on board.
There are two types of swageless terminals: mechanical, using a malleable cone to expand the wire within the fitting, and an epoxy type, that uses epoxy to form the bond within the fitting. I have not seen the epoxy type advertised for some time, but the mechanical types are represented by Sta-Loc and Norseman. Products from both companies are available through West Marine, Defender Industries, and other boat supply distributors. If you bought swageless terminals this year and decided to re-rig the boat in 10 years, you could re-use the fittings and only have to pay for new wire and new wedges. These are available from the manufacturer or distributor and are not costly.
A final type of fitting to be discussed is the oval sleeve or Nicropress type. These fittings are not easily used with 1 x 19 wire due to the stiffness of the wire but can be used in an emergency. This fitting creates an eye in the wire which can be used to attach a turnbuckle or other piece of hardware to the wire. The oval fitting will work well with 7 x 7 or 7 x 19 wire and is often used on small boats or for lifelines. If this fitting is used in a critical area, such as rigging, two oval sleeves must be used and carefully compressed around the wire. Be sure to leave a small amount of wire protruding from the end of the second sleeve. This can be wrapped for personal protection, but it needs to stick out a little to assure that both sleeves are in full contact with the wire for their entire length.
Now we have our rig, let’s sail. Oops, first we need to tune the rig.
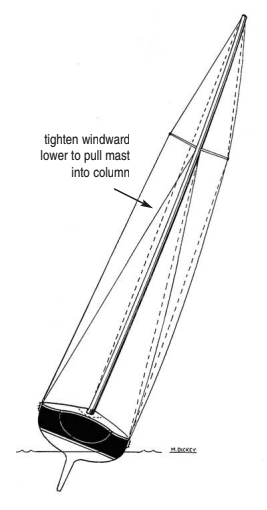
Tuning the rig
Rig tuning is very important. Boats with poorly tuned rigs are slower, don’t point as high, make more leeway, and may be difficult to steer. They are also more prone to rig failure. Tuning starts as soon as you step the mast and attach the standing rigging from the mast to the hull. First attach the four primary shrouds, forestay (headstay), backstay, starboard upper, and port upper (capshrouds). Once these are attached and tightened enough to hold the mast vertical, attach the starboard and port lowers, adjusted loosely. If the mast is keel-stepped, do not insert the wedges between the mast and the deck. They come later.
The object of tuning is to support the mast vertically in relation to the athwartship and fore-and-aft waterline of the boat. This means that the mast must not lean port to starboard nor toward the bow or stern. Masts on some racing boats are raked aft, but most good old boats will do well to at least start out with a vertical mast and begin tuning from there.
An easy way to initially position the mast is to establish a plumb line adjacent to the mast which can be used to determine the mast position. Hoist a light line to the top of the mast on the main halyard and tie it off. On the bottom end of this line, tie a weight (a wrench or similar will do), to create a plumb bob. You can submerge the weight in a bucket of water on deck to dampen the motion of the line.
Sight the mast from aft, and compare it to the plumb line. Adjust the port and starboard rigging to bring the mast into vertical alignment with the line. The rigging turnbuckle should be hand tight to start with and then tightened using a wrench to hold the rigging terminal and a screw driver through the turnbuckle to tighten it.
Before you set the mast, open all of the rigging turnbuckles an equal amount and take care to see that the top and bottom screws of the turnbuckles are equidistant from the center of the turnbuckle. If you start with this situation and tighten equally on all turnbuckles as you set the mast, you should have a mast more or less vertical with only the fine adjusting to be done.
Once you adjust the mast into vertical column athwartship, you need to do the same fore-and-aft to assure that you have a vertical mast in both planes. Now, adjust the port and starboard lower shrouds by tightening them to about the same hand-felt tension as the uppers. Check again to make sure the mast has remained vertical. Be sure when you tighten the lowers that you do not pull the middle of the mast out of column. If you have done this, loosen one side and tighten the other to get the column back in line.
At this point, all of the rigging should be basically tight using a wrench and screwdriver, but it is not “tensioned.” There are three ways to achieve the desired tension to the rig:
a) use a tension gauge such as the Loos Tension Meter available from various marine distributors;
b) calculate the tension (percentage of breaking strength of the wire; based on empirical measurement);
c) go sailing.
Method C is the most fun and will suit the average sailor. Method B is the hardest and is described in a sidebar. Method A is easy, but you have to buy the tension gauge.
Let’s use Method C. The first rule of C is never try to adjust rigging under load. If the starboard upper needs to be tightened, and you’re on a starboard tack (wind over the starboard bow), tack so you are on a port tack, take up the now unloaded starboard upper and tack back to gauge the effect you have made. Pick a day with 8 to 12 knots of wind. Find a sheltered shore so you can sail in calm water while still getting full wind. Set full main and your usual headsail or the biggest you would normally carry in the wind range, perhaps a 150 Genoa. Sail on one tack while evaluating the rig. Are the leeward lowers tight or loose? If loose, tighten hand tight without distorting the center of the mast. Is the masthead falling off the leeward? Tack and tighten the offending upper. Only use hand pressure to adjust the rigging. You can tension it more later. Check the masthead. Is it raked fore and aft? Run off or head up to adjust the required shroud. Tack over and do the same thing. Keep sailing and making hand tight adjustments until you can sail on any point and the rigging is tight and the mast is in column.
Now, come into the wind and drop the sails and feel the rigging tension. Is it about equal on all shrouds? It should be. Use your wrench and screwdriver to add tension to the rig by turning each turnbuckle the same amount of turns in a clockwise manner around the boat. Start with one full rotation of each turnbuckle. If it is getting hard to turn the screwdriver to adjust the turnbuckle, you are at about maximum desirable tension. Now, set the wedges between the mast and the deck for a keel-stepped mast. Your rig is ready for the season.
When you get to the point of tensioning the rig with the wrench and screwdriver, you could go to Method A and use a Loos Tension Meter to check the rig in lieu of adding a bit more to each turnbuckle. It’s up to you and depends on how you sail. I leave Method B to those more dedicated than I am.
All well and good, you say, but I don’t sail hard, and I don’t race. Why should I take the time to tune my rig? My short answer is that tuning the rig is about more than how we sail, it is about keeping our mast in the hull and the rigging sound and the tiller easy.
“Tiller?” you say? Yes, the tuning of the rig can assist in minimizing weather helm and bringing joy to the helmsperson. The straighter the mast, the less weather helm you’ll have. The ability to correctly tune your sails depends on a stable rig that does not allow the mast to distort out of column from tack to tack. Tuning is fun and can be a source of pride in a job well done and a boat well sailed.
Inspection and upkeep
Our rigs are our motion, our power, our joy, and can be our lifesavers or endanger our lives. We need to regularly care for and inspect the rigging. A careful twice-yearly inspection will pay dividends in catching problems before they become dangerous.
Discoloration is a clue to a problem and is evident before the actual problem surfaces. Rust-like stains in a barber pole stripe on the rigging wire tell us something has failed internally in the wire. Small discoloration around fittings may foretell a fitting failure. Water can enter a fitting and start corrosion. A small crack can travel.
One way to detect small cracks in fittings is to polish the fitting with Never Dull or a similar product. Wash the polish off and apply a mix of penetrating oil with carbon black dye added. Apply the mixture to the fitting, let it stand for 20 minutes or so. Remove excess oil from the surface with alcohol or mineral spirits then dust the fitting with baby powder. The crack will appear as a line in the baby powder. Dye Check Kits are also available from West Marine and others. It may take a couple of hours twice a year, but the peace of mind is worth every minute.
Fatigue failures may be caused by cyclical loading on a fitting. When we sail with the rig incorrectly tuned, the slamming of the sail from side to side cyclically loads the leeward terminals. With enough high load cycles, a crack may form. As the loads are repeated, the crack spreads, and finally the rigging fails. If you see the rig is working or pumping, do something. Retune the rig or reduce the press of sail. Applying too much backstay tension to a rig is probably the other common cause of failure.
To maintain your rig, keep it clean. Rinse it regularly with fresh water. Wash it with water-soluble detergent. Never use a cleaner containing chlorine. It is destructive to stainless steel. Use nylon or bronze wool to clean tough spots. Never use steel wool or steel scrubbing pads. Let the rigging breathe. Don’t cover the stainless with tape or other oxygen-excluding coverings. Use spreader boots or turnbuckle covers if you must cover some areas.
All rigging has a useful life, but it is very hard to determine what that life is. A rule of thumb for rigging in saltwater service is, “Replace in 10.” Ten years is a long time to endure the constant motion and loads on a sailboat. In freshwater service, the period may be extended to 15 years or longer if the rig is rinsed, kept clean, and not subjected to acid rain, smokestack gasses, or the like.
Problems that develop with rigs tend to multiply. Find one, and there is another one around somewhere. Unless you know the specific reason for an isolated failure, the whole rig should be suspect. When you see a light brown barber stripe on the wire, its time to replace, at five years or 15. Respect your rig. It will repay you with years of carefree sailing.
Measuring stretch to set tension
It is possible to determine the tension in shrouds and stays empirically. You can measure the elongation of the wire as a fraction of the initial length and then establish rig tension as a percentage of the breaking load of the wire.
This requires fairly precise measurements. Stranded wire is at about 5 percent of its breaking strength when it has stretched 1/2,000th of its length. Rod wire is at 7.5 percent of its breaking strength when stretched 1/2,000th of its length. After you read this you may decide that a tension gauge is a very reasonable investment. Either way, if you are ever stuck somewhere without one, a copy of this method will help you get your rig tension about right.
The example below is for stranded wire. The elongation for rod wire should be 2/3 of the elongation in the example.
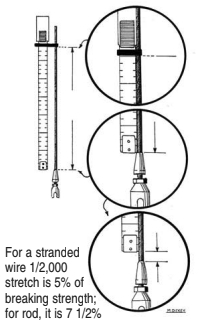
The easiest method is to use a set sample length of the wire, say, six feet. Using the top of the terminal fitting as the baseline and with the rig normally tensioned to hand tightness, measure up six feet from the top of the terminal and carefully mark the wire. You might use a round of tape to make identification of the six-foot mark easy. Now increase the tension on the rig by tightening the turnbuckle. As you tighten the turnbuckle the wire will elongate, and the six-foot mark will move upward as the wire stretches. Take a measurement down from the six-foot mark to the top of the terminal. This distance will now be more than six feet. If the measurement is six feet, plus 1/32 inch (or .036 inches to be exact), the tension in the wire is now 5 percent of the breaking load of the wire. If the measurement is six feet, plus 1/16 inches (.072 inches to be exact), the tension is 10 percent of the breaking load of the wire, and so on. Never exceed 25 percent of the breaking load of the wire. A 7/64 inch increase or (.108 inches to be exact) will put you at 15 percent breaking strength. That should be about right for a masthead rig cap shroud. You may need to go to 20 percent for a fractional rig with swept spreaders. In any case, if you cannot achieve the results you want with 25 percent tension, there is some other problem with the rig. Go back to the beginning of this article and examine the rig support structure to find the problem. If you want to observe the elongation of wire under tension, try this method and see how it comes out. Use care with this method. You should not need anything heftier than a screwdriver and a wrench for this. Fair winds and tuned rigs.
Thank you to Sailrite Enterprises, Inc., for providing free access to back issues of Good Old Boat through intellectual property rights. Sailrite.com