Issue 13 : Jul/Aug 2000
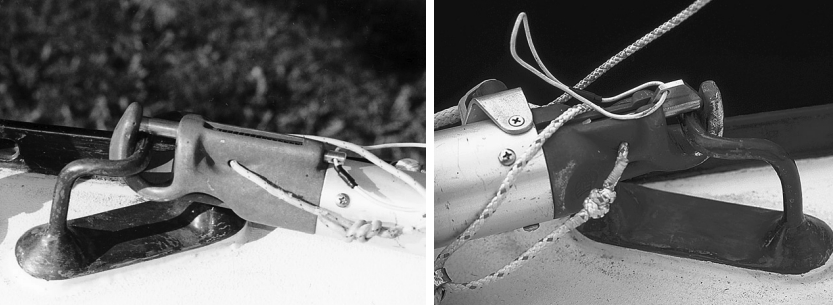
While most of the rigging on our boat was very satisfactory when we bought it, the whisker pole and mast pad-eye were not particularly reassuring. The pole was a small-diameter, twist-lock affair that did not lock and unlock reliably, and the pad-eye did not fit the mast well. The pole collapsed under load. I bought and installed a twist-lock repair kit, but then the pole took a frightening bend when it was under much of a compression load. It didn’t have the strength for the job.
It took awhile to get over the sticker shock of a new line-control whisker pole, but when I worked for Corporate America, nothing was too good for little Mystic. I spent a season figuring out how to get a decent-sized pad-eye that fit the mast and exactly how I wanted to stow the pole on deck. I didn’t consider stowing the pole vertically on the leading edge of the mast. A friend had done that on his boat, and I found it incredibly awkward. I suspected it didn’t help performance much to mess up the leading edge of the spar and put that much weight up high.
The stronger pole was more than twice as heavy and, when fully extended, was awkward to use. The line-control system also worked poorly. The control line was too small and jumped off the sheave frequently. A good friend machined a much wider sheave, and I installed a larger line and a cam cleat. That made the pole work nicely. I think the vendor has made some similar improvements since then. The need and the solutions were obvious. But the pole was still heavy.
With one hand
If you take the “one hand for yourself and one for the ship” rule seriously, you should be able to handle the pole with one hand for almost all operations. I worked out the choreography that first year and concluded that I needed chocks that would allow enough movement so I could pick up the after end of the pole, snap it into the pad-eye, then rig the topping lift and jib sheet to the forward end and lift it with the topping lift. Then I could go back to the mast and extend the pole. At no time did I have to lift the pole like a “free weight.” Roughly half the weight of the pole was always taken by either the forward chock or the pad-eye. The same applied when striking the pole, only in reverse.
That winter, I brought the pole home and flopped around on the basement floor with it trying to visualize the kind of chock I needed to buy. Then I went looking at chocks. None allowed the degree of freedom at the forward end that I needed to make the process a true one-handed affair. The available chocks were heavy and needed to be screwed to the deck. I don’t much like putting screws into my balsa-cored deck. It can be done properly but not simply. I went back to the basement floor.
I made wire models of what I thought the chock that I needed would look like. The ones that looked promising were duplicated in full-sized mock-ups and tried with the pole movements I wanted. I will not admit here how many models and mock-ups I made. I wasn’t a publisher yet, so there was leisure time available for such mindless and soothing puttering. Finally, when I had the ideal shape, I moved on to making the “production parts.”
Soft wire inside
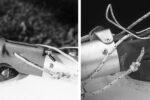
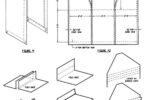
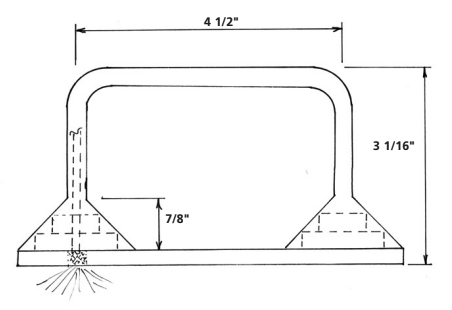
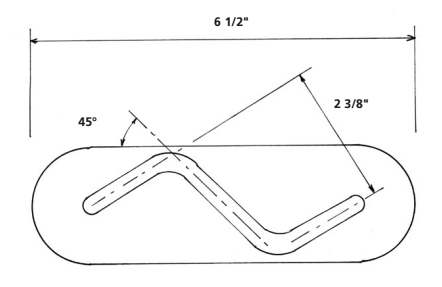
I made the complex shapes from New England Ropes’ Regatta Braid line with soft aluminum wire inside. The 1/8-inch wire allowed me to form the rope to the desired shape and to keep it there while I completed the assembly. The rope and wire were not strong enough to actually hold the pole in place, but they were strong enough to keep the desired shape while I assembled the chock. The chock base was made from 6-mm marine plywood skinned with glass cloth on both sides. The conical shapes were made from a stack of plywood disks. A hole down the center of the disks and through the base allowed the rope to extend out the bottom.
I combed the rope out into a flat disk under the base and glued the whole thing with epoxy. I soaked the rope with epoxy as well, and when the first course of epoxy had kicked, I added filler to the next course and filled in the rope and the edges of the disks to make cones out of them. I happily filled, trimmed, and filled some more. I mixed some graphite and aluminum powder with the epoxy to give the finished assembly some UV resistance. Painting would have achieved the same thing.
In the spring, I mounted my special chocks on the deck after measuring to make sure the pole would pivot from the aft chock to the new mast pad-eye. I sanded the gelcoat of the deck where I intended to mount the chocks, sanded the chocks, and glued them to the deck with more epoxy. After the epoxy kicked, and I had done some unscientific tug-tests to make sure I had a good secondary bond, I painted the sides of the chocks and the glue line at the deck to protect the epoxy from UV degradation.
Chock strength
How strong are the chocks? The rope has a breaking strength of 3,000 pounds. It is attached to the deck in two places, and the direct rope-to-deck-bond area is about 3 1/2 square inches. The total bond area is about 7 square inches per chock. The bond strength probably would never degrade to less than 1,000 psi and probably would be more like twice that in most cases. Not to put too fine a point on it, the parts will take some abuse, and a boarding sea will not take the pole. The chocks and their attachment to the deck are certainly stronger than the purpose-made aluminum alternatives, because the aluminum chocks are mounted to the deck with fairly small screws. I would not want to lift the boat with these chocks, but I think in an extreme loading, the rope would distort and break the epoxy-resin stiffener while staying attached to the pad and the deck. The chocks have been in service for three years and have needed no attention other than an occasional coat of varnish to protect the epoxy from UV.
If you choose to do something like this on your boat, note that the forward and aft chocks have shapes that are mirror images. One shape will not work for both. (See pictures and drawings.)
The aluminum wire was purchased in a hardware store. It had a .010-inch vinyl coating that I removed. I chose 5/16-inch Regatta Braid because I knew from other projects that it would take the epoxy well, and was soft enough to accept the wire. Other ropes might work as well, but I know some ropes are too stiff, and do not take epoxy well.
Thank you to Sailrite Enterprises, Inc., for providing free access to back issues of Good Old Boat through intellectual property rights. Sailrite.com