Issue 13 : Jul/Aug 2000
With or without a sewing machine, and with or without previous sewing experience, you can make a windscoop for the forward hatch on your boat. Windscoops coax gentle breezes into your cabin to cool you off. You can use any kind of fabric, but most windscoops are fashioned out of spinnaker cloth. You will want something light and durable. A windscoop needs to be able to fill and move air into your boat in a light wind but stand up to moderate air. If you don’t have spinnaker cloth, try old sailcloth, bedsheets, or even old boat tarps (depending on their weight). For more pizzazz, you can use different colors.
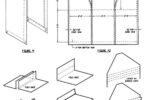
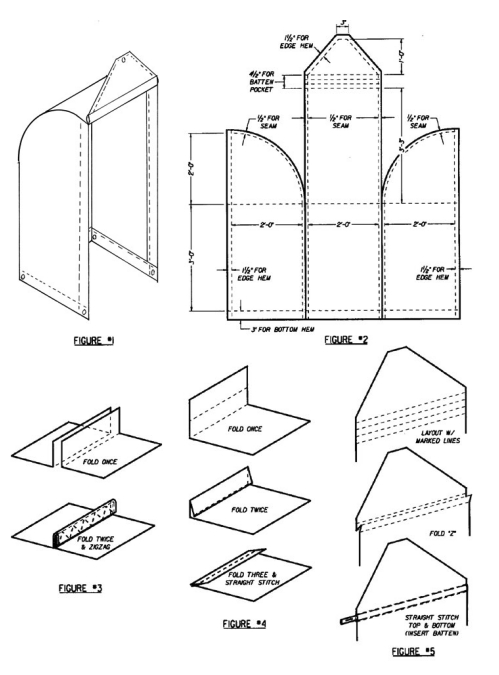
Figure 1 shows the finished product. The second diagram shows the pattern you need. If you want to adjust a dimension here or there to custom-fit this to a certain hatch size, feel free. Just make sure you go through the whole pattern to correct all the other dimensions your adjustments will necessitate. You might also have to split the pattern into two or three pieces if your material isn’t wide enough. For our example here, we will assume our cloth is 2 feet wide and our pattern will consist of three pieces.
First use a ruler, yardstick, or straightedge and a colored pencil or cloth pencil to lay out the sides and back of the windscoop as in Figure 2.
Seams and hems
After you have clearly marked these and allowed for the seams and hems, cut out the sides and back with the sharpest scissors you have. This helps prevent the cloth from unraveling.
For this project, you are doing two types of sewing. The first type, shown in Figure 3, will be a seam used to put the side and back of the windscoop together. This involves putting the two edges of cloth together and folding them over. Sew a zigzag stitch along this edge. Be certain to go slightly over the cut edges while sewing to reduce unraveling.
The second type of stitching, shown in Figure 4, is a hem. This stitch, used along the remaining exposed edges of the windscoop, provides a strengthened edge for attaching grommets. This involves folding an edge of cloth over three times and sewing a straight-line stitch along the top. With three folds of fabric, a sure footing is provided for the grommets in which to put bungees or lines used to hold the windscoop in place. You might want to practice a little on these stitches before the final assembly of your scoop to help with the consistency and look of your work.
Looking at Figure 2, you can see where you will need the seam and hem stitches. Keep the folds on the hem stitching and seams to the inside of the scoop and follow this practice with your seams. Your windscoop will look more professional, and if you do have a few “oopses,” they won’t show.
Batten pocket
After you have completed the shape, seaming, and hemming of your windscoop, add a batten pocket. This holds the scoop open to capture the slightest breeze. You can use a dowel rod, ruler, or similar rigid object for this purpose. I use left-over batten material in my example. Simply fold the extra cloth at the head of the windscoop like a Z, onto itself, as shown in Figure 5. Then use a straight-line stitch along the top and bottom of the pocket. Insert the batten and add a few stitches to each side to hold it in. If you don’t do this, your batten will fly out as the scoop moves around in the wind like a sail and, as you know, nothing ever lands and stays on board.
Now add grommets to the four corners at the bottom of the windscoop to hold it in place, and at the head to suspend it from a halyard, and you are done. Grommet kits and directions for installation can be found at discount stores where camping or tent-repair kits are sold. After the grommets are installed, you can harness the wind to your advantage, and you have the satisfaction of having done it yourself.
Congratulations!
Brian Engelke and his wife, Kelly, own and operate Sails and Sew On, a full-service sail loft and boat canvas house in Perry, Kansas. Although they are as far away from blue water as they can get, they do an extensive business on both coasts and locally (Lake Perry) through their website. They sail and race a 1967 Columbia 34, which they have restored.
Thank you to Sailrite Enterprises, Inc., for providing free access to back issues of Good Old Boat through intellectual property rights. Sailrite.com