Boxing in the space more than doubles its usefulness
Issue 77 : Mar/Apr 2011
The Pacific Seacraft Dana is a fabulous, well-designed boat. Two of us live aboard Doolittle with ease despite her small size. However, improvements can always be made.
One compromise we found annoying was the lack of a dedicated place for a trash receptacle. Some years ago, I helped my friend Angus design and build a box that replaced the companionway steps in his Flicka. It was a resounding success and something I thought would work equally well on the Dana.
Five years later, the companionway box idea had not progressed beyond a few quick sketches. The simple fact was that the original steps worked extremely well, doing all one could expect from steps. But, as that’s all they did, they didn’t fit in with our philosophy of making everything on a small boat do more than one job.
A companionway box would offer a perfect and easily accessible place for trash and recycling and, more than that, it would also tidily store our shoes and create a new place to sit in the galley. The original steps were too narrow to sit on properly, so there was nowhere to change out of dripping foul weather gear at sea except at a bunk.
What finally compelled me to build the box was a magnificent carpet I bought in Morocco. Before I could lay the carpet, I had to make the box.
Step by step
The companionway steps rested on the cabin sole and against the engine-access panel. But the panel was poorly fitted and it seemed illogical to go to all the trouble of making a companionway box if what it attached to needed attention. Before I could build the box, I had to remake the engine panel.
I made the new engine panel from slightly thicker plywood and planned to use the original panel to make the bulk of the box. The extra thickness would help the panel soundproof the engine better and present a more solid surface for the box to sit against. Since the panel is mostly hidden by the box, the new and much darker teak would be less notice- able and the nicely aged and faded old wood would help the new box blend in. Also, I didn’t want to make the box too heavy as I have to lift it out of the way to gain access to the engine.
One of the problems with the old steps was that they rattled when the engine was running. This was partly due to the loosely fitting engine panel. I hoped fixing it in place more precisely would help. As well as carefully lining up the four barrel bolts that held the panel in place, I added a rubber seal behind it. I routed out a groove all the way around the back of the panel and glued in 3⁄16-inch round neoprene rubber.
A box to fit
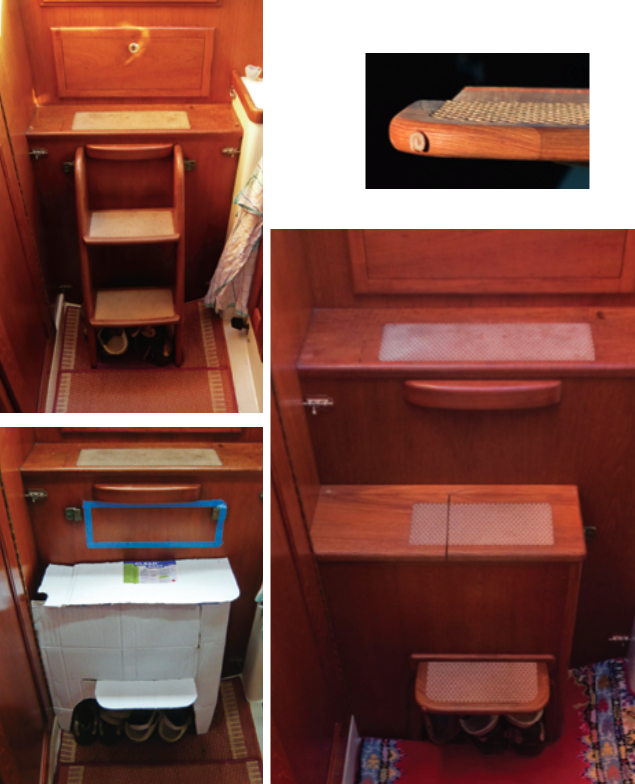
With the new panel in place, I could make the box. The shape of the boat and logic dictated the shape and size of the box. I could not make it any deeper than about 8 inches as it’s limited by the position of the head door, but that was adequate for a step, a rubbish bin, and for sitting on. The box extends from the bulkhead on the starboard side to where the steps used to go on the port side. It couldn’t have been any wider because, to look into the fridge, we have to get a foot into the space between the box and the galley. I made the box a little over an inch higher than the original step to make it a more comfy height for a seat and to gain more storage space inside.
To check the feasibility of the idea, I made a cardboard mock-up. Even the crudest template will enable the imagination to grasp a concept and work toward improving it. The main difference between the template and the final product is the size of the cutout in the base for our shoes. The main reason for the cutout is to allow removal of the floor panel that gives access to the fuel tank and gauge. This panel could be removed with the original steps in place, so I designed the new box to do the same. Besides, it just looked better visually with the smaller cutout.
We can now tuck our shoes away behind the woodwork. The middle step slides under the bin section and has no knees or other supports so it can be easily removed. I drilled a hole in the edge of the step and inserted a piece of rolled up leather to protect the head door where it touches the step when open. I recycled the non-skid surface from the original steps and set it flush into areas I routed out in the new steps.
The top of the box is divided into two equal-sized compartments (9 inches wide, 10 inches high, and 7 inches deep), one for trash and the other for recycling. Each compartment has its own lid and the hinges allow the lids to stay open when needed.
Pleasant surprises
So how does the finished box work? It makes an excellent new seat for the galley and it’s a joy to have a proper dedicated place for garbage that’s easy to clean. We simply take the box outside and wash it out. Having somewhere to put our recycling is also fabulous.
One surprise was just how much sealing in the engine hatch has quieted the engine. It’s not just that the rattles are gone — that alone would have been great — but the engine sounds as if it’s farther away. This has made a huge difference in comfort aboard.
The box wasn’t difficult to construct but it did take a few days. It weighs just a bit more than the original solid teak ladder but can now be removed with only one hand — the ladder required two. A handhold I cut in the ply separating the two halves of the box makes the box much easier to lift.
Another surprise was how little the box cost to make. I estimate about $300, which is very cheap as boat projects go. The invisible Soss hinges were among the most costly items, but I wanted them to match the other hinges on the boat. I used the lovely bronze fitting from the original steps to attach the box; it drops down into place as easily as the original steps did.
The head door opens as far as it ever did, but there is more floor space and the galley feels much more spacious. Visually? Well, it’s a box, but by copying the dimensions and angles from other parts of the boat I did my best to make it blend in. It’s growing on me. Aesthetically, perhaps it’s not as boatlike as before, but it has brought nothing but advantages and makes life flow that much more smoothly aboard Doolittle. Functionality is its own form of beauty after all.
Benjy Benjam in loves sailing, making things in wood, and photography, and sells dinghy plans and other stuff. He lives aboard Doolittle, a Pacific Seacraft Dana 24, with his partner, Celia, near St. Tropez in the south of France. He works on classic yachts to fill the time when not exploring the Med.
Thank you to Sailrite Enterprises, Inc., for providing free access to back issues of Good Old Boat through intellectual property rights. Sailrite.com