Cooling the cost of a warm cabin
Issue 77 : Mar/Apr 2011
A warm boat is a great comfort in the rainy Pacific Northwest. Boats stay in the water year-round here and the shoulder cruising seasons have a lot to recommend them: sparse crowds and better wind. My wife and I have schemed and dreamed about having a source of cabin heat for our boat for several years now. Our Albin Ballad sloop, just under 30 feet long, has a relatively narrow beam and low freeboard by modern standards. This translates into limited interior space, especially when cruising with a family of four and two cats, as we do. I ruled out any kind of bulkhead-mounted heater in the cabin because we don’t have room for it.
We occasionally use a portable AC electric heater when we tie to a dock with shorepower. This is the easiest and least expensive heat option, even if you have to install a simple AC shorepower interface on your boat. It’s quiet, effective, and worry-free as long as your AC system is up to snuff and you use it only when you are on board and watching it. The drawbacks are that we are without heat while under way or in remote locations away from shorepower. The portable heater is also one more piece of equipment to find a home for, to set up, and to stow after every use.
The ultimate solution for us was a forced-air diesel heater that could be installed out of the way so as not to impact the cabin interior other than by providing warmth. It does not require any new kind of fuel on board and it runs whenever and wherever we want it. The drawbacks were primarily price and the complexity of integrating and installing all its connected systems: air supplies, exhaust, fuel, and electrical.
Follow the manual
Failure to properly install a diesel heater can lead to malfunction, fire, and asphyxiation. If you plan to install one of these heaters yourself, it’s essential that you read thoroughly and understand the manufacturer’s warnings and installation guidelines. I was lucky to have a manual for the used heater I bought, but I have since found much of the same information online.
Did I mention the price? These are sweet little units, compact and self-contained marvels of engineering. Webasto and Espar are a couple of brands that come to mind but there are others out there. The smallest models are roughly the size of a loaf of bread. I called the marine Espar dealer in Seattle to ask how much one would cost. After buttering me up with a diatribe about how there aren’t any women on boats without heat, the salesman quoted me a price of about $2,700 for their smallest heater and the various parts associated with installing it. With professional installation, this price could easily double. I hung up the phone with a renewed appreciation for my wife, who has sailed with me for years without a heater in our boat.
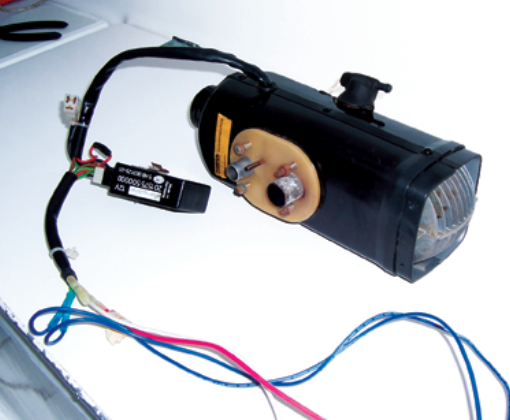
On eBay I found several small Espar heaters used in the commercial trucking world for around $1,000 each. To work in a boat, these units would still need the various specialized marine parts: ducting, grills, exhaust fittings, and so on. Still, they were considerably cheaper than the same thing sold for the marine market. But unfamiliarity and skepticism about eBay, along with lingering worries about adapting a truck heater to my boat’s needs, kept me on the sidelines. I was still mulling it over when I came across a used Espar D-1 on the shelf of our local marine consignment shop, Second Wave, for $375. If I was ever going to do it, this was the time.
I hate the uncertainty that goes with buying used “as is” equipment, so I immediately took the heater to Miller & Miller Boatyard. They specialize in installing and servicing diesel furnaces. I half expected them to say, “Oh yeah, we know that heater. It’s been in the shop a dozen times.” Instead, and much to my relief, they bench-tested it and found nothing wrong. In addition to peace of mind, they generously gave me a spare service/installation manual and an extra fuel-metering pump that I would need. This was well worth the $175 it cost me to have the heater tested.
Gathering the parts
Once clear of that hurdle, I was faced with the details of installing it. I still needed all the parts to integrate the furnace with my boat. I gave a lot of thought to planning how this was going to happen before going back to my local Espar dealer for the hot-air ducting, register, exhaust ducting, lagging, and exhaust through-hull fitting. I also got appropriate hose clamps for all the different types of ducting involved.
The folks at the Espar dealer took a very dim view of what I was doing, disparaging the furnace for being old and possibly coming out of a truck. I have since learned that virtually all of these heaters were originally designed for use on trucks and buses. Their use in marine applications is little more than an afterthought in relation to their primary market. I walked out $250 poorer and with a little less enthusiasm than when I walked in. One major problem had developed.
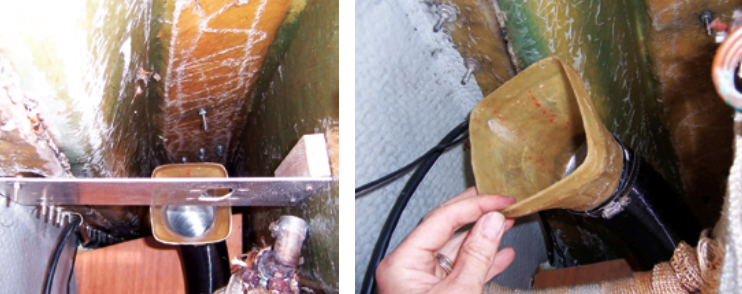
On my heater, the cowl, which directs hot air from the furnace to the cabin, had a sharp 90-degree bend in it and the duct diameter reduced to 1 1⁄2 inches. The dealer took pains to point out that this was incompatible with the 3-inch ducting normally used on boats and that it would reduce air flow to the point of rendering the furnace ineffective. Naturally, the right adaptor was no longer available for that model.
Fortunately, this is the kind of problem that I am good at solving. I shaped one end of a block of wood to match the end of the furnace that the cowl fits over and tapered the other end to a 2 3⁄4-inch round male plug. I rubbed it all over with paraffin wax to act as a mold release and laid several layers of fiberglass cloth set in epoxy resin over the plug to form a crude but effective adaptor between the furnace and the duct (see photo on page 41).
My service manual states that duct components should withstand temperatures up to 300oF, so I popped it into our home oven at 300 to see what would happen. My wife wasn’t exactly cool with this, but the adaptor endured its scorching unscathed.
A sheet-metal fabricator could also make an adaptor. It won’t fit the variable curves of the furnace body as well, but with furnace cement and (God forbid) duct tape, it will suffice.
A space for the heater
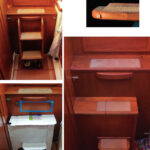
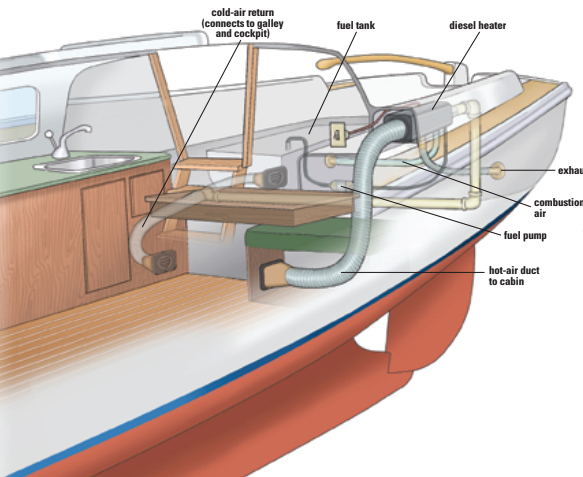
I was now ready to install the heater. My priority was to locate the heating unit out of the way and to make the duct runs as short and simple as possible. I decided to put the hot-air register in a vacant space beneath a stack of drawers at the navigation station. This was down near the cabin sole on the port side of the companionway. From there, the duct ran directly into the port cockpit locker, up the side of a bulkhead, and to the hollow molded hat section that forms the cockpit coaming. This was a completely wasted space into which the furnace fit easily.
I made a mounting bracket out of 1⁄8-inch aluminum plate supported on one side by the bolts in the hull-to-deck joint and on the other side by a wooden cleat epoxied to the inside of the cockpit seatback. The aluminum plate was a scrap, free for the asking from a local welding shop. I easily shaped it with a fine-tooth blade in a jigsaw.
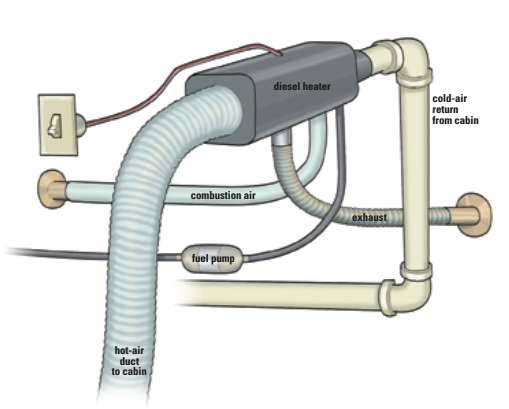
With the heater mounted and the hot-air duct connected, you might think that I was almost done. Not even close . . . there are five more systems to be integrated with the furnace: exhaust, combustion air, fuel, electrical, and the cold-air intake.
Next I tackled the exhaust system. The installation manual repeatedly stressed that there are optimal lengths for both the exhaust and the combustion-air hose. I connected a length of flexible stainless-steel ducting of the optimal length to the exhaust outlet on the furnace and led it outboard to the hull, maintaining a downward slope for drainage and avoiding all possible contact with anything stowed in the cockpit locker. This established where I had to drill a hole for the exhaust through-hull fitting. I hated to drill that hole, but if you want to make an omelet, you have to break some eggs.
The exhaust through-hull fitting is an expensive and specialized piece of stainless steel that comes in a variety of configurations, such as for a perpendicular penetration or through the slope of a reverse transom. It should be installed in accordance with the manufacturer’s specifications regarding clearances from the hull and the use of heat-resistant washers. Once installed, the exhaust-duct connections should be sealed with furnace cement and securely clamped. The entire length should then be generously wrapped with fiberglass lagging material.
If you install an exhaust through-hull fitting in the side of your boat, think about its placement with regard to the dock, docklines, fenders, and vent openings. In my case, placing the exhaust outlet high on the port quarter kept it clear of all these concerns.
Since the fuel pump requires electricity, I tackled the fuel and electrical systems next. I happened to have an extra port in the top of my fuel tank. Maybe it was intended for a diesel-heater fuel pickup — the boat was built in Sweden after all. I was easily swayed by the convenience of using this existing fuel source. I put a pickup tube in the port and ran the fuel line under the cockpit to the fuel-metering pump and on up to the furnace. The manual specifies parameters for the vertical and horizontal run of fuel lines, the permissible mounting angles for the pump, and splicing fuel lines together to prevent air bubbles from forming. I bundled the wires for the fuel pump to the fuel line with plastic wire ties.
An electronic control module has to be mounted near the heater. It should be oriented so the holes in which the wires are connected are facing downward so they won’t collect moisture. The possible locations for mounting are determined by the length of the wire harness. Newer heaters and other brands may not have this separate module.
A spare circuit on my fuse block provided power to the furnace with the 16-amp fuse specified in the manual. These furnaces use a fair amount of power during the startup and ignition phase but, once they are running, they are very modest in their use of electricity and fuel.
Next, I ran wires for the on/off switch to a convenient location. Needless to say, all wiring and fuel lines should be neatly routed and well supported. Pay special attention to protecting them from moving parts and heat sources.
Time for a test
At this point I was able to test run the heater. It ran, but not well; white smoke belched from the exhaust, comically at times, puffing perfect white smoke rings from the left flank of my boat. An avalanche of doubt descended on me. Was there something dreadfully wrong with the furnace after all? What could it be? When in doubt, read the directions!
Remember the optimal lengths for the exhaust and the combustion-air intake hoses? I don’t know why 21 inches of hose on the combustion-air intake would make a difference but it does. The exhaust gases now are crystal clear and the furnace works fine. Some of the latest furnace designs combine combustion-air intake and exhaust in the same pipe. This is a neat arrangement. It appears to balance the two air flows and its double-wall construction keeps the surface temperature of the duct cooler.
I worked out the cold-air intake very cleverly, if I do say so myself. Drawing cold air to be warmed for delivery to the cabin from inside the cockpit locker is not ideal, especially when the air space is shared with the engine. This is not just because of the risk of circulating fumes and odors — like mildew — throughout the cabin, but because the engine and the furnace may compete with each other for a limited air supply. Diesel engines use an enormous volume of air in relation to the fuel they use, on the order of 10,000 to one. Even though my cockpit locker is ventilated, I experienced a flameout in the furnace once when I was running both the engine and the heater with the cockpit lockers shut tight. It appears that these heaters are extremely sensitive to every nuance of combustion-air delivery and can quickly become starved for air. I have since arranged to draw the cold-air intake from outside the cockpit locker.
I have an existing ventilation duct in the starboard cockpit locker that runs from the aft galley bulkhead to a vent in the cockpit foot well. I installed a tee fitting in this duct and tied into it by running PVC pipe down under the cockpit from the furnace. Normally, the furnace now draws fresh outside air through the vent in the cockpit foot well. But I can also close this vent and recirculate air from the cabin at times when heat is in high demand.
Altogether, I am very happy with our new heater. It is effective, safe, and practically invisible. The cost was 20 to 25 percent of what it might have cost to buy a new unit from a marine supplier and have it professionally installed.
Tony Allport lives on Anderson Island in Puget Sound and sails extensively with his wife, Ann, and children, Alden and Claire, in their Swedish classic 30-foot Albin Ballad sloop. Tony is a SAMS marine surveyor and is also known on the island as a skilled cabinetmaker and for his excellent pies.
Thank you to Sailrite Enterprises, Inc., for providing free access to back issues of Good Old Boat through intellectual property rights. Sailrite.com