It lets wires in and keeps water out
Issue 98: Sept/Oct 2014
So you’re planning to add solar panels and a wind turbine to your boat. How can you lead the wires belowdecks without creating yet another leak?
Most boat owners are loath to drill additional holes in their decks. They know this will invariably lead to water penetrating the deck core or dripping below. I have had my own long and annoying experience with the problem. Various ways of doing this have been developed for boats constructed of different materials. Most involve polysulfide compounds and their inevitable failure at some time in the future.
Relatively inexpensive products that attempt to accomplish this and are easy to understand and install are available in marine stores. They work in some applications and may last some years but, because they are made of plastic and rubber, eventually the sun will take its toll, the materials will break down, and leaks will result.
There is no foolproof method for keeping water out. However, through years of experience and trial and error, commercial boatbuilders and the U.S. Coast Guard have found reliable long-lasting techniques that work pretty well. I work on commercial passenger vessels built to the federally mandated schedule of Title 46, Subchapter T, of the Code of Federal Regulations. This incredibly detailed federal directive mandates to very minute levels how to construct a boat that is harder to sink than your average pleasure boat. The procedures in the directive have been developed as a result of sad experience in extreme conditions.
So what does Subchapter T mandate for pass-through devices that penetrate decks and bulkheads? On the steel-hulled vessels common in the commercial world it requires welded steel pipes that stand straight up several inches above deck level. Wires are passed through the pipe and the open top of the pipe is then carefully sealed with plumber’s putty. It seems too simple to work well and yet it is the most reliable method I have seen.
In a fiberglass boat, the pipe can be fiberglass, either molded in place or glassed in later. In either case, it is still sealed the same way. (You can use PVC pipe or plastic electrical conduit for this purpose. –Editors.)
Wooden boats are rare in commercial service these days but present a more difficult problem. Because wood is more “alive” than steel or glass, it expands and contracts over time and will weaken any material attached to it. However, a pipe protruding from the deck and sealed with plumber’s putty will still work for a wooden boat.
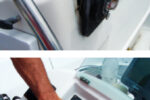
On my own fiberglass boat, I first tried the type of product commonly found in marine stores. This is a gland-like device that, when firmly screwed down, will squeeze around the wires and (one hopes) make a watertight seal. The base piece is screwed to the deck or hull with a polysulfide sealer under it to make it watertight. When installed, it looks clean and neat. You can expect a year or two of acceptable service from this type of device until the sun degrades it. These products are not the best solution if you have a teak deck, as I do.
A better way
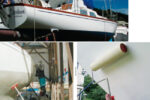
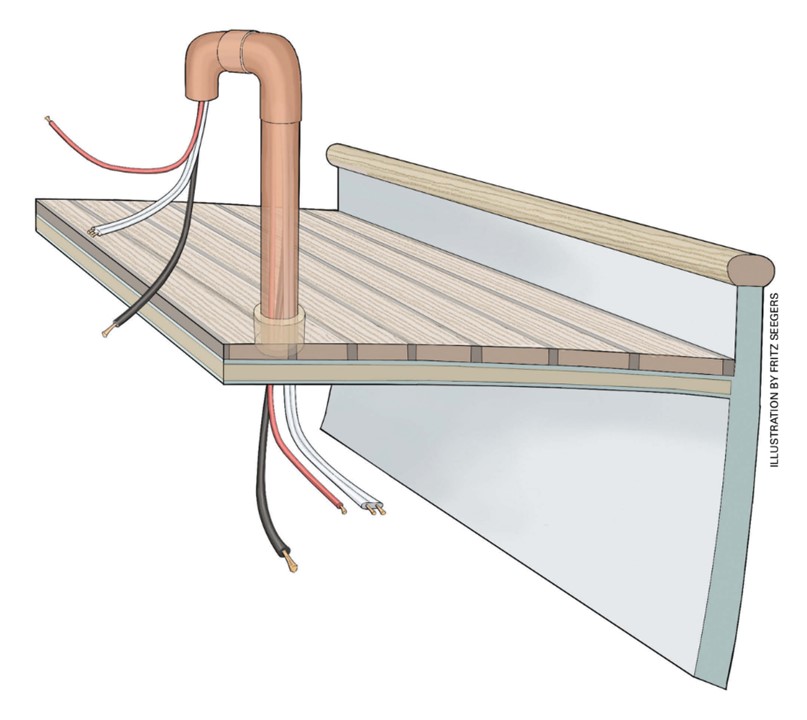
I had three pass-through glands in my teak deck. My solution was to consolidate them and epoxy into the deck a length of copper water pipe, the type that can be found in any hardware or home-improvement store. I didn’t want to cramp the wires, and 3⁄4 inch was sufficient diameter to allow three sets of 16-gauge duplex wire to feed through easily while leaving enough space for the final filler — plumber’s putty.
My boat has a type of compression board core with glass laminates top and bottom and a teak deck overlay. Teak decks will often present difficult leak problems because water may travel under the teak from somewhere else and go down the holes you have so thoughtfully provided. This method solves that problem too.
I removed the three glands from my deck and drilled out the three holes with a 11⁄4-inch drill bit, leaving one large clean hole. I sealed this hole from beneath with good quality duct tape, extending the tape well beyond the hole to help prevent epoxy leaks. With something below to catch “accidents,” I coated the raw edge of the hole with liquid epoxy (either penetrating or regular epoxy will work). This was a good time to check below to make sure the tape was holding up!
While the epoxy was setting, I prepared the copper pipe by carefully taping what would be its lower end with duct tape. I trimmed the tape as close to the outer edge of the pipe as I could. This was to keep any liquid epoxy or epoxy putty from obstructing what would be the lower outlet for the wires.
I set the pipe down into the hole so it rested on the tape at the bottom of the hole, measured up from the deck (4 to 5 inches will do it), and marked the pipe. I removed it for cutting with a hacksaw. A pipe cutter will work too.
Next, I mixed the epoxy putty. This project needs very little since only the gap between the pipe and the wall of the hole is to be filled with epoxy. The 3⁄4-inch pipe left a nice gap between it and the edge of the hole that was easy to fill. I scuffed the pipe with sandpaper to give it tooth to hold the putty.
I spread a generous amount of epoxy putty directly on the area of the pipe that would be in the hole and inserted the pipe into the hole with a slow twist to help ease the putty down along with the pipe. Then, with a small flat stick, I worked small amounts of putty into the remaining gap until I was satisfied I had filled the space completely. All the while, I was careful to keep the pipe centered and upright.
Once the gap was filled, I cleaned the deck surface, first with a dry paper towel, then with an acetone-soaked paper towel. I learned long ago to be very careful with the soiled paper towel. Like polysulfide goo, epoxy paste loves to travel and gets off at every stop.
I gave the epoxy a full day to set. There was no point in rushing the job; I only wanted to do this once. The following day, when I returned to finish, I peeled the tape from the bottom of the big hole. I had done the job well, so I revealed the new pipe, with its tape in place, surrounded by cured epoxy putty and now waterproof. I picked out the last bit of tape from the pipe and ran the wires.
I chose to install a gooseneck atop my pipe to add that little extra bit of water resistance. And when I finished running the wires, I pressed plumber’s putty into the gaps around the wire. It’s a good thing to be generous with the putty and work it in well. Plumber’s putty works best if it has been kneaded well and is warm. Its usefulness is in its tendency to stay put and that it is water-resistant.
It was time for a self-congratulatory pat on the back. I had just cured a leak!
Robert Neefus learned to sail at 14, raced to Tahiti at 17, and returned on his own boat 36 years later. He currently operates a ferry for the State of California.
Thank you to Sailrite Enterprises, Inc., for providing free access to back issues of Good Old Boat through intellectual property rights. Sailrite.com