Keep your icebox colder and for longer
Issue 96 : May/Jun 2014
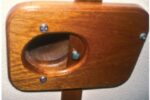
The factory-built icebox in my Catalina 28 Mark II is superbly insulated but has some drawbacks. I developed a way to make better ice that maintains the icebox at a lower temperature over a longer period of time and a system that equalizes the temperature from top to bottom. To accomplish this, I looked at three ways I was wasting stored “cooling energy” and how I could cut down on that waste.
- Issue 1 – To get the most cooling from the ice I take aboard at the beginning of a cruise, it should be completely melted just as I finish the cruise. I was returning from two-day trips with unmelted ice.
- Issue 2 – The icebox in my boat has a drain hole that routes ice melt into the bilge. I’m sure it’s there because cold water sloshing around could damage food in the icebox, but the water draining out was near freezing and, if retained, could help maintain cooler temperatures in the icebox.
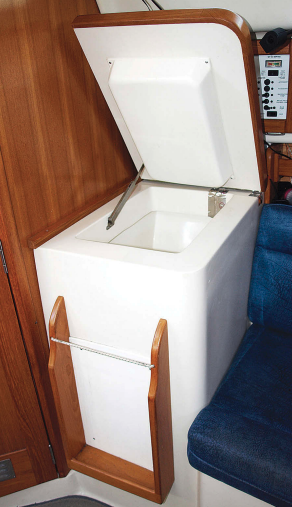
- Issue 3 – Cold air settles to the lowest point. My boat’s icebox is 26 inches deep and its capacity is 2.9 cubic feet. It has two ventilated shelves. With ice in the bottom of the chest, the temperature varied considerably from top to bottom.
To improve the performance of my icebox I needed to find ways to better manage the ice, keep the melted ice in the box without harming the food, and make the temperature uniform throughout the icebox.
Better ice
It is the melting of ice that performs almost all the cooling in an ice chest (see “The Physics of Melting Ice,” page 52). The trick is to start the melting process at a very low temperature and then sustain the melting for as long as you need it to keep food cold.
The physics of melting ice
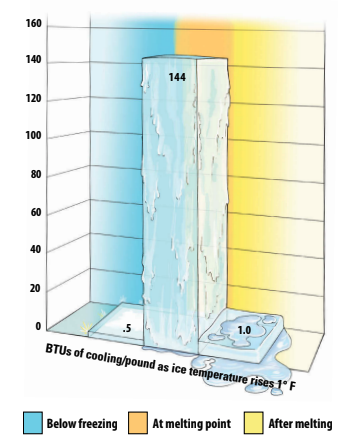
A British Thermal Unit (BTU) is the amount of heat energy required to raise the temperature of one pound of water 1° F. It is equally the amount of heat energy that must be extracted from a pound of water to cool it 1° F.
Ice has only half the heat capacity of water, so as it warms and before it melts, a pound of ice absorbs .5 BTU of heat for every degree its temperature rises. Or you could say it provides .5 BTU of cooling for every degree the temperature of the ice rises.
Ice comes out of your freezer (depending on how cold you’ve set it) at about 0° F. Pure water ice will not melt until it reaches 32° F.
When ice reaches that magic 32° F melting point, an astounding thing happens. As it makes the change from solid ice to liquid water, each pound of ice absorbs 144 BTU of heat — or provides 144 BTU of cooling.
The massive BTU surge will take place at whatever the melting point.
So, if you can get some of the ice to melt at a lower temperature, you can create a jump start for keeping things cold in an icebox. As the temperature inside the box drops, the melting slows down. And the cold liquid from the melt also helps a little to keep the temperature lower.
Once melted, a pound of cold water provides only 1 BTU of cooling for every degree Fahrenheit that its temperature rises. Although it’s twice the cooling power it provided before it melted, it’s very little compared to the melt transition. The cold liquid will not help a lot at that rate. When the temperature in the icebox reaches 50° F, some foods will no longer keep safely.
Rubbermaid sells a product called Blue Ice, which is essentially a blue antifreeze solution in a plastic container. It freezes or melts at a lower temperature than water, which speeds the cooling process and maintains a colder temperature. I learned how to make my own reusable low-temperature ice and I, too, color it blue. (I call it low-temp ice because the Blue Ice name has been trademarked.)
How I do it
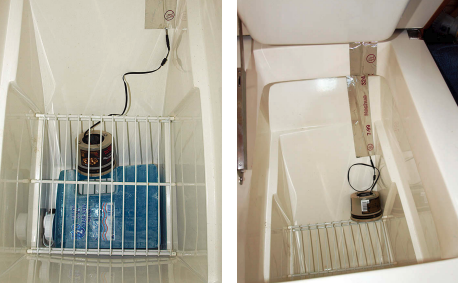
For a while now I have made boat ice in 1-gallon plastic jugs. That way, when the ice melts, the still-cold water stays in the icebox but cannot harm the food.
Originally, I used jugs that once held store-bought spring water. But to fit, they had to be on their sides in the icebox and their caps were prone to leaking. I switched to jugs purchased at Walmart that are made of thicker plastic and are less likely to crack as the ice expands and contracts through repeated freeze/melt cycles. Their shape fits the ice chest better. I also fitted O-rings into the caps as additional insurance against leaks.
My formula for low-temp ice is 1 quart of rubbing alcohol and 3 quarts of water. Rubbing alcohol is toxic, so I add blue food coloring to make sure nobody thinks it’s water and takes a drink after it melts. It could be any color, but blue has a glacial look to it.
As you freeze a liquid, you’re removing energy in the form of heat from the liquid. I think of it as storing “cooling energy” in the ice. Melting releases that “cooling energy.”
I tried higher percentages of alcohol, but the freezing/melting point dropped so low it was impossible to get it completely solid in a home freezer. If it doesn’t get completely frozen, the magic cooling phenomenon as it changes from solid to liquid can’t happen. Eventually, I found the 3:1 low-temp ice mix the best formula for quick cooling. It freezes and melts at about 0° F.
A second jug of ice will maintain the low temperature after the first jug of low-temp ice has done its job. The second jug can be plain water or another mixture with a smaller ratio of alcohol to water.
I have a small freezer in my garage dedicated to making ice for the boat. The low-temp ice solution takes hours longer to freeze than regular water because it must get much colder to become solid. The low-temp ice is right at its freezing point and begins to melt shortly after it leaves the freezer.
Cooling tests
I tested a series of various combinations in a 28-quart Igloo cooler. In my last test, I used what I had learned in previous tests. As a reference point, most refrigerators are set to keep food at about 37° to 40° F.
When I put a jug of low-temp ice in the Igloo cooler, the air temperature was 78° F. As the low-temp ice began to melt and go through that 144 BTU-per-pound cooling process, the temperature in the chest dropped from 78° to 40° F in 30 minutes. Amazing.
At that point, I added a jug of plain water ice to the same chest. After 90 minutes (two hours after the test began), the temperature in the chest had dropped to 31° F. This is below the freezing point for the regular ice, so it had not begun to melt. At the four-hour mark, the temperature was down to 29° F.
The temperature in the test cooler did not get back up to 32° F until eight hours after the experiment started. The regular ice then began a slow melt.
I get the best results on my boat with a jug of low-temp ice and a second gallon jug with a mix containing a pint of alcohol, half the amount in the low-temp-ice jug. I put less blue food coloring in that jug, to distinguish it from the 1:3 formula.
The low-temp-ice jug quickly drops the temperature in the icebox. The diluted low-temp ice begins to melt sooner than regular ice would and is completely melted by the end of the second day. This combination maintains an icebox temperature on my boat that does not rise past the mid-40s for 36 to 48 hours.
Factors that affect cooling
How quickly an icebox will cool and how long it will stay cool is influenced by several factors:
- The internal volume of the icebox
- How well it is insulated
- The outside temperature
- How much food it contains
- How often the lid is opened
- The melting point of the ice in the chest
It takes some experimenting to juggle all these factors, along with the proper mix of alcohol for the frozen jugs you use, so the last of the ice melts as the cruise ends.
When I told a fellow sailor about my experiments, he said he was going to try using vodka instead of rubbing alcohol for his low-temperature mix. That way, in a pinch, the contents of the jug could be drunk after it melted.
Equalizing the temperature
Most boat iceboxes are designed for the ice to be placed in the bottom and the food stored above it on shelves. The lower shelf, nearer the ice, is colder than the upper shelf. Putting the ice on top would seem to be a better idea, since the heavier cold air would descend to keep the food cold, but then you’d have to remove the ice each time you took out food.
A household refrigerator has a fan inside to circulate the cold air and keep temperatures even from top to bottom. I installed a small fan that does the same thing for my boat’s icebox. A fan probably adds a little heat to the chest, but it is such a small amount, I don’t think it matters.
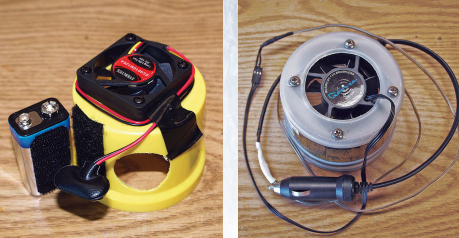
Fan test #1
I experimented with two fans. The first was a 40-mm fan (approximately 1 3⁄4 inches in diameter) of the type used to cool computer motherboards. It cost $6 and can run on 5 to 12 volts DC. I ran it off a 9-volt battery, so it didn’t run at full speed (inside a computer case, the fan’s speed is controlled by changing the supplied voltage).
I mounted the fan on the plastic cap from an aerosol paint can. It fit very nicely. I drilled a hole for the fan intake in the top of the cap, and four holes to mount the fan securely using the screws that came with it. (A piece of scrap wood placed behind the plastic makes the drilling more precise. Without it, the plastic flexes and the hole can become misaligned.)
I cut two holes in the side of the cap for air intakes. A self-stick Velcro strip on the side of the cap held in place a 9-volt battery with a matching strip attached. A pre-wired battery snap-on harness ($1 at Radio Shack) connected to the fan allowed the battery to be detached for recharging.
There is an inherent problem with using a battery inside an icebox. When batteries get cold, their voltage drops. The most cold-resistant battery type is lithium, followed by NiMH. If you try this method, run your battery and fan in a refrigerator to test it.
At Amazon.com, I bought a rechargeable 9-volt lithium-ion battery and a charger for $9. That was a much better deal than using batteries that can’t be recharged. Cold temperatures seemed to have little effect on the lithium-ion battery’s voltage, but the battery was completely discharged after running the fan for 20 hours.
I assume two batteries wired in parallel would run it twice as long, and for a daysail or a smaller icebox, it would be fine. But because our icebox is more critical to us when we make overnight cruises, I created another model that uses the boat’s 12-volt battery and a slightly larger fan. This provides more airflow.
Fan test #2
My second fan was a 60-mm fan (about 2 1⁄2 inches in diameter) designed to run on 9 to 13 volts and move up to 11 cubic feet of air per minute. It draws .15 amps at 12 volts. Hundreds of fans are listed at NewEgg.com. The one I used cost $5, with free shipping.
I mounted this larger fan in a plastic container that once held Campbell’s soup. It does a marvelous job of circulating the cold air inside the icebox. Because of its size, it doesn’t sit flat on anything, so I didn’t have to cut air-intake holes in the sides like I did for the smaller fan.
To power the fan, I used a cigarette-lighter plug on a length of 22-gauge wire. I close the icebox lid on the wire and plug it into a 12-volt outlet. The wire is so small, it fits neatly along the piano hinge at the back of the lid and doesn’t cause an air leak. Inside the box, the wire is held in place with aluminum-foil tape of the type used in air conditioning ducts.
To conserve cold air when I open the lid to take out food, I can stop the fan by simply unplugging it. I put a connector in the wire close to the fan so the fan can be removed for service or cleaning without changing the routing of the power cord.
If this kind of setup provides more airflow than you want, use a smaller fan or solder a voltage regulator into the circuit to drop the voltage. A tiny electronic module to do this costs about $3 at Radio Shack. Be aware that, if you go below 9 volts, some fans won’t run, or they won’t start spinning without a jump-start from your finger.
Since I made these improvements to the icebox, we can taste how much colder our food and beverages are on the boat. I’m sure they’re a lot healthier for us too.
Clarence Jones is a writer, news media consultant, photographer, sailor, tinkerer, and inventor. He and his wife, Ellen, live, work, and keep their Catalina 28 Mk II on Anna Maria Island in the mouth of Tampa Bay, Florida. Clarence has owned sailboats for more than 35 years. For him, part of the joy of sailing is the challenge of creating and building enhancements for his boat, especially when he can do it inexpensively. His book, Sailboat Projects, is available from Amazon.com.
Thank you to Sailrite Enterprises, Inc., for providing free access to back issues of Good Old Boat through intellectual property rights. Sailrite.com