Persistence’s owner thanks his lucky stars
Issue 74 : Sept/Oct 2010
Call it “boat tattooing” if you like. With a razor knife, a few ounces of epoxy, and some homemade wood filler, or maybe even your leftover coffee beans, you can add decorative elements, permanent lettering, or identification to wooden surfaces on your boat. Boat tattoos don’t take long to do and are fun to make. You can get creative and at the same time beautify beat-up or damaged areas. And, like body tattoos, they’ll last forever.
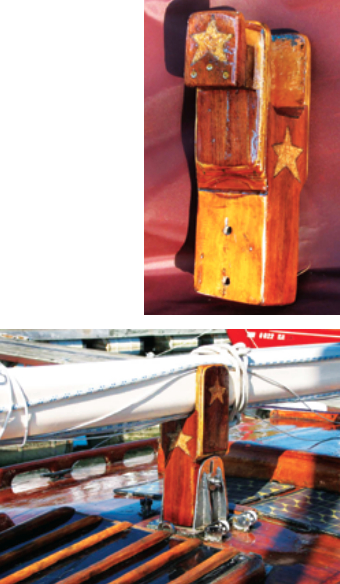
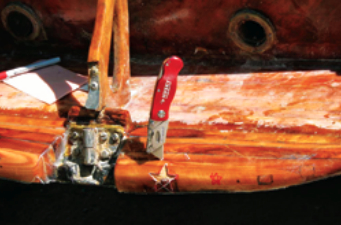
To celebrate my boat’s transition into her second quarter-century, I added some stars on the transom’s aft edge. Nautical stars have always meant luck. These were a pleasant design addition and easy to apply. I used a razor knife ($7 from Home Depot with 10 blades) to cut through the glass-and-epoxy surface layer. Since the surface was tough to cut, I used a woodcarver’s mallet made of lignum vitae. With a few light whacks of the mallet on the razor knife, the sharp blade sliced away clean lines for the stars. I carved the outlines with my razor knife, then scooped out a layer of wood inside them with a wood chisel. This left me with a star hollowed out to a depth of about 1⁄8 inch. And naw, this treatment didn’t seem to hurt the tough little razor knife’s fold-out blade holder.
Mixing up the colors
I carved four stars, two large and two small. Since Persistence’s cedar transom is golden-colored, I wanted the fill to be of a darker color to make the stars stand out. I selected a piece of dark mahogany from my wood box and sliced off some shavings with my razor knife. I put these mahogany bits into my household coffee grinder and ground the shavings into a fine powder. This would do for the larger stars. For fun, I also ground up some used, dried, espresso coffee-bean grounds. I now had two different filler colors. These I’d mix with epoxy.
Starting with the small stars, I brushed in some two-part boat epoxy. When the raw wood wouldn’t suck up any more, I added a stiff filler mix of fine-whipped espresso and mahogany to give me a dark surface.
For the larger stars, I saturated the raw wood with epoxy and stuffed the star cavities with mahogany-epoxy filler. In each case, I overfilled the surface. After the well-filled stars had dried and contracted a little, I used a hand sander with medium grit to level the protruding star surfaces to the surface of the transom. Now I had my beautiful stars . . . and perhaps I had given my boat a little good luck too.
A little sanding with a power sander using fine grit gave me a good tooth. A layer of epoxy over everything — raw stars and the surrounding varnished area — prepared the surface. I’ve found that you can brush boat epoxy over old varnish, provided you give the epoxy something to grip.
Now came the real payoff for all that work: making the final surface pristine once more. For the past 25 years, my 20-foot centerboard sloop, Persistence, has been bright finished with high-quality marine varnish fortified with UV filters. I thought the little boat deserved something new. I turned to one of the newer wood finishes, a two-part high-gloss, clear polyurethane with UV filters. This is the good stuff that — cough, cough! — retails for around $160 a gallon. I bought a couple of quarts.
A special luster
After I wet-sanded the transom I used my power sander, working with the quarter-sheet purple sanding papers put out by 3M, since these have a consistent cut and last a good long time. I used a fine grit overall so I could give the new epoxy and the old varnished surface a slight tooth. This would let the new two-part polyurethane get a grip and also give the surface underneath a certain refractory quality. Well-sanded surfaces seem to sparkle under final finishes. I wiped the sanded surface with a clean cloth lightly moistened with thinner, turning the cloth often. It’s important to keep your cloth clean or you’ll muddy the surface with old varnish dust.
To lay down my expensive two-part finish, I used ordinary disposable bristle brushes I buy by the bag at Home Depot. Some sailors buy expensive hair brushes and spend a lot of time and money cleaning them with solvents. Others use foam brushes. I don’t like the foam because it doesn’t seem to lay down the kind of thick coat I want. After fussing with a number of expensive brushes, I found having to clean them all the time was a bore. Hence the cheap disposable bristle brushes. After one or two uses, I throw them away. I’m not certain this costs very much more or is any less ecologically sound than using expensive brushes and solvents.
“Varnishing” is the most pleasurable and rewarding part of the entire process. On a clear, fresh day, without much wind, I chose a clean, new brush and began laying down the two-part polyurethane coating. With each stroke, the gleaming clear finish brought the wood to life and the whole job seemed to glisten with an amber glow.
That left the hull sides looking a little shabby and — can you see where this is going? — I wound up refinishing not just the new part of the transom but the entire hull and both sides of the cabintop as well as the deck. In the late spring sunlight the wood gleamed, and Persistence shone as never before.
Coming clean
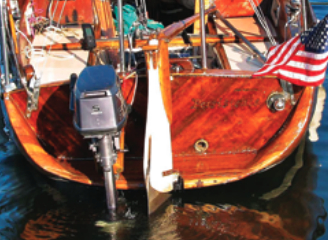
I admit that I had not limited my boat’s pretty tattoos to just a few stars on Persistence’s transom. Earlier, I had used the same process to permanently tattoo her name and registration number in the transom. This was the same process: I set up a typeface and size I liked on my computer, printed it out, and tried it out on the boat (it’s important to get the right size and relationship). I then cut out the image with my razor knife, taped the heavy paper to the transom, and drew around the outline.
I used my razor knife and chisel to get the 1⁄8-inch indentation and filled the cavity with a contrasting wood-epoxy filler. In this case, I used a homemade filler, courtesy of my kitchen blender, of golden-hued Sitka spruce. To provide a little contrast between the letters and the transom, I drew a black line around the edges with a Sharpie permanent marker.
A sea hood that had some old compass holes also got the tattoo treatment. As I eye my boat for some new tattoo opportunities, I see several more good places. A hatch has seen a lot of bumps over the years and there are some spots where hardware has been used and removed, leaving filled holes. A tattoo star would look good here. My custom-built tiller could use a star on its end — a minor decoration — and so could the ends of my Sitka spruce rubrails, which have seen their share of rubbing over the years.
Tattoos are fun, and I am happy to say you’re not weakening the wood; you’re really building it up with a wood-epoxy composite that is far stronger than the soft wood it replaces. So, if you have a broad wood surface that aches for decoration or a bit of blemished wood that has seen better days, maybe a tattoo would be a fine addition.
And, oh yes, did I mention that stars bring luck to a mariner?
Marlin Bree has had his fair share of luck while cruising his 20-foot homebuilt sloop on Lake Superior. He has written about his adventures in books, including Wake of the Green Storm: A Survivor’s Tale, and Broken Seas: True Tales of Extraordinary Seafaring Adventures. See what Marlin is up to at his website www.marlinbree.com.
Thank you to Sailrite Enterprises, Inc., for providing free access to back issues of Good Old Boat through intellectual property rights. Sailrite.com