An easy, low-cost project for the beginning canvasworker
Issue 36 : May/Jun 2004
Screen bags are an elegant solution to a couple of age-old problems aboard our little sailboat — namely where do we put all our stuff and how do we find it again when we need it? Our answer has been screen bags. We’ve found dozens of uses for them on our boat.
These bags are easily and quickly made, low in cost, good looking, and handy almost anywhere above and below deck. Making bags from screen instead of solid cloth has several advantages. The screen allows the contents to be seen easily, and air circulates much better through these bags, preventing mildew. The material costs less than either natural canvas or Sunbrella, and it doesn’t rot.
So far, I’ve made sheet and halyard bags for the cockpit, a holder for the air horn and winch handle (those plastic winch-handle holders are impossible to clean after a few seasons), and some bags for the interior. You can use these bags for food, for clothes, for dishes (even dirty dishes can be placed in them and towed over the side for a few minutes, feeding the fi shies and pre-scrubbing the plates!), for winch-handle holders, hatchboards, sails, life jackets . . . there’s literally no end to the possibilities.
The key material in these bags is fiberglass screening that you can buy at any hardware or builders’ supply store. It’s light, strong, and inexpensive. I paid $7 for a 10-foot roll of 24-inch-wide screening, and I’m still making bags from the original roll. I wish I could take credit for this idea, but I’m not the originator of this concept. Someone posted the suggestion for bags made from screening on the MacGregor/Venture email list. (I was unable to find out who wrote the original post, though the idea may be in a book somewhere.) I simply took this suggestion and developed it a little.
More durable
My thought was that by adding cloth edging to the tops, these bags would be a lot more durable and better-looking. I’ve used canvas tops for most of my bags, but I have quite a bit of scrap upholstery material left over from recovering my cushions.
Making these bags requires a sewing machine, but don’t panic . . . a sewing machine isn’t as expensive a proposition as you might think. I’ve made all my bags using an old straight-stitch machine from the early ’40s. A friend bought it at a garage sale for $10 and gave it to me. He had three. It didn’t come with a manual, but I was able to teach myself how to thread and operate the machine with a general sewing handbook from the library. The older machines are similar and not that difficult to use once you get used to them. Garage sales, estate sales, and secondhand stores are great places to find old, cheap sewing machines, and the all-metal construction often makes it possible to do heavy work with a few modifications (a great article on modifying a home machine for sailmaking can be found on Sailrite’s website, ). I used a heavy craft and carpet thread with a denim needle and had no problem sewing through four layers of canvas.
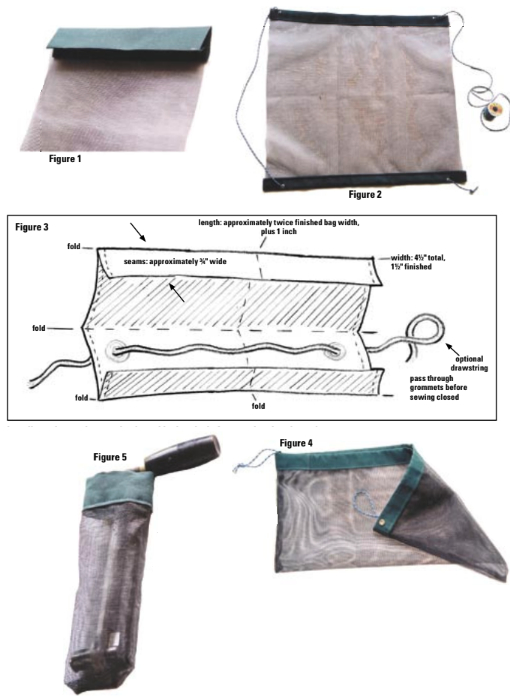
To make these bags, start by cutting a strip of canvas that’s about 4 1⁄2 inches wide for a small or medium bag. I used natural canvas, but Sunbrella would make nice bags as well. Draw a line 3⁄4 inch from the top and bottom edges. A yardstick is handy to have, and a thin piece of worn-out bath soap works really well to mark the lines. Fold the cloth in at the lines, and pin it into place if necessary. The canvas I bought had some kind of sizing added during the manufacturing process, making it stiff enough to stay in place when folded, so I didn’t have to pin it much.
Iron the strip
Fold the strip in half lengthwise. Ironing the strip will help the folds stay in place. Trim the strip at approximately twice the width of the finished bag size, plus an inch or so for hem allowance. For example, if you want a bag that’s about 8 inches wide at the opening, then you need about 17 inches — 16 inches for the bag and 1 inch for the hem. (See Figure 3.)
At this point, you need to decide if your bag will have an elastic cord or a drawstring. If it does, you need to install grommets near the ends of the strip. I used plain old sewing-store grommets with fine results, though if you can, get a small marine-grade or sailmaker’s grommet, which would be better. The smaller grommets usually come with a cheap setting tool in the package. It will do for the light use that these grommets will see. In other words, you don’t have to spend a bunch of money on a good grommet tool unless you really want to; regular grommets will work fine.
Thread a length of line or shock cord through the grommets and tuck a piece of screen into the fabric. A few pins will help hold everything securely. Being careful not to sew through the line, run a stitch along the bottom edge of the cloth. This will trap the line while binding the screen to the cloth at the same time. Of course, bags without a drawstring are easier to make, and in the case of halyard bags and on-deck holders, drawstrings aren’t necessary. In these cases, a pair of snaps work really well to attach the bag to the boat.
Once the screen is secured to the canvas top, the rest is easy. Fold the cloth strip back on itself, and close up the bag with a row of stitches. The stitch line is L-shaped, and runs through both the cloth top and the screen, then down and across the bottom of the bag. It’s a good idea to run an extra row of stitches beside the first for reinforcement.
Continuous bottom
It’s also possible to fold the bag differently so that the screen forms a continuous bottom and a row of stitches goes up each side, but this takes longer and is only slightly stronger. You could go crazy and make bags with canvas bottoms, and this might be the method of choice if you were making a circular-bottomed sailbag or duffel. I haven’t tried this yet, though. I’m still making, and finding more uses for, the small simple bags.
Reach into the bag and turn it inside out. This makes the stitching face the inside and the outer seams look more finished. That’s really all there is to it. After a little practice, you can probably zip one out in less time than it takes to read this article. I really enjoy making and using these little bags. I honestly believe that there are few boats so well organized that they can’t benefit from at least one or two.
Thank you to Sailrite Enterprises, Inc., for providing free access to back issues of Good Old Boat through intellectual property rights. Sailrite.com