Issue 8 : Sept/Oct 1999
If your good old boat is powered by an Atomic 4, a valve job is in your future sooner or later. When I purchased my Pearson Triton, I was told the Atomic 4 had been “running fine” three years earlier when the boat was hauled. I nonetheless decided to tear it down and rebuild it over the winter and was glad I did as I found all the valves thickly crusted and several sticking open. Perhaps a contortionist can complete a valve job with the engine in the boat, but the opportunity for dropping tiny irreplaceable parts (like valve keepers) into the bilge is far too great for me. Pull the engine, place it on a bench, and life is much better.
If you don t already have it, get Don Moyer’s manual before attempting any work on your Atomic 4. It makes life much easier. The first thing you will find in attempting your valve job is that you need a valve-spring compressor. Don recommends a “C” type valve-spring compressor. (He uses a Wilde 600.) I remembered the type from my very first car — a ’51 Merc with the famous flathead V-8. Unfortunately, all engines — automotive or marine — now come with overhead valves, and the compressors for an OHV engine will not fit in the tiny confines of our Atomic 4.
I called every automotive parts store within a 50-mile radius of my home and found no one who had an appropriate tool. The only helpful suggestion was to try a small engine repair shop since many small engines are still “L heads.” Of course, finding a shop willing to lend you their valve-spring compressor may be a challenge.
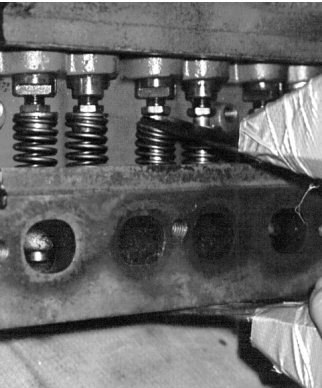
Fortunately, a workable tool is easy to make. For those who have not yet opened up their Atomic 4, the valves sit in the block right beside the pistons. When the head and access plate are removed, one can easily see the valves, springs, retainers, and tappets. The work is much easier if the engine is placed nearly upside down, resting so the valves are toward you, and the top of the block is down. (See picture on facing page.) All that is needed is to rotate the cam until the tappet is off the valve stem (the associated piston will be at TDC of compression stroke), then place your thumb on the valve face and one finger on either side of the retainer and compress the spring while removing the keepers with your other two hands. Of course the real problem is that you lack three hands and may also lack the strength to compress the valve spring with your thumb and fingers. Besides, the Atomic 4 lacks the space for three hands. What is needed is a tool that has the thumb and fingers shape and can be as smoothly and easily controlled.
How to make one
The valve-spring compressor must have one arm (the thumb) to rest on the valve face and another (the fingers) with a notch wide enough to let you get the keepers out but narrow enough to bear on the retainer and fit into the confines of the block. It must be capable of being applied and released smoothly. To make such a tool, you need two pieces of hardened steel about 1 inch wide, thick enough not to bend (approximately 1/8 inch) and 5 to 6 inches long. I used the handle ends of the two wrenches that came with my Porter-Cable router, but you probably have something similar around the shop. (This procedure does not impact their intended use once you are done.)
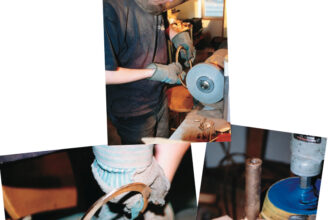
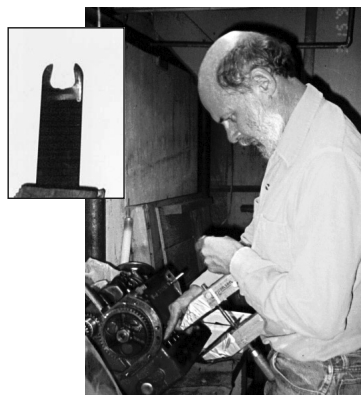
Take one piece and grind a notch to create two fingers. I used my 7-inch right-angle grinder with a metal cutting blade, but a similar blade can easily be used in a table saw (probably with more safety). Work carefully and leave enough “meat” on the fingers so they can’t bend. (See close-up picture in insert on facing page.) When the fingers are complete, attach them to a Jorgenson-type wood clamp with duct tape. (I was going to drill the wrenches and attach them to the clamp with screws, but the hardened steel proved too difficult to drill.) The duct tape will stretch and need replacing after about four valves, but that is a small price to pay for the convenience.
Putting it to work
To use your new valve-spring compressor, position the engine (with head removed) upside down on the bench. Adjust the jaws open just enough to fit over the valve spring and at a slight angle so that when the spring is compressed, they will be parallel. With the thumb on the valve face and the fingers on either side of the stem, turn the rear screw to compress the spring until the keepers are exposed. They usually fall off at this point. If not, you can remove them with an awl or small screwdriver. Slowly release the compressor, and you can slide the valve out. You can then remove the spring and retainer with your own fingers.
Carb cleaner and an expendable wood chisel work well for removing all the crud built up under the valve heads. In the April Good Old Boat newsletter I recommended using nail glue (the type used for fake fingernails) to attach the standard suction cup-type lapper tool to each valve to aid in lapping them. (That recommendation is reprinted in the sidebar at right.)
Nail glue? A few drops will do
This will come in handy sooner or later for all A4 owners. When hand lapping valves on the engine, the usual way to do it is to use one of those little suction-cups-on-a-stick holders to rotate the valve and apply some pressure for grinding. They never seem to really grip that well, especially after you’ve gooped the grinding compound everywhere. The alternative is doing it with your fingers working from above and below. That is hard on the fingers and slow going.
Here’s a better idea: nail glue. No, not Liquid Nails construction adhesive, but the modified super glue sold with those plastic nails for ladies’ fingers. A couple of drops of that on the suction cup, press firmly, and it’s stuck. You can grind away to your heart’s desire, spinning the stick between your hands (like a Boy Scout starting a fire). When you have finished that valve, carefully peel the suction cup off the valve, apply more glue and proceed to the next. The process eventually will ruin the suction cup, but you can get about four valves from each cup. Since there are two cups on each stick, you can do the whole engine on one $2.99 stick plus a few drops of your wife’s nail glue! (So even if you have to buy the fake nails, they’re under $10.)
Reinstallation is the reverse of removal. Position the valve spring and retainer in place with your fingers, slip the valve back in place, and then position your compressor and crank it down. You will need both hands to wiggle the keepers in place, but if you have the appropriate physique with adequate belly for bracing, you can control the compressor without using your hands as I am doing in the picture. Once the keepers are in place, release the spring slowly, and you are done. Your valve-spring compressor may now be disassembled and returned to its former uses none the worse for wear.
Mark Parker, M.D., is the assistant director of the Emergency Care Center at The Cheshire Medical Center in Keene, N.H. He’s been sailing since he attended college — Sunfishes, Lasers, Hobie Cats. He has begun work on a 16-foot trimaran, a “work in progress” temporarily sidelined when the Pearson Triton, Always, received a higher priority rating. Mark sails with his wife and family in Narrangansett Bay.
Thank you to Sailrite Enterprises, Inc., for providing free access to back issues of Good Old Boat through intellectual property rights. Sailrite.com