Renewal restores the psyche
Issue 100: Jan/Feb 2015
This is the second of two parts. In the first part, in the November 2014 issue, Matt described the process of removing the deck skin and soggy core of his Alberg 35, Magic. In this issue, he describes how he installed the new core and laminated the new skin.
Once I had finished the destructive part of my refit, it was time to begin the much more satisfying rebuilding phase. This would involve replacing the core, laminating a new top skin over it, and fairing and prepping the surface for paint.
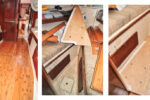
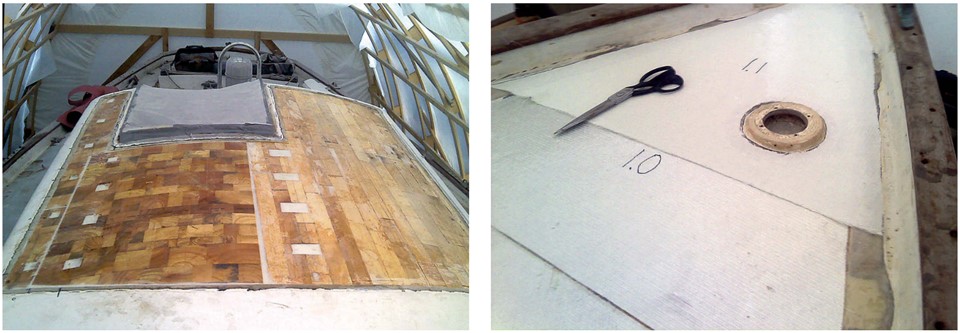
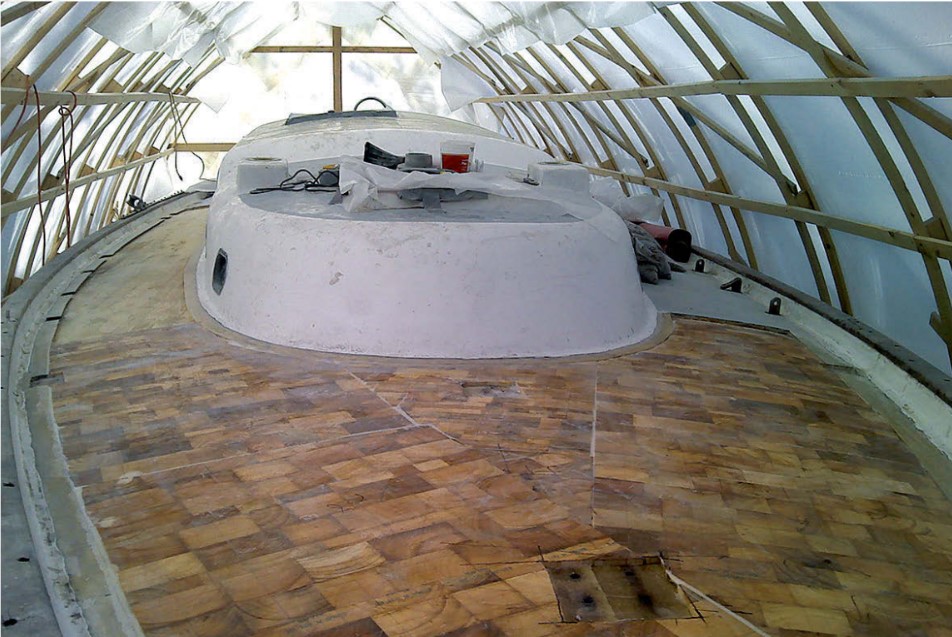
I bought a roll of rosin paper and cut out templates that fit into the area of the cabintop where the old core used to be. Once I was happy with the fit of the templates, I taped them to 2- by 4-foot sheets of 3⁄8-inch flexible balsa core (Baltek CK100 Contourkore). I tried to minimize waste by fitting as many paper templates onto the core as I could. This core material is made up of 2-inch blocks of balsa glued to a scrim backing to form a sheet. The blocks are nice because they will take the shape of almost any curve you want and are easy to cut. I used nothing more than a sharp utility knife to cut out the shapes to match the templates.
I double-checked the cuts by fitting all the balsa pieces in place and removed any balsa core from areas where deck fittings would be going. For these sections, I would be laminating multiple layers of biaxial glass fabric to form a solid plug. This prevents water intrusion into the core where the fittings are mounted.
It’s important to have everything cut and fitted prior to mixing any epoxy. You don’t want to find out after you’ve mixed up a pot of expensive epoxy that something doesn’t fit. Preparation is the key; checking and rechecking every fit saves a lot of frustration in the long run. Once I was completely satisfied with the fit, it was time to get sticky.
Mixing epoxy
I chose System Three epoxy because I was able to get a good price locally and I really like their 2:1 ratio of resin to hardener. Over the years, I’ve found through trial and error (mostly error) that when I venture into the unknown with a new project I tend to stress out a bit. Normally this isn’t too much of a problem, but I tend to make really dumb errors when I’m stressed and it usually involves math. It is much easier for me to figure out how much hardener I need if I pour 16 ounces of resin with a 2:1 ratio than with a 5:1 ratio or something else. I simply divide by 2 and pour the hardener. Others may not agree, but when I’m in the middle of a layup and I need to mix 15 batches in short order, I don’t want to have to think about ratios too much.
The cheap mixing pumps that screw onto the jugs help with the ratio problem, but I’ve had a number of problems with them over the years. They tend to suck air bubbles into the metering chamber if the temperatures are on the cool side. This can result in a mess of uncured chemical syrup on whatever it is you thought you were laminating. It is not fun to clean up. Geared metering pumps are available that are very reliable but expensive.
The best approach for me was to measure everything by volume in cups. I priced one-quart graduated plastic mixing containers and found that, even though they were only about $1 each (they are cheaper online), the cost would certainly add up, as I would be using hundreds over the course of the project. I bought just a few of them and experimented with plastic containers I had in the recycle bin at my house. I found that one-quart yogurt containers make a perfect disposable epoxy container. I went to the recycling station at the dump the next day and brought home a stack of 200 (the dump was happy to get rid of them).
When mixing the epoxy, I first poured the desired quantity of resin into one of the graduated quart mixing containers and the proper volume of hardener into another of the graduated mixing containers. Then I poured both into a quart yogurt container to mix them. That way I was able to reuse the graduated quart containers and save a few dollars (I marked each measuring container so I wouldn’t put resin or hardener in the wrong one). Eventually, these containers get messy enough they need to be replaced with clean ones, but over the course of the entire project I ended up using only eight graduated containers and more than 120 quart yogurt containers.
Fitting the core
With the container issue solved, I began the process of installing the new core. I tried to limit the size of each section I was actively working on to roughly my arm span so I wouldn’t be wetting out too large an area.
I put on two layers of disposable nitrile gloves (they often break) and mixed up my first batch of unthickened epoxy. Using a 2-inch chip brush, I spread it over the inner skin on the deck where the new core was going and squished it up under the flanges where I had ground the bevels. I then did the same to the bottom side of the core about to be installed to make sure all the sections being bonded had adequate coverage. I used the remainder to wet out a bunch of little squares of biaxial glass I had previously cut. The squares would fill in the areas where through-deck fittings like stanchions and handrails were to be reinstalled. The solid glass would better support the fittings and prevent water from intruding into the balsa core around the fasteners.
Next, I mixed up another batch and, once I was sure the epoxy was thoroughly mixed, added Aerosil (fumed silica) to thicken the mixture. When thickening epoxy with fumed silica (or any thixotropic agent), I stir in a little at a time until I get the desired consistency. Once I had added enough Aerosil to reach a mayonnaise-like consistency, I took a notched trowel and spread it out in ridges over the unthickened epoxy I had just applied and then laid in the new core. At the same time, I also laid several layers of wetted-out biaxial fabric at the through-deck fitting locations.
Back at the mixing bench, I made up another thickened batch, squished it under the beveled flanges, and filled in any gaps between the existing deck and the new core. I used the remainder of the batch to fill the areas I had cut out for through-deck fittings and to fill any voids in the top of the core. I finished by putting down plastic sheeting and weighting down the whole layup with 1-gallon Ziploc bags filled with sand to ensure a good bond.
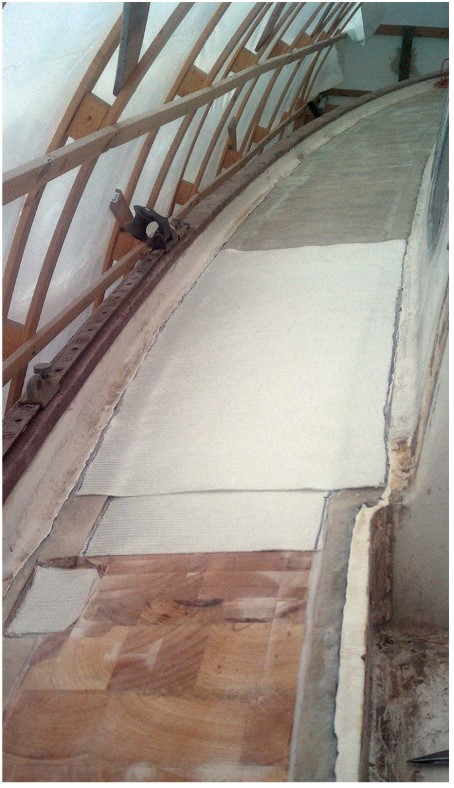
Preparing the top laminate
After letting everything cure for a day, I sanded smooth all the drips and bumps from errant epoxy in preparation for the first two of the eventual three layers of Knytex 1708 biaxial fiberglass fabric I had chosen for the top skin. I found it was easier to eliminate the rosin-paper template step for the fabric because I could just lay down a big piece and mark it out with a Sharpie to get the desired shape. I staggered the cuts for each layer so there were no overlapping seams. The first layer was smaller, roughly the size of the balsa core, and the second layer was larger to overlap the beveled edges of the old deck.
I had decided to do both layers at once to save the step of sanding the first layer before starting on the next. It certainly made for a more stressful lamination, because I was running around to get everything done, but overall I think it saved a lot of time. There isn’t anything overly complicated about laminating fiberglass, but you have to work quickly and need to pay attention to a few things before jumping in.
The biggest lesson I learned was to do the layup when the ambient temperature is falling. When the temperature is rising, you run the risk of having bubbles form in the layup, causing the lamination to have voids that will result in a weakened structure. I tried to schedule layups later in the afternoon when the temperature was going down.
I also kept my batch sizes as small as possible to keep the mix from heating up too much before I could spread it out. The largest batch I used for the entire project was 24 ounces. Common sense plays a big role in almost every other aspect of doing a layup; just make sure you have all the tools, wipes, and gloves ready. It’s frustrating (and expensive) to mix up a batch of epoxy only to find that you left your squeegee on the workbench back at the house.
Laminating
For the layup, I first wiped all the previously sanded surfaces with acetone. I then mixed up a batch of epoxy and wet out the surface where the glass was to be laid, using a disposable 6-inch plastic trowel for the big areas and a 2-inch chip brush for the corners and hard-to-reach places. Next, I set in each piece of the first layer of glass, making sure it was lying flat on the cabintop. Once all the glass was in place, I poured out the epoxy mix and spread it evenly over the entire surface with the trowel and worked it into the corners with the chip brush. When everything was thoroughly wet out (the glass turns from white to translucent), I ran the trowel over the glass to remove any excess epoxy that was pooling on the surface, leaving just the translucent weave of the glass visible.
I did the second layer in the same fashion, only I followed the last step by going over the entire surface with a laminating roller (aka bubble roller). I finished up by covering the layup with plastic sheeting and sandbags to keep everything flat.
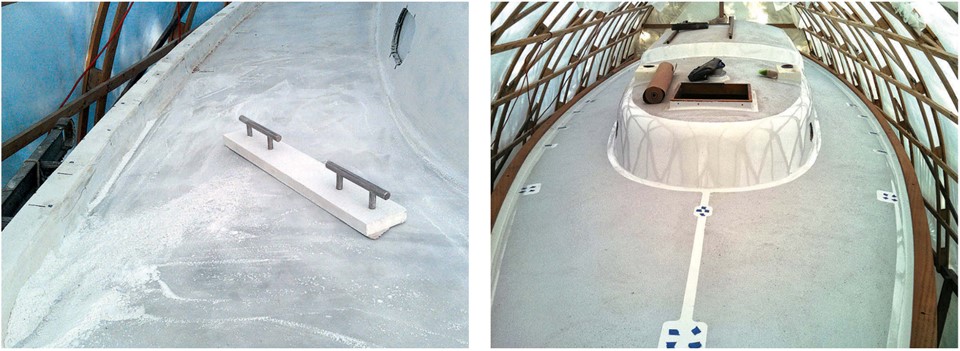
At this point, I moved on to the decks and used the same process. I worked clockwise around the boat until all the decks were re-cored and had two layers of glass laminated in place. One area I excepted was a 3-foot section on either side of the cockpit where I planned to remount the winches. I wasn’t sure exactly where I was going to mount them, so I laminated the entire area with no core, just seven layers of biaxial fabric. This would further strengthen an area of high stress and I wouldn’t have to worry about removing and isolating the balsa core when I decided where to mount the new winches.
The third layer
It was time for the third and final layer of glass, but I wanted to get the first two layers as smooth as possible so the final fairing would be minimal. First, I sanded everything over the course of several days to make sure the third layer had a good mechanical bond. While sanding, I found several low spots where the core and first two layers were not flush with the surrounding deck, so I did some pre-fairing. I mixed a batch of Aerosil-thickened epoxy, filled in the low spots, and let it set for a few hours so it would harden up to some degree but was still pliable (and would bond nicely with the third layer of glass).
Next, I worked around the boat again, wetting out and laying in the third layer of glass. I completed this job in 4- to 6-foot sections over the course of a week to keep it manageable. This was the first time in many years Magic had seen solid decks. Of course, there was a lot more to do, but the psychological milestone was huge.
Fairing the surface
After a bit of research on fairing and fairing products, I found that there were several options. Many easy-to-use epoxy-based pre-thickened mixes are on the market. Some cure fast enough for several applications in a single day. They’re all great for fairing, but the downside is that they’re very expensive if you have a large area to cover. Since I already had plenty of regular epoxy on hand, I decided to make my own. However, using Aerosil alone to thicken the epoxy would result in a surface that is not easily faired (read: it’s like sanding granite). I tried a few different fairing powders but settled on a 2:1 ratio of Q-Cell filler (quartz microspheres) and Aerosil. This gave me a creamy mixture that spread nicely and sanded even better.
The fairing stage is like an art project; the more time spent refining your technique, the better the result. With Magic, I had ample opportunity to practice. Starting on the aft deck, I worked my way around the boat counterclockwise over the course of three days, skim-coating the entire surface (1⁄8 inch or less). When I got back to where I had started, I made a few sanding boards of varying length and slightly flexible and went at the decks with 60-grit paper. The idea behind sanding boards (longboards) is that with such a large footprint, you will get a fairer surface than with something smaller like a random orbit sander that would follow any depressions in the surface.
Many people call the process of sanding decks fair with longboards “torture boarding” but, aside from the dust and the time it took (5 to 8 hours over the course of a week), I found it to be quite satisfying. I’d stop and vacuum up the dust every 10 minutes or so, check my work, and move on if it looked good. I could really see how the technique I used for spreading the fairing mix improved as I followed my work around the boat. The first section had lots of ragged edges and peaks, while the last section barely needed any sanding at all. Once I finished up the first fairing pass, I spot-filled some of the areas that were low and repeated the longboarding process until I was satisfied that my decks were fair enough and ready for primer and, ultimately, paint.
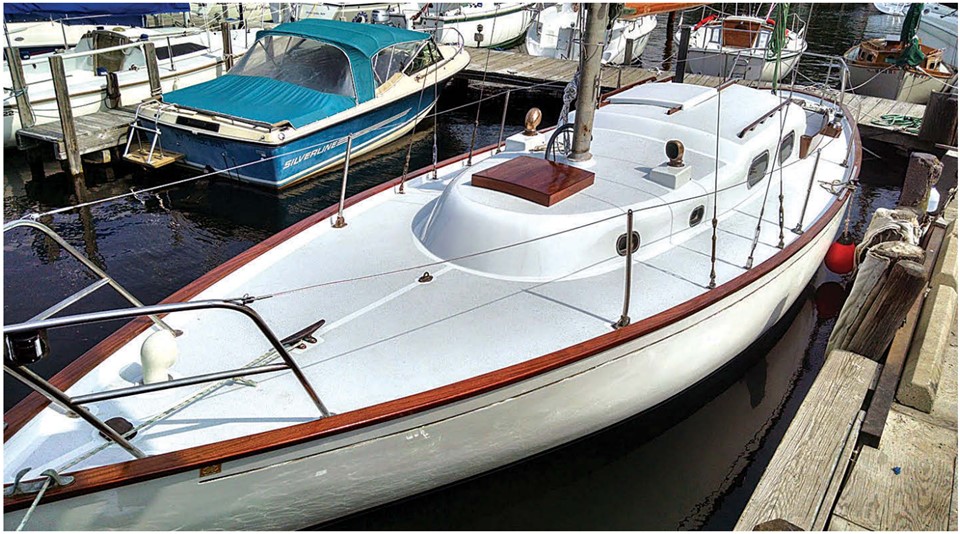
A big job completed
There’s no question that re-coring the decks of a boat is a big job, but the tasks involved are not above the skills of the average caveman carpenter with some basic tools, a lot of patience, and plenty of time. Any new skills acquired can be considered on-the-job training that can be practiced and repeated if you’re not satisfied. You get to decide what is good enough.
With two young kids, a paying job, and an actual life beyond sailing, it took me almost two years to complete the re-coring of Magic, so I had a lot of time to practice and decide what I thought was good enough. Sure, there were times when I wanted to throw in the towel, but by focusing on the task at hand while keeping the ultimate goal in mind, I was able to see it through to completion.
Materials and tools
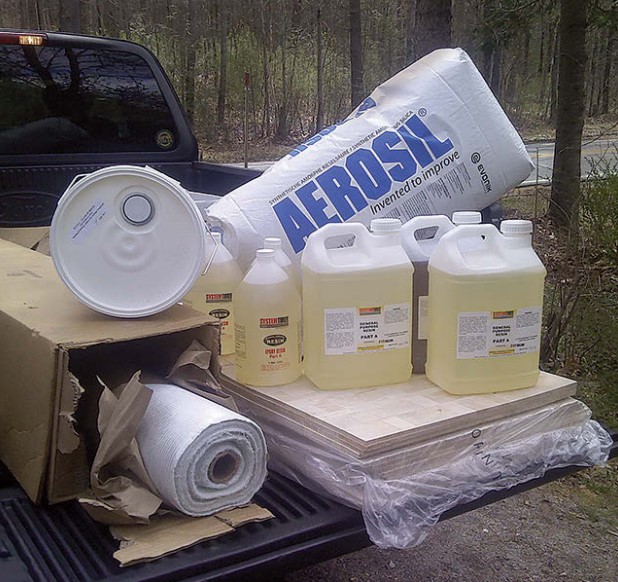
Matt purchased the bulk of his laminating tools and materials at Merton’s Fiberglass Supply.
• Baltek CK100 Contourkore 3⁄8-inch
• System Three epoxy
• Aerosil
• Q-Cell
• Knytex 1708 biaxial fiberglass fabric
• Gloves (nitrile)
• Squeegee
• Laminating (bubble) roller
Other supplies came from home-improvement stores and other sources.
• Rosin paper (for templates)
• Graduated mixing cups (1 quart)
• Yogurt containers (1 quart)
• 2-inch chip brushes
• Plastic house trim for longboards
• Sandpaper: 60-grit to 220-grit
• Acetone
• Wipes
• 6-inch disposable plastic trowels
• Plastic sheeting
• 1-gallon Ziploc bags filled with sand
Matt Bowser got the sailing disease at a very young age and has been afflicted ever since. After a four-year restoration project, he and his family are finally enjoying sailing Magic again on Lake Winnipesaukee in central New Hampshire. Follow his project blog at www.alberg35.com.
Thank you to Sailrite Enterprises, Inc., for providing free access to back issues of Good Old Boat through intellectual property rights. Sailrite.com