Investing in overhead pays dividends below
Issue 101 : Mar/Apr 2015
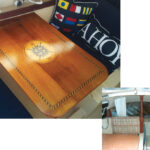
Having owned my almost-40-year-old Islander 36 for 17 years, I am always looking at ways to renew its beauty. One of the items that needed updating was the headliner. Made of a white perforated vinyl material, much like the headliner in my old VW bug, it had yellowed and become unstapled along the edges. Since I had been wanting to check the integrity of through-bolted deck fixtures, and the only way to do that was to open up the headliner, I was doubly motivated.
Normally I can be quite impulsive, but anticipating this to be the biggest project I’d taken on to date, and accepting that I am not a truly gifted craftsman, I figured I should spend some energy researching my options and working out a solution to fit my skills. Having sailed on a wide variety of boats, from C&Cs and Sabres to Beneteaus and Jeanneaus, I had developed a fairly wide knowledge of how other manufacturers finish their overheads. To get an idea of how other Islander 36 owners have dealt with headliner restorations, I spent some time perusing the Islander 36 website and communicating with other owners about what worked for them.
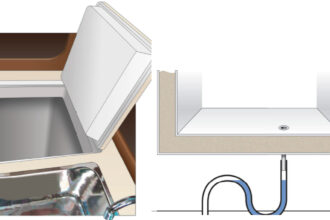
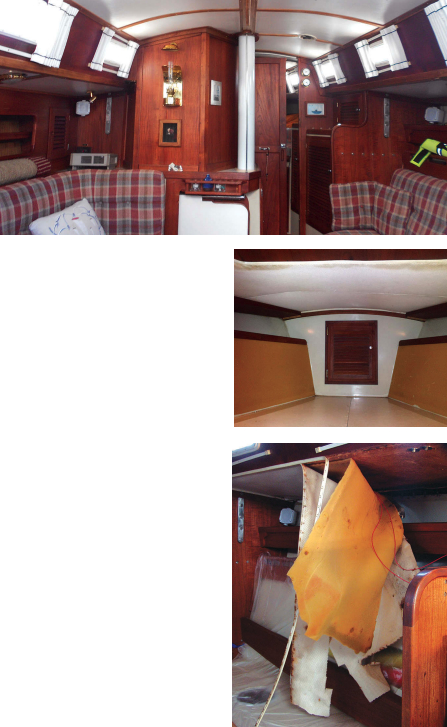
There were lots of options, including fairing out and painting the overhead, gluing fabric onto the bare overhead, and creating new headliner panels using any of a variety of materials. I settled on a rather traditional look of removable white panels trimmed and held in place with teak battens.
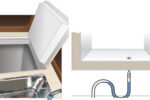
I wanted a durable surface that was easily cleaned, so I chose a hard plastic material for the panels called Panolam Fiberglass Reinforced Wall Board (FRWB). I found it at Lowe’s in white and almond, and similar products are readily available at home-improvement stores under other brand names like Sequentia and Glasliner. The two sides of this material have different textures; one has a shiny, pebble-like finish and the other is rather dull and smooth. I decided to expose the smooth non-glossy side.
Finding enough teak at a reasonable price for the trim took some doing. One day at our local recycling store I came across a mother lode of ready-to-finish 1⁄4-inch-thick by 1 3⁄8-inch-wide teak battens in a variety of lengths at a very good price.
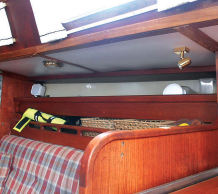
As originally constructed, the Islander 36 has few good handholds for crew to grab when moving about in the cabin with the boat under way. It seemed that a teak handhold along the centerline would be a good addition. I found an appropriately sized handrail at my local chandlery.

Planning and preparation
The first step, once I had located the materials, was to create a plan for the size, shape, and placement of each panel. Fortunately, the Islander 36 Association has the line drawings for the boat on its website, so I printed out the overhead view and began to pencil in the panels based on cutting my materials in the most efficient way.
I was ready to remove the old headliner material. The original vinyl had been stapled in place along the edges, with trim pieces added to hide the staples. It was easy to remove the edging and vinyl by grabbing a corner and pulling, since most of the staples had deteriorated. Underneath the vinyl was 1⁄8-inch-thick open-cell foam insulation that had also been stapled in — and also pulled loose easily.
However, while the old headliner had come off easily, it left behind hundreds, if not thousands, of staples and pieces of staples that would have to be removed tediously, one by one. I modified an old small screwdriver by bending it over at the point and grinding it narrower. Loosening the staples with this screwdriver and then pulling them out with a small pair of flat-nosed pliers was the most efficient way I found to remove them. Just the same, it took almost 40 hours to remove them all.
Once the headliner and old insulation were removed, I had a great opportunity to inspect the through-deck fittings for leaks and to inspect the backing plates for my lower shrouds. The deck and cabintop were reinforced on the inside with plywood and I was relieved to find that, at close to 40 years of age, the decks were sound.
Foundation and insulation
Acknowledging that I needed insulation between the cabin roof and the new headliner, but not wanting anything that could absorb moisture, I went with a material called Reflectix that had been recommended by others who had used it to insulate their boats. This material is available at home-improvement stores and looks something like foil-covered bubble wrap.
The insulation would need space behind the FRWB panels. I decided to glue strips of plywood to the coachroof to create the necessary space for the insulation and provide anchor spots for the panels and battens. To get enough space, and to more easily form them to the curvature of the Islander’s overhead, I chose to laminate two pieces of 2-inch-wide, 3⁄16-inch plywood one on top of the other.
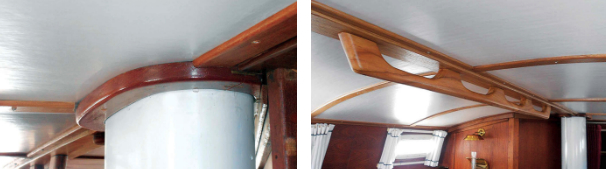
I located the centerline of the boat and laid the first plywood strips fore and aft along it. These strips were 4 inches wide so I could attach the handrail to them.
I realize that a handrail should really be through-bolted. That was not an option for me in this project, so I worked out a method that I felt would be the next best. I through-bolted the handrail to a 1⁄2-inch-thick piece of teak that I could then glue and screw to the strip that I had already attached to the centerline of the coachroof.
For laminating the strips and gluing them to the coachroof I used West System Six10, a rather new epoxy-based material that comes in a tube to fit a standard caulking gun, is easy to work with, and cures quickly. I cut each strip to size, applied the epoxy, and held it in place with one hand while using an electric drill to insert several 1⁄2-inch #6 stainless-steel flathead screws that would hold the strip in place while the epoxy cured.
After the epoxy for the first strip had cured, I attached a second strip over the first in the same manner. Because boats tend not to have square corners or straight lines to start from, I found it was important to start by installing the fore-and-aft centerline piece before placing the other support strips. By starting from the centerline, I was able to create the square corners and straight lines I needed.
Once all the strips were in place it was time to attach the Reflectix with 3M Hi-Strength 90 spray adhesive (contact cement). I cut a piece of the insulation to fit between the laminated strips. After spreading dropcloths to protect the rest of the interior, I sprayed the adhesive on the overhead section, then took the matching piece of Reflectix outside to spray it. After letting the adhesive dry for 10 minutes, I attached the Reflectix, sprayed side to sprayed side, and it bonded immediately.
Panels and trim
The FRWB panels would be next. To get the most efficient use out of the materials, I made templates with thin plywood door skins, and to get the most out of each door skin, I started with the largest panel first and worked my way to smaller ones. Once I’d made and tested each template for fit, I transferred its shape onto the FRWB with pencil. When working overhead, and then laying out and cutting on material below you, it’s important to keep in mind the reverse orientation, especially if the material is two-sided like FRWB.
I made most of the cuts with a scroll saw, but the FRWB is flimsy and needs to be supported well. I did cut some pieces with my table saw, but found that it tended to chip the material more than I cared for. I attached the panels to the wood strips on the overhead with several 1⁄2-inch #6 stainless-steel flathead screws.
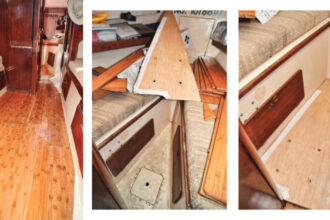
Back at home, I had finished the long strips of teak battens by first sanding them smooth and then applying at least three coats of a semi-gloss, water-based Aquafin varnish, letting one coat dry completely before applying the next.
Once all the panels were in place, it was time to fit the teak battens to the new headliner. Again, I started from the center and worked outward. I cut the pieces one-by-one, keeping in mind that there are few, if any, square joints. As I was making these cuts on board, I used a small, fine-toothed, Japanese pull saw.
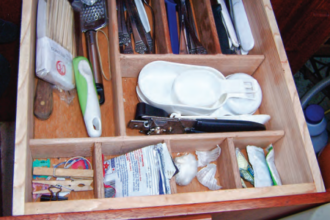
Several tools and methods could be used for determining the angles to cut. I found a variable angle tool to my liking for this work. I attached most of the trim pieces to the strips with three 3⁄4-inch #6 oval-head stainless-steel screws, one in the center and one toward each end. I didn’t add plugs in the battens as I wanted to be able to remove them easily anytime I wanted to mount a new piece of hardware or run an electrical wire above the headliner.
While most of the trim was straight, several places — such as around the mast, hatches, vents, and the companionway — required irregularly shaped pieces. I used scrap wood to work out their shapes before committing them to the expensive teak.
A satisfying job
I must say that, considering my very basic knowledge of woodworking, the project was not that difficult, although it did take longer than I expected. I stayed within my budget. I spent more on screws and adhesive than I thought I would but I saved considerably on the recycled battens.
It pays to buy the screws in bulk in packages of at least 100. It’s also important to measure twice, or even three times . . . and then to think about what you are about to do before making the cut.
The new overhead grabrail has made it much easier to move about on Islander under sail. A similar addition should be a definite consideration on any boat that lacks handholds below.
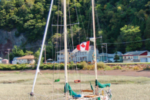
Mike Reed, over the past five decades, has sailed good old boats all along the left coast from Vancouver Island to Cabo San Lucas. Now retired, he lives in Bellingham, Washington, holds a USCG Master’s license and, as an ASA-certified instructor, teaches sailing for local sailing schools. Along with his wife, Karen, and their boat dog Diaz, Mike cruises the islands of the Salish Sea and beyond in their 1974 Islander 36, appropriately named Islander.
Thank you to Sailrite Enterprises, Inc., for providing free access to back issues of Good Old Boat through intellectual property rights. Sailrite.com