Make inspection and maintenance your watchwords
Issue 97 : Jul/Aug 2014
During the golden age of sail, old salts greeted new crewmembers with the advice, “One hand for the ship and one hand for yourself.” One trip to the yardarm during a howling gale to reef a flapping mass of wet, frozen canvas was all it took to validate this bit of wisdom. As Ol’ Jack Tar was often forced to hold on with his eyelids while manning the decks or working aloft, it’s little wonder a right good tar was said to possess a hand with “every hair a rope yarn, every finger a fishhook.”
Today’s sailor has it better with regard to staying on board but still has to contend with rough seas, wet decks, and bad weather. Modern safety gear — PLBs, handheld VHF radios, and personal flares — make it easier to find crewmembers once they’re overboard, but it’s the old-school stuff — harnesses, jacklines, and lifelines — that keeps them on board in the first place. Of this fundamental safety gear, none plays a more vital role than a vessel’s lifelines. It’s important to keep your lifelines ready, willing, and able.
Lifelines “just don’t get no respect.” Their condition and upkeep can be a matter of life and death, yet they’re often burdened with numerous unrelated tasks and used as clotheslines and all-purpose tie-down anchor points for fenders and lines. They serve as impromptu grab holds when boarding, fending off, or coming alongside. Even sailors who are aware of the role lifelines play in keeping them on board while under way often fail to realize their value at the dock (where vigilance is more relaxed) or while the vessel is hauled out, where a failure can result in a long fall and a hard landing.
The system as a whole
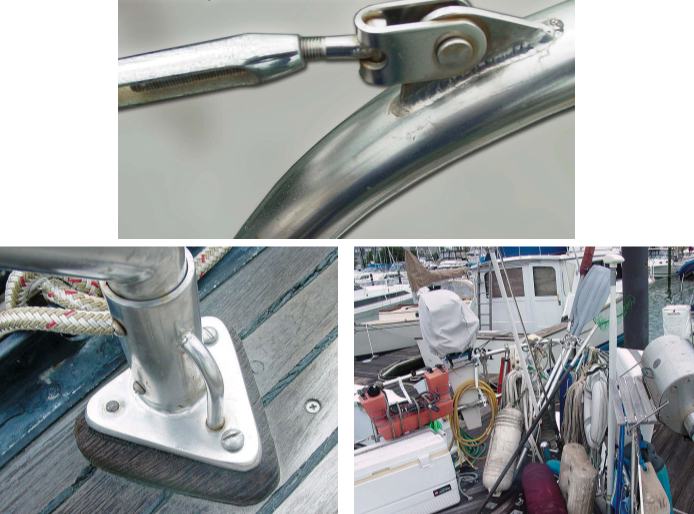
Mention lifelines and most sailors think of the wire running along the perimeter of a vessel’s deck, but that’s only half the story. In addition to lifeline wire and its associated hardware (pins, shackles, swages, and so on), it’s imperative to view the role played by stanchions, bow pulpits, and stern rails.
Stanchions keep lifeline wires at the correct height, provide rigidity to the system, and help absorb the initial
impact of a potential crew-overboard situation. Bow pulpits and stern rails are able to absorb the force of a flying body and they add strength to their associated stanchions.
Lifelines are commonly constructed of 300 series 7 x 7, 7 x 19, or 1 x 19 stainless-steel wire rope, but high-tech, low-stretch synthetic rope is increasingly being used. The first decision one faces with wire is whether to use vinyl-coated or bare wire.
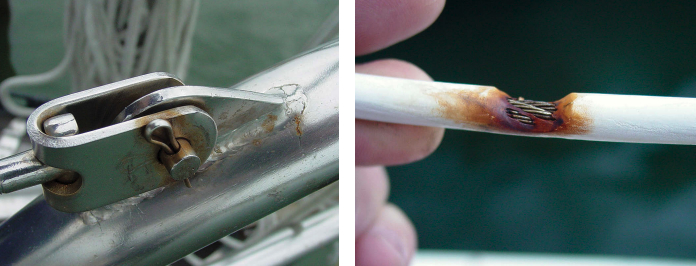
Coated wire looks nice and is easier on sails. Because it’s slightly thicker, it is also easier on hands. When the coating is worn or damaged, however, it can trap water that wicks along the wire and accelerates corrosion. As this corrosion is often beneath the coating, it remains undiscovered until a failure occurs. For this reason, vinyl-coated wire is not recommended and is actually prohibited by many offshore racing organizations.
Uncoated wire lifelines allow you to visually inspect their condition at all times. As the diameter of uncoated wire is smaller than the same-sized coated wire, you can enhance safety by increasing the wire size. In a pinch, larger diameter lifeline wires can even be used to fabricate emergency stays and shrouds. (See Don Casey’s argument for uncoated lifelines, November 2009. –Eds.)
For coated wire, the general recommendation is that lifelines be replaced every five years, regardless of how good they look. Inspect the plastic coating regularly for damage due to chafe or cracking from UV exposure or old age. Pay particular attention to the ends (often the first place corrosion occurs as the coating has to be cut back to install terminal fittings) and never tape over damaged spots that can trap water, as that makes matters even worse.
Rope lifelines
The use of Spectra, Dyneema, and other high-tech, low-stretch rope in lieu of wire has become increasingly popular. (See David Lynn’s report on installing Dyneema lifelines, March 2013. –Eds) The cost of rope is similar to that of stainless-steel wire, and rope has the added attractions that it’s lighter and doesn’t corrode. The disadvantages of rope lifelines are a greater susceptibility to chafe and UV damage that is more difficult to detect than wire corrosion. As a result, rope lifelines should probably be replaced more frequently than bare stainless-steel lifelines.
Inspecting lifelines
Lifelines epitomize the expression “as strong as its weakest link,” as failure of just one component can lead to someone taking an unplanned swim. When inspecting lifelines, take your time and be thorough:
- Make sure all clevis pins are pinned and all turnbuckle barrels are properly secured with turnbuckle nuts (and pins if possible).
- Clean and polish fittings, swages, and other hardware, then inspect each with a magnifying glass for stress cracks and corrosion.
- Inspect vinyl-coated wire closely for damaged coating and signs of rust.Replace the wire if you see chafe, cracking, or wear on the coating.
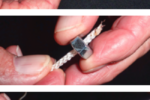
- To check uncoated wire for broken strands, take a handful of tissue paper, encircle the wire and lightly drag the tissue paper its entire length. Broken stands or “meathooks” will snag the paper. Don’t hold the paper too tightly or they may snag a little meat as well.
- Remove all lifelines annually and inspect them for kinks, wear, damage, or corrosion, paying particular attention to the wire at end fittings and where it passes through stanchions.
- If you use end lashings (a multi-purchase lanyard of small-diameter low-stretch line) rather than turnbuckles to attach and tension the lifelines to bow pulpit or stern rail, replace them annually. Lashings should be no more than 4 inches in length (with lifelines fully tensioned) and as strong as the wire they attach. Line strength is reduced at each bend of the line around a lifeline terminal eye and the corresponding pulpit attachment point. When calculating lashing strength, throw in a couple of extra turns for an additional safety margin. Some sailors use lashings so they can cut them to quickly lower the lifelines should they ever need to retrieve a crewmember who has fallen overboard.
- Check all lifeline hardware (gates, turnbuckles, and so on) to ensure that each is in good condition and adequately sized. It’s also a good idea to tape pelican hooks and similar gate hardware closed to prevent accidental opening.
- Verify the height of your upper and lower lifelines. The American Boat and Yacht Council (ABYC) recommends a minimum stanchion and top lifeline height of 24 inches, although heights of 36 to 42 inches are preferred. The recommended maximum height for lower lifelines is 9 inches above the deck. This is intended to keep an adult from rolling beneath the lifelines (consider fitting netting if there are children or pets on board). Rigging temporary chest-high lifelines of low-stretch line is also a good idea when heading offshore.
- Lifelines should be tight, but not to the point of bending stanchions or deforming the pulpit or stern rail. If, by using the muscles of your arm only, you can deflect a lifeline more than 2 inches by pressing down with your thumb at mid-span between two stanchions, it’s probably too loose and should be adjusted.
Stanchions
The condition of any single stanchion may not seem significant, but as each provides strength to the system as a whole, all must be maintained in top condition. Put off replacing that bent stanchion now and it may fail completely if it’s heavily loaded, such as when a crewmember falls against the lifelines in heavy weather.
Stanchion bases must be strongly constructed and through-bolted to the deck with properly sized hardware and backing plates. In some cases, the stanchion and base is a one-piece unit; in others, the stanchion slides into a socket in the base and is held in place with a setscrew or machine screw.
The best setup has the stanchion secured with a transverse bolt that passes through both stanchion and base with an additional setscrew to tighten the stanchion in the socket itself. Through-bolts (with locknuts or lock washers) or machine screws are preferable to Allen screws. If Allen screws are used, there should be at least two, with both threaded through the base and set into dimples in the stanchion.
An easy safety upgrade is to replace the lower setscrew with a machine screw. Drill a hole in the stanchion slightly larger than the screw (so it threads through one side of the stanchion) and use a lock washer to secure it in place.
Stanchion inspection
- Release the tension on lifeline wires and give each stanchion a good wiggle. If loose, determine if the cause is a sloppy stanchion-to-base fit (possibly due to a loose setscrew) or flex in the deck itself. Slight play due to the former is acceptable, but flexing due to a weak deck is a different story and must be addressed. Verify that the mounting hardware and backing plates for each stanchion base are of adequate size and strength. Backing plates should be two to three times larger than the stanchion base and constructed of 1⁄8-inch stainless steel or aluminum. Fiberglass or other composites (StarBoard, for example) should be between 3⁄16 to 1⁄4 inch thick.
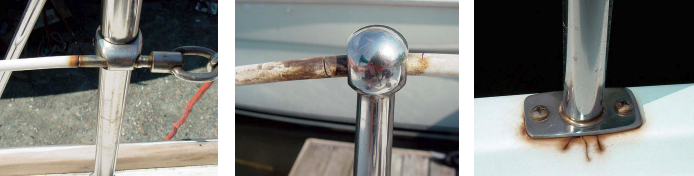
- Gelcoat cracks around stanchion bases (often an indication of point loading or thin, poorly reinforced decks) should be inspected thoroughly, even if seemingly cosmetic in nature. Installing larger backing plates or top plates can help reduce point loading by distributing stanchion base loads over a larger area.
- Inspect stanchions and their bases for bends, cracks, broken welds, looseness, and corrosion. Bent stanchions, as well as fractures in the stanchion or its base, are often the result of passengers or crew using stanchions to hoist themselves on board, but fractures can also occur if water enters the base socket and freezes.
- Combining dissimilar metallic components (a stainless-steel stanchion coupled with an aluminum base, for example) promotes corrosion and one or the other should be replaced.
- Tighten stanchion screws and all base-mounting bolts and hardware regularly, and replace any that are stripped or damaged.
Bow pulpits and stern rails
Sailors have an uncanny knack for finding a gadget or doohickey to occupy almost every bit of available space. As a result, stern rails (whose primary job is anchoring the lifelines) are often burdened with solar panels, outboard engines, wind generators, davits, barbecues, man-overboard poles, and more.
It’s almost impossible for designers to factor in the additional loads imposed by these aftermarket add-ons, but they can degrade the entire lifeline system. The best way to maintain structural integrity is to install arches, davits, and equipment independently of the lifeline system. If a stern pulpit is used as a mounting platform, additional supports may be needed. In some cases, the best solution may be to fabricate a new stern rail of larger-diameter tubing, with larger base supports or stiffening struts.
If any part of your lifeline system seems inadequate or fails to meet generally recognized standards, don’t hesitate to upgrade it — just make sure those retrofits are properly engineered and robust enough to get the job done.
Pulpit and stern rail inspection
Many of the inspection points for stanchions apply to pulpits and stern rails as well.
- Check that each base is properly through-bolted and verify the presence of properly sized backing plates.
- Ensure that all mounting hardware is in good condition, tight, and secured with lock washers or Nyloc nuts.
- Unlike stanchions, bow pulpits and stern rails typically use welded bases rather than retaining hardware. This means you don’t have to worry about loose through-bolts or setscrews. However, you will need to check all the welds closely for hairline cracks and corrosion.
- Inspect all lifeline attachment points (welded eyes and so on) for distortion, corrosion, and cracked welds. Clean and polish welds and hardware and inspect them for cracks with a magnifying glass.
Your lifeline system is one of your vessel’s most aptly named components. Life jackets, harnesses, and tethers are one line of defense, but nothing matches the 24/7 security blanket provided by a lifeline system — as long as it’s well-designed and properly installed and maintained. The time to make sure your system is up to the task is before it’s needed.
Frank Lanier is an accredited marine surveyor with more than 30 years of experience in the marine and diving industry. He has captained and maintained vessels from dive boats to passenger ferries in the Atlantic, Caribbean, and South Pacific. He’s also an avid writer, public speaker, and award-winning journalist whose articles appear regularly in marine publications worldwide. Frank sails his good old boat, Melelu, a 1978 Union 36, on Chesapeake Bay, although she’s currently in Marsh Harbour, Abaco, Bahamas. Find him at www.captfklanier.com.
Thank you to Sailrite Enterprises, Inc., for providing free access to back issues of Good Old Boat through intellectual property rights. Sailrite.com