Easy on the eyes and warm to the touch
Issue 97 : Jul/Aug 2014
The stainless-steel steering wheel on our 1978 Islander Bahama 30 was always cold on the hands and the eyes. I wasn’t a fan of expensive leather covers so, for visual appeal and warmer hands, wrapped rope around the rim. But a teak rim was always my dream. Edson offered a teak-rimmed wheel, but at more than I was willing to pay.
The question became: “How can I build my own?” I had never before tackled a project like this and couldn’t find any information on how it was supposed to be done. With my limited knowledge and woodworking skills, I approached it with trepidation. Friends thought it wasn’t possible. My fallback position was to return to the basic stainless-steel rim or wrap it in rope again. I don’t pretend to be a carpenter or shipwright and am not saying mine is the correct way to build a wooden wheel, but this is how I managed to do it at minimal cost.
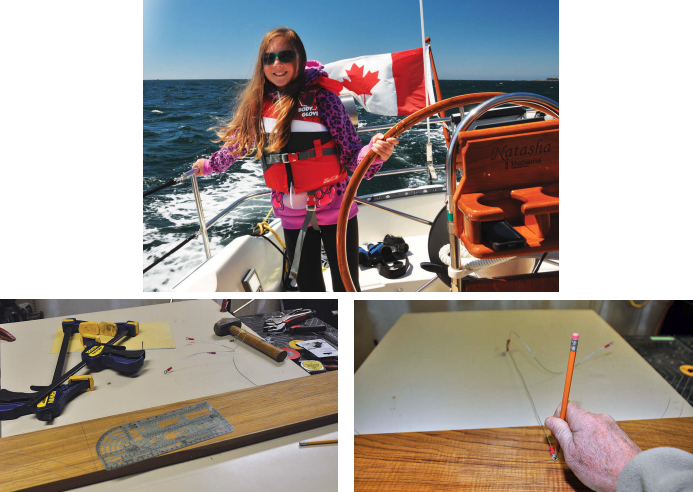
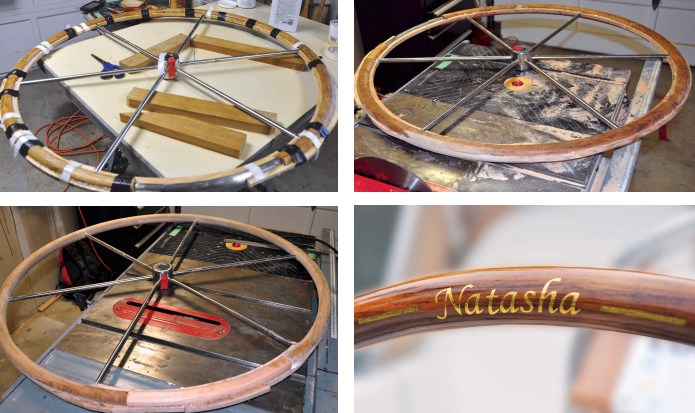
I started with the Edson 36-inch stainless-steel wheel that’s been on Natasha for a number of years. I took measurements with the intention of providing between 1⁄8 and 1⁄4 inch of solid teak over the 1-inch rim. Instead of a purely teak rim, I wanted oak inserts on the inside and outside edges, joining the fore and aft teak halves. I thought this would enhance the look and reduce the amount of teak required. I included an oak quadrant at the bottom of the wheel to provide a quick visual reference for the wheel’s position when sailing.

Measuring and shaping
The first step was to set up a measuring table. I used an old countertop and placed a nail in a position that would allow me to lay out the wheel’s radius. I measured two lengths of wire (as it doesn’t stretch) with eyelets at both ends, one to the inside and one to the outside radius of the wheel. This allowed me to mark cutting lines on a 1 x 8-inch teak board. To minimize waste, I drew the pieces as long as I could within the width of the board while allowing for overlapping pieces facing the opposite direction on the board.
I cut each piece just outside the drawn lines using a handheld jigsaw. A floor-mounted bandsaw would have been ideal, but you work with what you have. To ensure each piece would be identical, I clamped them all together side by side, then sanded them down to the drawn lines. I started with a belt sander and finished with a sanding block cut to the same inside and outside radii.
Careful with those tools!
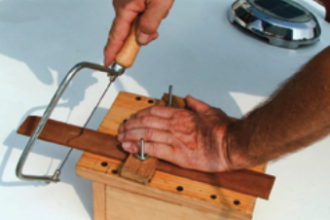
The next step was to round the edges of the pieces. I used a quarter-round router bit with guide bearing for accuracy and, being a coward with power tools, took small cuts with the table-mounted router until I achieved the desired edges. I then cut each piece in half lengthwise on the table saw (with great care — count the fingers!) creating two finished pieces (front and back) from each curved piece.
Hollowing out the cut pieces to accommodate the stainless-steel rim was the riskiest and most challenging part of the project. This would have to be accomplished using a 1-inch bullnose router bit. The standard straight router fence would not work; there was just too much room for error as the curved pieces were moved past the bit. So I built a curved router fence out of pine to the same radius as the outside dimension of the curved teak, aligning it carefully on the router table. Using plenty of practice pieces (did I mention that, whatever I did with the teak, I first practiced on much less expensive pine?) and multiple shallow cuts with the router, I now had the front and back shells for the rim.
The oak inserts between the front and rear teak pieces were next. Using the same procedure as with the teak pieces, I drew the narrow curved sections onto a 3⁄4-inch oak plank, cut the curves, then clamped them together and sanded them into shape. I wasn’t too concerned about the non-critical edges (those not facing the stainless-steel rim) so the photos show a very rough cut. Another time I’ll be more careful — it would save a lot of sanding! The inserts were cut to a width that would allow sufficient room inside the teak shells for epoxy once all the pieces were assembled on the rim.
Assembly and finish
Before putting it all together, I roughed up the stainless-steel rim with 80-grit emery cloth and washed it thoroughly with acetone. Using epoxy and filler, I came up with a thick, sticky, non-drip paste that I troweled into the hollow of each teak piece. I also coated the critical sides of the oak inserts. I placed each piece on the rim using overlapping joints and held them in place with elastic electrical tape. I was careful to ensure that each wood piece lined up with the next one on the epoxy bed. No clamping was necessary; the elasticity of the tape created sufficient pressure to bring the pieces together. Clamping would have simply squeezed out more epoxy and warped the teak. It was an anxious day waiting for the epoxy to cure!
The most time-consuming part of the project then began: sanding! Starting with a small sanding disc on an angle grinder, I sanded the oak inserts on the inside and outside of the rim until they were level with the teak. Then, using the sanding blocks again, and progressing from 80- to 220-grit sandpaper, I sanded the whole rim into a smooth, round profile. Around the spokes, I used a Dremel tool with a sanding disc.
Once I was satisfied with the shape of the wooden rim, I began the varnishing. I used Epifanes high gloss in seven initial layers, creating a very smooth, high-luster finish. Any good marine varnish would suffice. I had a local sign shop create the boat name in imitation gold leaf, placed it on both sides at the top of the wheel, and finished it with six more coats of varnish. Our granddaughter Natasha was most pleased and I’m very satisfied with the results. It took about 40 hours of spare time to build (and probably just as much time to varnish!) with minimal cost in material. The oak, epoxy, and varnish were already on hand from previous projects; all I needed to buy was the teak.
And now I have my wooden wheel!
Bert Vermeer and his wife, Carey, live in a sailor’s paradise. They have been sailing the coast of British Columbia for more than 30 years. Natasha is their fourth boat (following a Balboa 20, an O’Day 25, and another Islander Bahama 30). Bert tends to rebuild his boats from the keel up. Now, as a retired police officer, he also maintains and repairs boats for a number of non-resident owners.
Thank you to Sailrite Enterprises, Inc., for providing free access to back issues of Good Old Boat through intellectual property rights. Sailrite.com