Faster discharge from flooding waves
Issue 74 : Sept/Oct 2010
My boat’s original cockpit drains were adequate for a rain shower or a light wash-down but often became partially blocked with one thing or another that finds its way onto the cockpit sole. This had me wondering whether, if the cockpit filled with seawater, the drains could empty it before another wave boarded. I had my doubts, so I decided to install some good-sized freeing ports that could handle a sea breaking into the cockpit.
I figured that, if I located the ports on the cockpit “walls” high enough so they would come into play only in extreme conditions, they would not fill with junk. In addition, I decided to add flaps to prevent water from flowing in when sailing in following seas or when the boat was heeled. Finally, I wanted these flaps to be inboard, out of harm’s way.
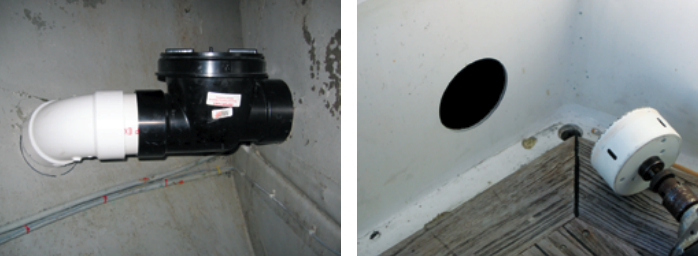
My solution was to install in the cockpit two ports, made up of 4-inch PVC, that would discharge well above the static waterline aft. Check valves (called backwater valves at the plumbing supply) located inboard in the lazarette would connect to the discharges with short pieces of 4-inch PVC pipe and 60-degree elbows. In the cockpit, the drains would be trimmed off with 4-inch Beckson inspection ports (which mate perfectly with the 4-inch PVC backwater valves). Different boat geometry may call for 45-, 90-, or 22.5-degree elbows, and possibly even street elbows, depending on where this arrangement will exit your hull.
Dry-fit everything
Based on what I learned, here are my suggestions. Dry-fit all your pieces. The goal is to get the end of the discharge pipe or elbow to hit the curved hull as close to square as possible. If your discharge pipe does not hit the hull squarely, try a different style elbow and/or longer pipe nipples. If it’s still not square, no problem — just remember to hold the hole saw at the same angle as the pipe.
While holding the pipe in place, trace around the assembly on the inside of the hull and on the cockpit wall. Stand back and rethink everything before taking out your huge hole saw. If you’re still satisfied, find the centers of your tracings and drill a small (easily patchable) hole at each center. Then check from the outside of the cockpit and hull: do these small holes represent the locations you had in mind? Are they the same on both sides? If not, now is the time to change them.
Now — having considered and reconsidered everything — take your hole saw and, working from the outside, cut your holes. Remember to hold the saw at an angle if your fitting or pipe hits the hull at an angle. Next, grind away any paint on the inside of the hull within a 1-inch circle around the holes. Take a moment to dry-fit your pipe and fittings one more time, then mark and cut the piece of pipe or the fitting end that protrudes through the hull so it will be flush with the outside of the hull. Make index marks on the fitting and the inside of the hull so you will align the fitting correctly.
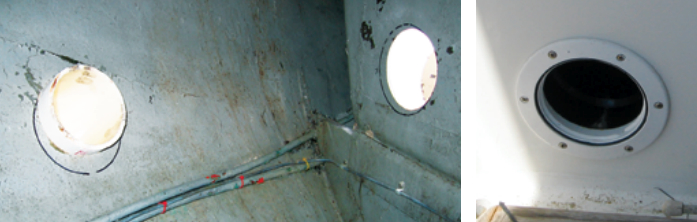
The trim ring on the cockpit side assures a solid installation and can be fitted with a cover if needed, at right.
Final assembly
Using the index marks to ensure they are positioned correctly, press the through-hull pieces so they are flush with the hull and attach them permanently.
I installed this first through-hull piece of pipe using 3M 5200 sealant and applied a large fillet of the same sealant around it on the inside. I have found this sealant to be compatible with PVC and to hold tenaciously when the PVC is rough-sanded where the sealant will go. You may wish to use the PVC gluing method outlined in the West System guide.
After allowing the sealant to cure for a minimum of 48 hours, assemble the other parts and fasten the inspection port rings to the cockpit wall. I used silicone sealant instead of PVC cement for this step. Silicone also holds well on PVC and offers more working time. It may also be possible to disassemble it later, if needed. Don’t forget which way the backwater valve must face: water out, not in.
If you install the check valves fore and aft, they won’t click and clack when the boat rolls at anchor, as they may if fitted athwartships. I have never installed the port covers, which are part of the kit, but I keep them in case a need arises. I worried that the discharge pipes would look like the dual exhausts seen on some big sport-fishing boats, but they’re hardly noticeable.
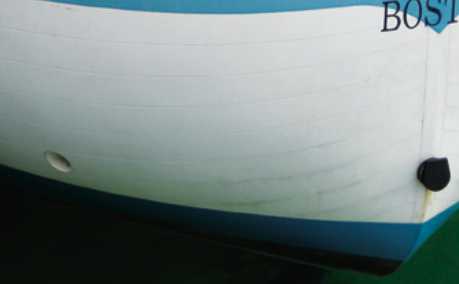
For the technically inclined, the amount of water that will flow through an unobstructed 4-inch hole is about 300 gallons per minute (gpm) with the water 1 foot above the lower edge of the hole. If the water is 2 feet deep, the flow will be twice that. So, two 4-inch ports would allow 600 to 800 gpm to escape from a cockpit flooded to a 2-foot depth. The truly paranoid (or those with very large cockpits) could substitute 6-inch PVC and get some very amazing flow rates indeed.
John Brooke resides on Cape Cod and has owned boats since he was 10. He has made several trips down the Intracoastal Waterway, and has sailed from Bermuda, through the Bahamas, and to the Windward Islands. He owns two boats and devotes his time to all things nautical.
Thank you to Sailrite Enterprises, Inc., for providing free access to back issues of Good Old Boat through intellectual property rights. Sailrite.com