Modifying an anchor-locker lid
Issue 95 : Mar/Apr 2014
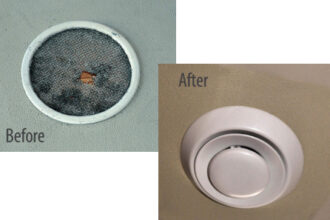
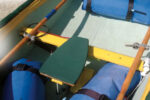
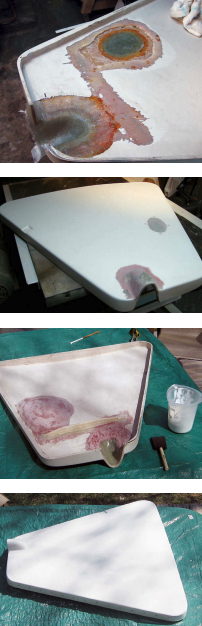
Our C&C 35, Secret Plans, came with a navel pipe on the anchor-locker lid for the anchor rode to pass through. It was also excellent for smashing toes on. Since we were installing an anchor windlass in the locker, we needed a smooth run of chain into the locker and wanted to remove the original navel pipe and patch over the hole.
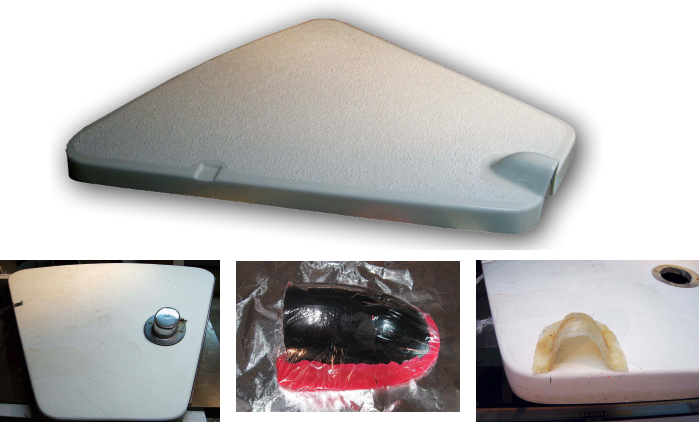
To get started, I made a male mold of what I wanted the new curved pipe at the forward edge of the hatch to look like. It had to accommodate 5⁄16-inch chain. I found a curved plumbing fitting of appropriate diameter and cut it to the shape I wanted. Then I applied Play-Doh to provide filleted edges. I “borrowed” the Play-Doh from my son’s collection, but didn’t think he’d miss the pink stuff! After covering this with Saran Wrap, I applied four layers of 6-ounce fiberglass wetted with epoxy. After the epoxy cured, I pried free the resulting female mold.
The next step was the messy one. I marked the forward edge of the hatch with the outline of the new cutout and cut this out with a jigsaw. I then used an angle grinder and 40-grit sanding disk to cut the taper on the skins. For a 1⁄8-inch- thick skin, a taper of at least 1 1⁄2 inches is required to meet the recommended minimum taper of 12:1. I also used a random-orbit sander to remove gelcoat on the top surface of the hatch around the new cutout area so I could apply some glass on that side and fair it in.
Around the cutout where the old fitting had been, the core was soaked and rotten. I cut back the inside skin until I found solid core. To make finishing the outside easier, I tapered the top and bottom skins from the inside.
Laying up
With the female mold waxed and taped in place and the hatch upside down, I applied the first few layers of glass and epoxy to the new navel pipe. Once that set up, I was able to remove the mold. I then applied many more layers of epoxy and glass to build up the thickness to about 3⁄16 inch, tapered to match the taper in the cutout. Flipping the hatch over, I cleaned the new material thoroughly to remove any residual wax from the mold and applied a few layers of glass to ensure a good bond.
To patch the old hole, I laid the upside-down hatch on a piece of 1⁄4-inch plywood with a layer of plastic between them. Clamping the plywood to the hatch gave me a smooth solid surface to lay the glass against when I applied the layers required to repair the top fiberglass skin. I cut new balsa core to replace the wet core I had removed and epoxied it in place. I then covered this with the replacement bottom-side glass and epoxy.
I was worried that cutting out a big section of the hatch edge would make the hatch flexible, so I also glassed a stiffening rib to the underside of the hatch. This piece runs from one side to the other, stopping short of the edges to allow it to fit properly in the deck cutout. The stiffener consists of five layers of glass laid over a piece of 3⁄8-inch balsa set on edge.
Fairing and finishing
Once all the glasswork was done, I used fairing compound and epoxy to fair the repairs and modifications. I quickly learned that, as with drywall, the key is to not add too much compound in one go. Once things were faired acceptably, I covered the fairing compound with a coat of epoxy to seal it and, when that had cured, gave it a final sanding.
I painted the entire hatch with Interlux Primekote, followed by Perfection topcoat, using foam brushes and doing the painting outdoors. The two-part paints are amazing, but they are also very nasty smelling and working outdoors was the only option. The representatives at Interlux aren’t kidding about humidity being an issue during cure; one night it was foggy and the humidity caused the paint to crinkle. I had to sand it smooth and redo it. I did not worry too much about the quality of the paint job anywhere except on the edges that would be visible on the finished hatch.
The last step, applying KiwiGrip non-skid material, was by far the easiest. I masked off the edges of the hatch, slathered on the KiwiGrip, and rolled it out with the special roller. As this stuff is not nasty smelling, I could apply it indoors.
The modified hatch has been in use for two years and still looks new.
Graham Collins is an obsessive boat modifier, a woodworker, and a manufacturing engineer of military electronics. He sails Secret Plans, a C&C 35-3, on the waters around Halifax, Nova Scotia, with son Sam and wife, Jill.
Thank you to Sailrite Enterprises, Inc., for providing free access to back issues of Good Old Boat through intellectual property rights. Sailrite.com