A Bermudan sloop gets an unusual makeover
Issue 95 : Mar/Apr 2014
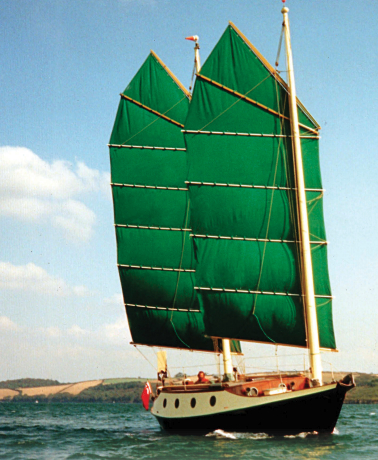
For many years and more than 110,000 miles, I happily sailed aboard a 34-foot, junk-rigged plywood dory. This rig was brought to the attention of small-boat sailors by Blondie Hasler when he sailed his modified 25-foot Folkboat, Jester, in the first Single-Handed Transatlantic Race with a single junk sail. (Note: For more about Blondie and Jester, see our article in the September 2002 issue. –Eds.)
Although the rig bears many similarities to those used in Chinese working boats, Hasler’s genius was in seeing how it could be adapted for singlehanding. In its ultimate setup, the sailor does not have to do any deck work at all: sail can be made, lowered, and controlled from one place with the operator almost entirely sheltered. Self-steering controls are also led within reach of this area.
The junk rig has so many advantages that, to those of us who have sailed with it, it’s a continuing mystery as to why it has never caught on. The ease of reefing is incomparable — it takes longer to describe than to do. The sail is divided laterally by a number of battens that take the stress off the fabric. These battens are generally used to delineate each reef (although there is no reason to be pedantic about this) so the right amount of sail can be set for the prevailing wind. The ease with which this can be done means that, when sailing into or out of an anchorage, the boat can be maneuvered under easy canvas at a pace that allows time to think. As the sail is fully automatic, all that’s required when tacking is to put the helm down, so the helmsman can concentrate on positioning the boat exactly where he wants it. This makes one much more likely to do things under sail, a source of great satisfaction to most sailors.
Junk-rigged boats have no wire standing rigging, thereby reducing cost, windage, and worry while enabling the sail to be fully squared away when running. This minimizes the chance of an inadvertent jibe and makes it possible to sail by the lee to an astonishing degree, making downwind sailing in a narrow, winding channel more relaxing than with other rigs.
Because the battens support the sail, the sailcloth needs to be neither strong nor particularly dimensionally stable, so fabric can be chosen for longevity and ease of sewing. This makes it easier for an amateur to make a sail. The lower battens along the straight leech of the sail are controlled by sheetlets controlled by the mainsheet. This reduces the loads on sheet and sail, so smaller rope sizes can be used.
When it’s lowered, the sail falls into lazy-jacks; all that’s required is for the sheet to be hauled in to stop the sail bundle from being a nuisance. There’s no need to tie the sail down (or to tie in reef points, for that matter) or even to cover the sail if it’s made of waterproof, sun-proof cloth.
The junk rig’s only drawback is that when the sail is made with flat panels and fitted to the typical short, fat cruising boat’s hull, performance to windward is less than startling. Many people insist on citing reduced speed to windward as a disadvantage of the rig, but since the overwhelming majority of sailors appear to reach for the iron topsail when the alternative is to beat, I don’t understand why people make such a fuss about it. In recent years, sailmakers have started to introduce camber into junk sails, making them much more powerful when close-hauled. Boats with these sails perform as well as their Bermudan-rigged sisters when beating to windward.
A yen for a junk rig
Since that unhappy day when Badger sailed out of my life, I had missed sailing with a junk rig. I am, I suspect, the world’s laziest sailor. I enjoy the way of a boat under sail, maneuvering the boat in close quarters, even steering when daysailing, as long as the boat is going more or less in the right direction and there’s lots to look at. What I don’t enjoy is fiddling with bits of string or physically handling sails. I get frightened on the foredeck and a flogging sail turns my knees to jelly.
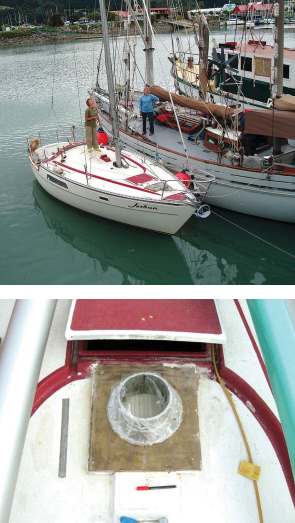
Alone after 35 years spent sailing as part of a couple, I decided it was time to have my own boat, to be able to do with it as I chose, and to be able to make my own decisions without compromise. Although boating is very popular in New Zealand, I was living on South Island where few boats were for sale. Reducing the choice even more, I had a very limited budget. At the time, there were very few junk-rigged boats in the country and the only one for sale was way beyond my means. Some will say my devotion to the junk rig borders on obsessive, but I included Bermudan rigs in my search. I found a boat, delightful in all other respects, that was only about 10 percent more than I could afford and, within a few weeks of first seeing her, became the owner of a Raven 26.
The boat was moored in Waikawa, more than 100 miles away, and to get her home I had to undertake a winter passage in the Cook Strait. Already during this first small adventure I had privately condemned her rig. While the roller-furling headsail was easy to use, the genoa car was not. If I didn’t adjust it, however, the sail set worse and worse as I rolled it in. To avoid that problem, I put a reef in the mainsail instead. What a performance! The so-called “jiffy” reefing took forever. The internal halyard was led back to the cockpit and several trips were required to lower sufficient sail and then raise some of it back up. The logic of the system failed me. Surely it would be much easier to handle the halyard from the mast, as I had to go there anyway to wrestle with sail slides and hook the cringle onto the boom. By the time I had finished, I was contemplating alternatives.
A conversion is hatched
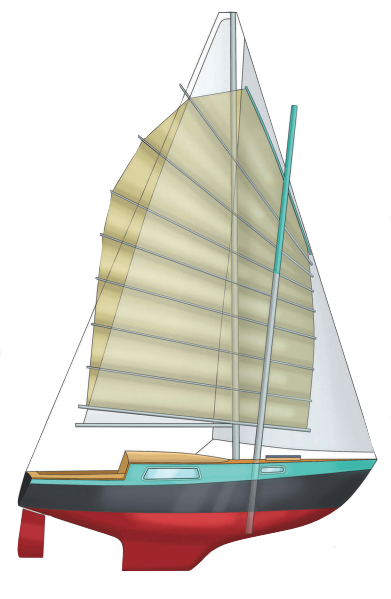
My onboard library contained a copy of Practical Junk Rig by Jock McLeod and Blondie Hasler. It’s considered the bible in the world of junks. It shows complete amateurs how to design and build junk rigs for their boats and I studied it in detail. I generally kept the idea to myself, knowing what most people would think, but when I mentioned it to another junkie (an apt word, as adherents of the rig tend to get addicted to it), David was eager to help. He was at the other end of the country, but it’s amazing what can be done with a little email and a lot of text messaging. I sent a drawing of the hull and rig, asking where the mast and mast step should be located.
Since I was reluctant to have the mast come through the head of my bunk, the design was less straight-forward than it might have been. This arrangement meant that the mast needed to be raked forward but, as this would help the sail hang out when running in very light wind in a slop, this was an advantage. I tend to emphasize this reason when asked about my forward-leaning mast. (To a friend who was shocked that I put comfort in harbor before sailing considerations, I pointed out that I would spend more time lying in my bunk in harbor than under way!) As I find forward-raking masts on junks enchanting, I was delighted with this solution.
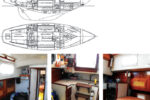
While David pondered, I toiled away at my drawings. I kept Practical Junk Rig at my elbow while working up a sail plan. One morning I opened my inbox and there was a PDF document with a perfectly executed sail plan. (David understands CAD programs.)
I had intended to do everything myself, but am not so foolish as to turn down the best of help for the worst of reasons. Another junkie, in the midst of refitting a 32-foot steel ketch in Auckland, offered me the use of a good sewing machine, a large table, and some “spare” sailcloth . . . enough to build the sail David had designed.
Suddenly, from toying with a future plan, I was committed to an imminent project.
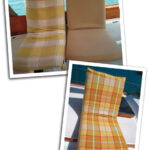
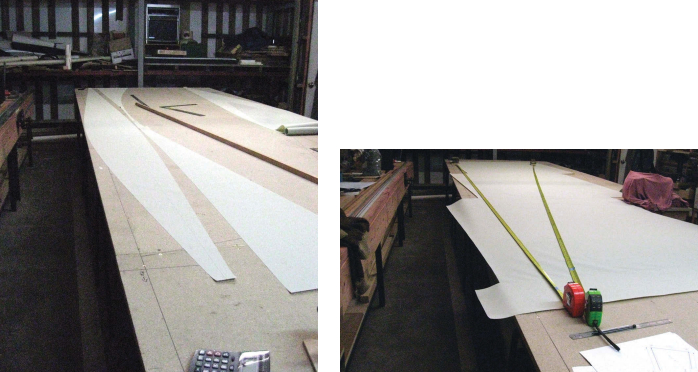
I was shown to a superb workshop that included the large table on which I could lay out fabric. Then Paul, my kind host, went back to his boat. The first hitch came when I realized the table was insufficiently long for me to cut full-length panels from the sailcloth (a polyester awning material called Odyssey). As there was just enough material, I wanted as little scrap as possible. Paul (also at home with CAD programs) reckoned he could knock out patterns to minimize waste. This he did, and I got out the scissors and started cutting and sewing. This was fairly straightforward.
Loft and cut
I am not good at planning too many steps at a time, and I can find myself reaching a stage where I am unable to see where to go next. When I started to cut the material, I didn’t know exactly how I would get to the end result. But once the material for the panels was sewn together, I could begin to see the whole process.
The latest thinking in the junk rig world is that it’s possible and beneficial to put camber in the sail, eliminating the weaknesses that plague flexible battens. But things are not as you might expect: instead of the camber being along the height of the sail, it’s along its length between the battens. There are several ways of achieving this. I used a method whereby lens-shaped pieces of fabric are sewn to the straight edges of the generally asymmetric panels.
The lenses decrease in size as they go up the sail and therefore require some basic lofting techniques, but the panels were more demanding. I started with the lenses to get the feel of things. This went well, so I began to loft and cut the panels. To do this, I had to measure the diagonals and — as the sail is more than 16 feet long from leech to luff — this was not straightforward. I found a couple of lead weights and weighed down one end of the tape measure while moving the other end.
As I cut the panels, I marked “top,” “bottom,” “luff,” and “leech.” For good measure, I added such notes as “to lens number 4.” I tried everything I could think of to ensure that nothing went wrong with the assembly. Odyssey is coated on one side; the coated side is shiny and the other is matte. I also had to take into account that the panels could not be accidentally reversed. In fact, I only had to undo one seam: a batten pocket that I sewed on wrong-side-up. All my graffiti paid off.
The final cutting job was the batten pockets. I had decided to fit them full-length. Because my mast was to have a 6-degree rake, I had difficulty working out just where the battens would lie against the mast. This made it impossible to be sure where the batten parrels (that hold the battens against the mast and stop the sail from blowing away from the mast) would have to be tied. I opted to forget about this problem for the moment and cut away the necessary material when I bent on the sail. Because Odyssey is coated, it doesn’t tend to fray.
Sew and finish
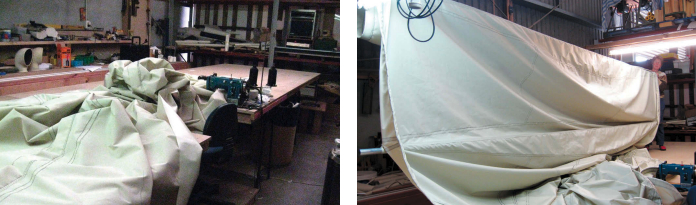
Once my pieces were cut, I was ready to sew. I started at the top, because those panels are smaller and easier to handle. In addition, the top of the sail is cut flat (as this is the area that stays up in heavy weather), so there were no lenses to sew. After that, I would sew a panel to a lens, sew on the next panel, then sew a batten pocket over the middle of the lens.
This way, I was working on the edge of the sail. It all went surprisingly smoothly, although my stitching was far from straight or regular. When I first started joining the panels, I rolled the sail I had already made into a tube, thinking this would be easier to push along the table, but it was reluctant to slide over the rough chipboard surface. Eventually I just shoved mountains of material back and forth. While this technique allowed the machine’s foot to do its thing and feed the fabric through, it was far from perfect.
I attached boltropes at the foot and head, to enable the sail to be slid into the slots on yard and boom, and sewed webbing on the luff and leech. Then I reinforced the corners and cut off all the long ends. The sail was finished. I hoisted it up on its boom and was not displeased with the result. I should have added grommets above and below each batten so I could lace them together should a batten break or a panel tear, but I had none available and put it off for another day.
A new mast
Now that I had a sail, it was time to think about the mast. It might seem that the sloop’s mast, longer than that required for a junk rig, would be ideal. Sadly, a junk’s mast, being free-standing, needs to be of heavy wall thickness and, if aluminum, has to be free of holes. The mast section also has to be more or less circular so stresses will be distributed evenly. I had to create a new mast for my boat.
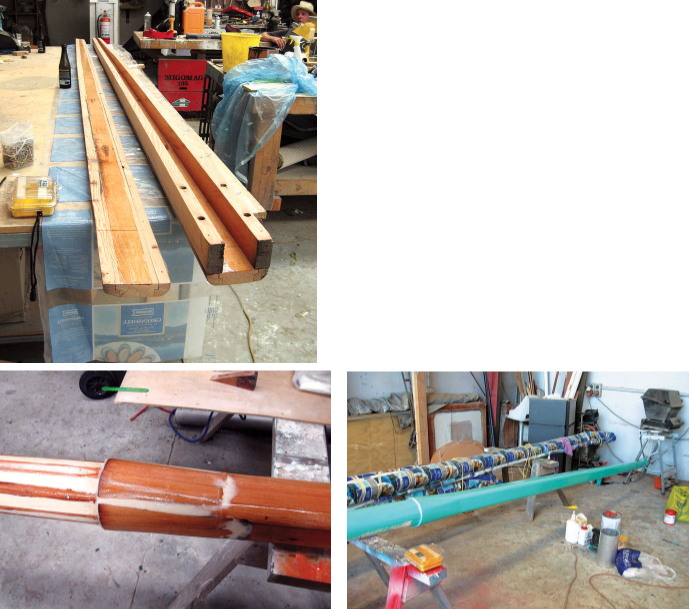
I investigated new and secondhand lumber, alloy poles of various shapes and sizes, and even fiberglass. When the owner of a neighboring boat presented me with a broken Oregon (that’s Kiwi for Douglas fir –Eds.) mast and a large beam of the same lumber nearly 5 feet long, I decided to go for a “hybrid” mast with an alloy base and wooden top. The longest length of 6-inch aluminum tubing I could buy was 19 feet 8 inches. I needed a 31-foot 2-inch mast and the topmast would need a bury of 1 foot 4 inches. I had just about enough wood. (If these measurements seem a bit odd, it’s because I’ve converted them from the metric numbers I used.)
The local boatyard let me use their shed and they cut the old lumber for me. I went over each piece with infinite care because the boatyard owner had made it quite clear that if he damaged his saw blade or planer, I would have to pay for the resharpening or replacement of a tooth. Once it was sawn, we were all impressed with the quality of the wood. I scarfed the shorter lengths of wood together and glued them into two long lengths. I then glued these to the two lengths sawn from the old mast.
The next stage was to pull out the screws, fill the holes, and sand the whole thing down. I then had to shape the mast. Because of the way I had put it together, there was plenty of wood at the top, so I could remove excess weight there to create a pleasing taper. I worked down the mast, planing off more wood as I turned the sharp edges into well-rounded corners, ensuring that there was still adequate thickness of wood to maintain the spar’s strength.
I now had a square-based mast that would have to fit in the round alloy tube. I filled out around the base to create an almost-circular section by fitting pieces of wood roughly to size and filling the gaps with thickened epoxy. Then I sanded the whole butt. I had bought an offcut of alloy tubing of dimensions similar to my mast and used this to ensure a good fit.
I filled screw holes and imperfections in the secondhand lumber and coated the mast with epoxy. The old wood soaked up plenty. Once it was well coated, I sanded it all down and covered it with a layer of glass and epoxy. This makes a very hard finish that can withstand the sawing back and forth of the batten parrels.
The next stage was to make a shoulder for the topmast, so it could rest securely on the alloy tube. Offcuts created when I scarfed the wood were useful here. This was then planed, filled, sanded, and glassed.
I ran a couple of wires up the mast — one for a tricolor light and one for an all-round steaming light — and painted the mast with pigmented epoxy, slightly thickened with silica, as an undercoat. Instead of making a masthead fitting, I glued some large hex-head bolts into the top, head down (I had left extra wood for this) and a large eyebolt for the halyard. I screwed stainless-steel eyes onto the bolts. (This caused a certain amount of tooth-sucking among various parties, with dire warnings about fatigue because the eyes are not meant to be used in this way. But they’re very big!) Finally, I used the eyes to suspend the mast while I painted it my favorite shade of turquoise, the color I later used on my boat when I repainted her.
Out with the old
While waiting for glue to dry, I prepared for the removal of the old rig. New Zealand yacht clubs and marinas rarely have their own mast cranes, so masts are left in boats for decades, apparently without problems. The usual plan should have been to hire a crane, but this was going to cost several hundred dollars. Instead, I consulted with my friend Dick, who knows how to use low cunning instead of raw power. We brought my boat alongside his Irene — a large gaff ketch — and used her gear for pulling my mast.
Now I had to reinforce the deck, make a large hole in it, and fit substantial partners to take the side load from the mast. As the mast is a cantilever, the greatest loads are taken at the partners. I also needed to fit a mast step at the correct angle and distance from the bunk bulkhead to give the mast a forward rake of 6 degrees.
Had I made the mast step and partners out of wood, I would have ended up with very large structures, so I bit the bullet and asked a local metalworker to make them of stainless steel. Galvanized mild steel would have been as good, but there were local issues making that option just as expensive. So with plywood on deck, a hefty piece of mahogany below, and plenty of thickened epoxy, I fitted the partners.
I now had to line up the step. I dithered and measured and worried and fretted. Finally, I got the alloy part of the mast, stepped it through the partners, and marked as well as I could where the step should go. The mast seemed to have an excessive forward rake, but I took photos and measured the angle and it seemed to be about 6 degrees. With help, I got the heavy tube out again and started another round of fretting and worrying as the marks I’d made didn’t match up with my earlier measurements.
I finally forced myself to bolt the step down. This was tricky because a previous owner had added some trimming ballast just where I wanted to fit my step and these random-shaped pieces of lead were very firmly secured with Sikaflex. Eventually, I filled in the gaps with huge amounts of epoxy until I had a solid layer into which to set bolts. Using the Gougeon method, I drilled oversized holes and set greased bolts into these, held in place by the step itself (also greased). When the glue had set, I backed out the bolts and cleaned up the step. Then I spread Simson’s Marine Glue, stuck the step down, and replaced the bolts.
Stepping the new
This done, I brought the topmast out of the shed and spread Simson’s glue over the butt. Using pieces of copper tubing as rollers, I moved it into the alloy base, which I had wedged securely on the pontoon. I had to get the mast into the boat quickly to avoid upsetting the marina management. I roped in several strong and willing friends. One moved his boat alongside mine, and we used his main halyard to get things started.
As his boat is smaller than Dick’s Irene, we needed far more brute force and bad language, but at last we had the heel of the mast over the hole and quickly slacked away a little on the halyard. More pushing and pulling on deck and then we went below to haul the heel back. Once it was past the half bulkhead, it gave up the fight and, as it was slowly lowered, moved gradually down and into its step . . . to my profound astonishment. Rejoicing, we released all the lines, I tapped in some temporary wedges, and we all stood back to admire The New Mast.
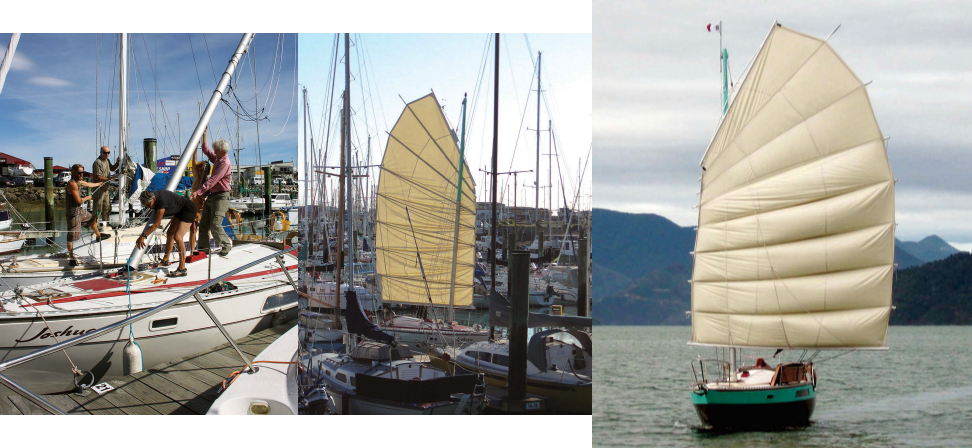
Next was the exciting bit: bending on the sail. A friend came by as I was feeding battens into their pockets and offered to help. He was amused by my refusal and explanation that I was enjoying doing it on my own. I had a lot of fun playing with new rope, knotting, and whipping. There is plenty of string on a junk and my cambered sail required some lines I hadn’t used before. The folds had a natural tendency to hang in diagonal creases and it took a bit of time to remove these. But finally I felt all was ready for a trial sail.
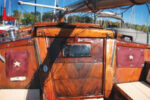
On a calm morning in early April, I started the motor, cast off the lines, and chugged out of my marina berth. I turned up the harbor and, with the last of the land breeze, shut off the engine and hoisted sail, ghosting through the marina and its rows of silent boats. Once in the Haven, we headed into the little breeze and the boat took herself to windward quite satisfactorily. We went through the entrance and out into Tasman Bay where the new sea breeze greeted us. As she lifted to the swell coming down from Cook Strait and heeled to the increasing wind, I looked up at the lovely sail, thrilled at what I had created. I tacked and jibed with nothing to do but move the tiller across. I dropped reefs and shook them out again. I felt in control and confident. The great fan rose above me and, like the little bird she is named for, Fantail ducked and swooped over the water. I felt a profound mixture of relief and contentment . . . relief that it all worked, contentment because I was once again sailing with the rig I love so much.
Annie Hill has lived aboard boats since 1975 and doubled the Atlantic before the age of 21. She has sailed more than 160,000 miles and crossed the Atlantic 17 times. After crossing the Pacific in 2006, she settled in New Zealand in 2009 and bought her 26-foot Fantail. After some time in South Island, she sailed to North Island where she happily lives and sails singlehanded. Annie is a fan of the junk rig and vows never to sail anything else again. Follow her adventures with her “junkie” friends at http://anniehill.blogspot.com.
Thank you to Sailrite Enterprises, Inc., for providing free access to back issues of Good Old Boat through intellectual property rights. Sailrite.com