An inexpensive way to keep the warm or cool air inside
Issue 36 : May/Jun 2004
When the winter chill comes on board or when you want to keep that cool air-conditioned air inside your cabin, sew yourself an insulated companionway door flap.
Supplies
- Sunbrella or other water-resistant fabric.
- 1 x 1-inch teak strip, as long as the width of your companionway sliding hatch.
- 1⁄4-inch-thick closed-cell foam (I used 27-inch-wide flexible neoprene foam from Quest Outfi tters).
- Four or five Lift-the-Dot fasteners (cloth-to-surface variety).
- Thin strip of teak or other wood.
Measuring
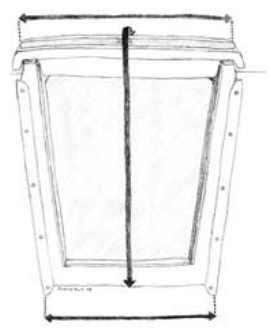
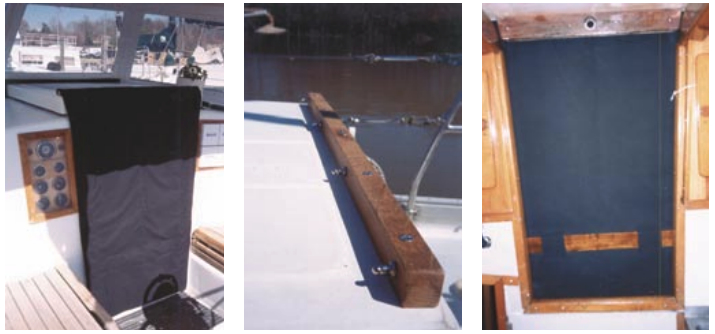
Measure the width of your companionway slide. Cut, varnish, and mount a 1 x 1-inch wood strip to the top of the companionway slide. Install Lift-the-Dot snap studs in the forward face of this wood strip, as shown in the photo on facing page. Measure from the forward face of the wood strip around the top of the strip and down to a little beyond the bottom of the companionway opening to get the finished length for your flap. Then measure the widest width you will want to cover over your opening (generally this is along the top edge) plus an inch or two to have it cover the edges well. If the widest area is not along the top, you will need to measure exactly where the width occurs in order to cut the fabric accurately. Then measure the slimmest width you want to cover (usually this is the bottom edge of the companionway opening) plus an inch or two to have it cover well (see illustration above).
Make a sketch of your measurements to help you plan the flap. Add 1 1⁄2 inches to the top and the bottom for hems. Add 1 inch to both sides for doubled-over 1⁄2-inch hems.
Marking and cutting
Lay the fabric out on a flat table or floor and measure the top width along one of the straight edges of the fabric and mark the bottom edge. Find the middle of your top edge and draw a perpendicular line down the length to the bottom edge. This midline will make it easier to measure any changes in width. Measure and mark the length overall. Now measure the bottom width using your centerline so that half the measurement is on either side of that line. Join the top and bottom edges. Using a straight-edge, draw the cutting lines — a knife-sharpened piece of chalk or a thin sliver of soap works well for drawing. Cut out two Sunbrella pieces and a foam filler piece (don’t include hem allowances on the foam piece).
Sewing
Fold the side edges of one Sunbrella piece to form a 1⁄2-inch hem and sew. Then fold over the top and bottom edges 1 1⁄2 inches and sew. Lay out the foam on this piece of Sunbrella and pin or tape in place. Hand-baste doubled-over stitches in about 12 to 15 places through the foam and Sunbrella so the fabric will not shift when sewing the edges. Sew the foam to this piece by sewing one side edge, then the opposite edge, and then the top and bottom edges. (Don’t remove the basting stitches yet.)
Next, make similar hems on the other piece of Sunbrella. Now place the two pieces of Sunbrella together so the foam is on the inside and pin or baste the pieces, matching the corners and encasing the turned-under hems (as shown in illustration at right). Sew. Along the top edge, sew one more row of stitches 1 inch from the edge. Mount female Lift-the-Dot snap fasteners to match up with the studs along the wood strip on the sliding hatch. Do them one at a time and test each one after putting in each snap.
Snap the new cover in place. I like to include a piece of clear vinyl window material between the Lift-the-Dot fastener and the fabric to protect the Sunbrella from chafe. To help the flap stay in place during gusty winds, make a casing of Sunbrella for the remaining strip of wood that allows the wood to slide in along the edges of the companionway entrance like your hatch-boards do (see photo above). Trim the wood so it slides easily. Now you can take out all basting stitches.
Thank you to Sailrite Enterprises, Inc., for providing free access to back issues of Good Old Boat through intellectual property rights. Sailrite.com