Unruly wires get herded onto a bus
Issue 72 : May/Jun 2010
Recently, a failed torque damper required the removal of our good old boat’s good old engine. I made arrangements with the yard boss to have the iron beast hoisted out but resolved to do all the prep work myself to keep the labor cost down. As I set about de-coupling couplings and un-clamping clamps, I found myself tracing innumerable black and green grounding wires to their many individual and often solidly rusted attachment points on the engine block. “Wouldn’t it be great,” I muttered to myself, “if all these ground wires were attached to one common point?”
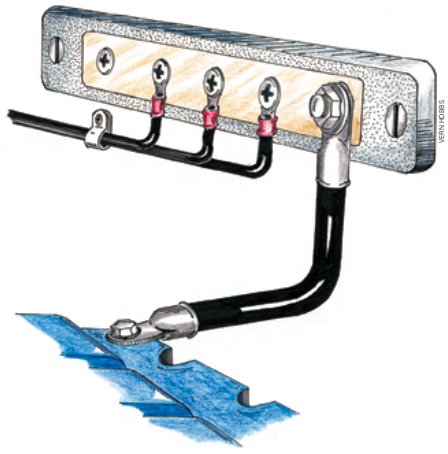
While the ancient Perkins waited for parts, I contrived a solution to my ground wire infestation. The perfect remedy, I reasoned, was to install a bus bar to which all the various ground wires in our DC electrical system would be attached. The bus would, in turn, be connected to a master grounding point — the engine block — by a single, heavy-duty cable. To sort out the technical details, such as appropriate wire gauges and required electrical load capacity of the bus bar, I consulted two handy references: Sailboat Electrics Simplified, by Don Casey, and Pocket Ref., by Thomas Glover.
Five steps to a tidy solution
Step 1: Purchase a bus bar.
This component would have to accommodate at least one 2 AWG grounding cable on a 5⁄16-inch stud, provide connection points for a minimum of eight grounding wires ranging in size from 6 AWG down to 14 AWG, and be adequately rated to meet or exceed the maximum electrical loads of the system. Blue Sea Systems makes a number of products that meet these requirements. All are available through marine suppliers for less than $30.
Step 2: Ensure the boat’s electrical power is OFF.
Step 3: Choose a suitable location for the bus bar.
Ideally, the bus bar should be mounted well away from any fuel system components, it should be positioned in a protected space where errant contact with it is unlikely, it should be in a dry place, and it should be positioned to provide the shortest possible length for the primary grounding cable. Mounting was simple; two #10 wood screws, stainless steel of course, secured the bus bar firmly to a wooden bulkhead in the engine room.
Step 4: Prepare the wires and cables.
I carefully pre-positioned each one, checking for adequate length and alignment, and replaced the few that failed to measure up. When I had the wires where I wanted them, I bundled them together and secured them to the bulkhead using nylon hanging straps and stainless-steel screws. Next, I fitted each wire with a tinned-copper marine-grade ring terminal of the appropriate size. I purchased the straps, ring terminals, and screws at a local chandlery for less than $15.
Step 5: Attach the wires to the bus bar in an orderly way.
When our old, reliable 4-107 was back on its mounts, I connected the primary grounding cable from the bus bar to a suitable point on the engine block, ensuring that this final connection was against clean bare metal.
The benefits I’ve gained from this easy and inexpensive project are a less cluttered engine room, fewer electrical faults, easier diagnosis of faults when they do occur, and simpler removal and reinstallation of the engine sometime in the future when that will be required again.
Vern Hobbs and his wife, Sally, sail a 1974 35-foot Bristol cutter along Florida’s Atlantic coast and the Intracoastal Waterway. Their day jobs pay the rent, but Vern finances the boat projects through his work as an artist. He specializes in maritime subjects.
Thank you to Sailrite Enterprises, Inc., for providing free access to back issues of Good Old Boat through intellectual property rights. Sailrite.com