A rigging repair is a community effort
Issue 79: July/Aug 2011
In this, the first of two parts, authors Leslie Linkkila and Philip DiNuovo describe what happens when rigging fails in paradise, how they kept their mast up, and the choices available to sailors when replacing standing rigging themselves.
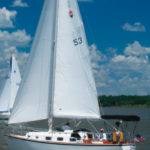
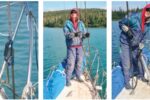
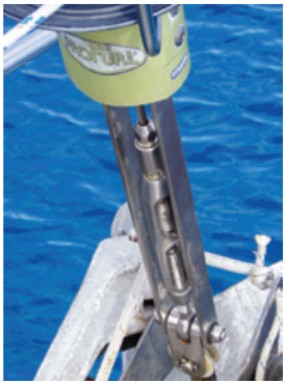
We were anchored in the ultra-calm anchorage nestled between Isla Del Rey and Isla Espiritu Santo in Islas Las Perlas in the Gulf of Panama, making final preparations for crossing the Pacific in our Mason 33, Carina. Before taking off on the 4,000-mile passage to the Galapagos and on to the Marquesas, we wanted to inspect the rig, so Philip donned a climbing harness and I (Leslie) cranked him up to the masthead.
“Uh oh,” he called down.
“What?”
“It’s bad, very bad.”
“You’re kidding, right?”
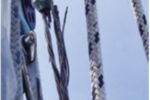
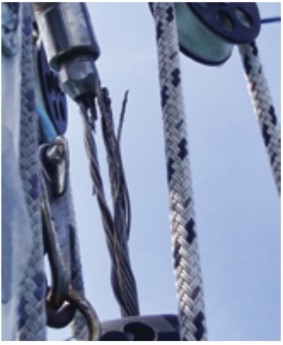
“No, I am not kidding! We only have a couple of wire strands left holding up the forestay.”
We were roughly 50 miles south of Panama City, where — despite its status as the crossroads of sailing — there is no rigger.
Our standing rigging is made of 1 x 19 stainless-steel wire rope with Sta-Lok mechanical terminals and had been professionally installed in 1999. Since we had been diligent about cleaning and inspections and had replaced Carina’s chainplates in 2007, we were (unwisely) confident about our rig’s integrity.
Of the many spares we had on board, we had no wire rope, Sta-Lok terminals, or spare wedges for the terminals. In hindsight we had been irresponsible . . . but that was the situation. Getting back to Panama City would be difficult against episodic winter northerlies and short steep seas. These conditions could cause the forestay to part, taking the roller furling unit, and possibly even the mast, with it.
Other cruisers offered us their spare (used) wire, but its age was similar to Carina’s failed wire. We decided to motor back to Panama City, where obtaining supplies would be easier than anyplace we had cruised or would be cruising. We used our SSB radio and modem to email a Seattle marine supplier and ordered wire rope and fittings to be shipped to us in Panama City.
Our immediate need was to reduce the tension on the failing forestay. We moved both spinnaker halyards to the bow, secured them to the forward port and starboard cleats, and winched them tight. We then eased the backstay a bit. To reduce weight on the forestay, we dropped the genoa and flaked and stowed it. We returned the Profurl swivel to the top of the extrusion with the genoa halyard so it was tucked under the stop. We moved our two main halyards aft, attached them to pad-eyes, and winched them tight. We set up our running backstays in their working positions and tensioned them. We hoped these steps would be enough to keep the rig intact while we motored to Panama City for 12 to 15 hours under potentially rough conditions.
A better plan
Friends on the other boats in the anchorage conferred, kibitzed, and offered suggestions. Finally, friend Royce, of the schooner RDreamz, recommended we take down the forestay while at anchor. His argument was that by lowering and disassembling the furling system on his expansive deck, we could prevent a catastrophic failure that would cause serious damage to the furler and possibly the mast. Luckily, his boat’s deck was longer than our forestay.
We assembled and met with crews from RDreamz, Tao 8, and Bluebottle to carefully plan the steps needed to remove the damaged forestay. The following morning dawned breezy but the water in the anchorage remained flat calm. We pulled Carina’s anchor and slowly motored up to RDreamz and passed a line from our bow to the stern of RDreamz. Once this line was cleated on both vessels, we put Carina in reverse at low rpm and locked her wheel.
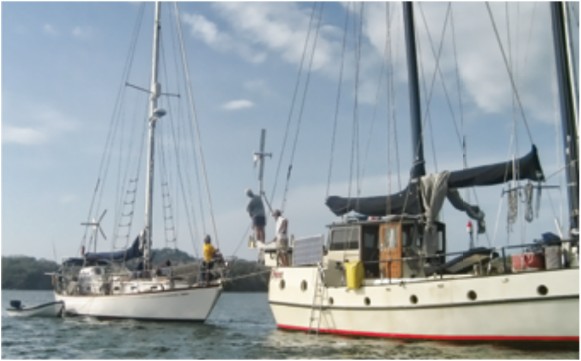
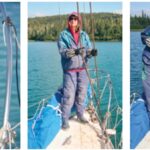
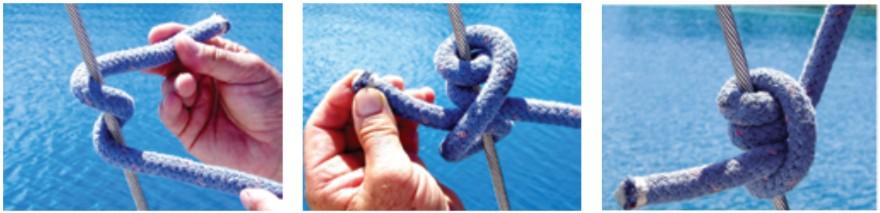
Philip donned his climbing harness once again and we cranked him to the masthead. Using a rolling hitch, he tied a second halyard to the furling extrusion about 5 feet below the furler wrap stop. After tensioning this halyard, the team on Carina’s deck removed the clevis pin from the tack of the roller furler, swung the furling drum and forestay over the bow pulpit, and handed it to the team on RDreamz. When ready to lower the forestay, Philip snipped the remaining wires . . . they were so few he only had to use lineman’s pliers. Though supported with a halyard and with the backstay eased, there was still enough tension that the wires parted with a sharp “Sproing!”
A team of two managed both halyards, slowly lowering the top of the forestay as the team on RDreamz walked forward on deck, carrying the furling drum while supporting the extrusion to clear the stern rail as it came down.
Soon Carina’s forestay was resting safely on the deck of RDreamz. We then attached the spinnaker halyards to Carina’s bow pulpit to support the mast and lowered Philip to the deck along with the upper Sta-Lok terminal and the frayed end of the forestay.
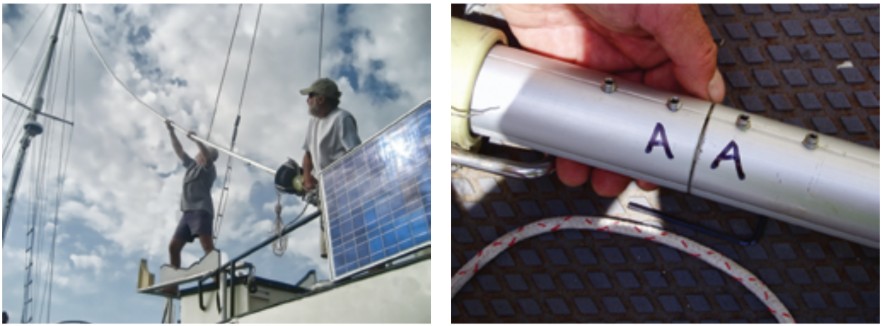
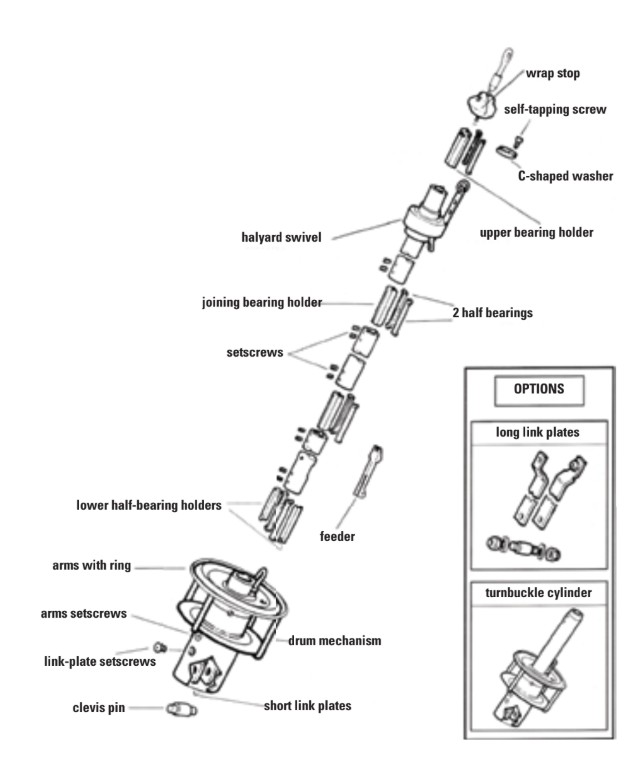
Later, while disassembling the extrusion sections, we cleaned and inspected the furling drum, extrusions, extrusion bearings, and setscrews. We were careful to label where sections intersected. We also took care to measure, to the millimeter, the full length of the original 1 x 19 wire rope.
With the parts of the furling system safely stowed in Carina’s main saloon, padded with pillows and tied down, we began our trip to Panama City. There we would meet the shipment of rigging supplies we had ordered by email.
Our original plan had been to bring Carina into the marina at Panama City, where we could lay out the new forestay, install the Sta-Lok terminals, and assemble the Profurl extrusions using a stable and relatively clean dock. This option seemed less appealing as we approached the city. The marina was tightly packed with megayachts, the management unfriendly, and the slip cost shocking. The idea of using the parking lot near the anchorage was even worse — it was filthy and served as the staging area for crowds of island-bound ferry passengers. So when friend John of Nakia suggested that we might be able to install a new wire and then reassemble the furler directly on the wire as it hung from the masthead, we agreed.
A collaboration of cruisers
To do this, we would need help. Once we received our parts shipment, we assembled another team of eager volunteer cruisers from the vessels Susurru, Iwa, and Nakia. All the boats involved had rigs with mechanical terminals — either Sta-Lok or Norseman — but none of these cruising sailors had actually assembled a terminal. For that matter, neither had we. In addition, most of our team also owned Profurl roller furling, so everyone was interested in that aspect of the project too.
To prepare for reassembling the roller furler, we made sure that the inner-extrusion bearings were at the top of each extrusion section. This would allow us to slide the bitter end of the new wire through the constriction of the bearing, push the extrusion over it, and have the bitter end of the wire emerge at the lower unconstricted end of the extrusion bearing assembly.
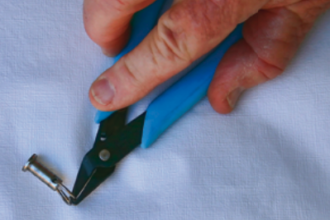
We also assembled the Sta-Lok stud terminal fitting to what would be the masthead end of the new forestay wire. We did this in our cockpit the night before our team arrived so we could learn how to assemble a Sta-Lok fitting in privacy. The process seemed pretty straightforward and — on our first try — we assembled a nearly flawless terminal.
When our team was assembled, using the old wire as a measure, we cut the new forestay wire, allowing for the damaged wire we had cut off during disassembly and the fact that the new wire would stretch a bit.
We again winched Philip aloft, where he and the masthead crossed the sky in wide arcs in the rough conditions — we were in the La Playita anchorage amid wakes created by workboats and vessels transiting the Panama Canal, all the while being buffeted by 20- to 25-knot winds. We considered postponing the project, but everyone was enthusiastic and we proceeded.
Using a rolling hitch, the deck team attached a halyard to the new forestay and hoisted the forestay wire fitted with the Sta-Lok eye to Philip, who slipped it onto the masthead tang and secured it with a clevis pin and cotter pin. We then lowered Philip to the deck.
We assembled the Profurl by slipping each section of extrusion onto the forestay in succession, beginning with the top section. The genoa halyard was attached to the swivel and we periodically took up on the halyard to raise the swivel up the foil column. We had a messenger line attached to the swivel so we could retrieve it later.
As each section of extrusion was added to the growing furler foil on the forestay, we pushed the assembly slowly upward. One person was the assembler, sliding each extrusion over the bearing of the adjacent extrusion and securing the setscrews with (red) thread locker. A support person handed him tools and materials when needed. Another team member fetched and aligned the next extrusion section, and the last held the bottom end of our increasingly weighty assembly as it swayed around in the wind, waves, and boat wakes.
The final section was longer than the others, due to the long link plates of our Profurl unit. Reaching as high as possible, grunting and groaning as Carina danced around her anchor, the assembler was finally able to get the setscrews in place. In retrospect, we could have made this easier by removing the furler link plates or by hoisting our assembler up the staysail stay to the height of the joint.
With the assembly complete, we attached a halyard to the drum and winched the Profurl assembly as far up the forestay as it would go, to expose the lower end of the 1 x 19 wire. Our team, eager to learn, watched and helped as we assembled the lower Sta-Lok fitting, a stud which fi t the turnbuckle.
To complete the assembly, we threaded the stud into the turnbuckle, then secured the tack with the clevis pin and tensioned the forestay. The final touches were to reattach the Profurl link plates at the tack and the wrap stop at the masthead and, lastly, to tune the rig. We were all satisfied with the successful completion of our first do-it-yourself rigging project.
Rig care and inspection
Rigging life expectancy depends on many factors including the grade of the stainless-steel wire, terminal type, the quality of the workmanship used in constructing and installing terminals (swages or mechanical terminals), maintenance, the environment (temperature, humidity, and salinity), rig tuning, and boat usage (frequency and racing versus cruising). We recommend an inspection of all standing rigging components at least annually, preferably more often, but especially before every ocean passage!
Although we don’t know the exact cause of our failure, we suspect it was an incident in which a spinnaker halyard that had been stowed at the bow pulpit wrapped the forestay as we attempted to furl the genoa while sailing downwind in fresh conditions.
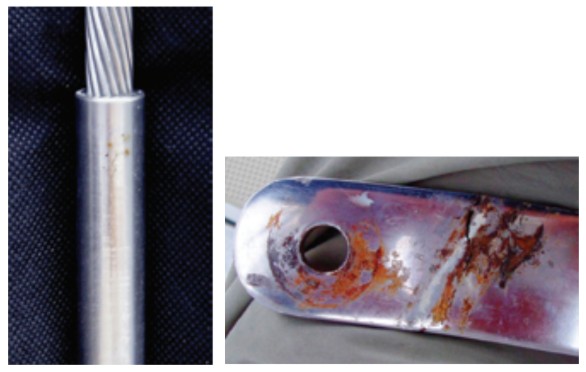
To clean and inspect our rig, we use WD-40 (a moisture-exclusion agent and lubricant available everywhere we have cruised) along with a fi ne synthetic scrub pad and a soft cotton rag to remove dirt and surface rust. After cleaning, we carefully scrutinize the full length of our stainless-steel wire-rope stays and shrouds, turnbuckles, tangs, and terminals, looking for corrosion, pitting, cracks, broken strands, and wear. Any questionable areas, we examine more closely by magnification. We have no dye penetrants aboard but these products, when available, are effective in amplifying the visual signs of damage, such as cracks or pitting.
It is also advisable to periodically invert rigging wire and terminals since seawater, dirt, and acidic pollutants run down the wire and accumulate at a wire’s lower end, causing corrosive breakdown in the terminal. Internal corrosion in terminals causes the swelling that leads to cracking and failure, a problem more pronounced with swaged terminals. Mechanical (compression) fittings, such as Sta-Lok, provide greater internal space for expansion in the event of internal corrosion.
Also, depending on the age of your boat, pulling and inspecting your chainplates is prudent. Six of Carina’s eight chainplates were dangerously cracked, something we discovered during a refi t when she was 20 years old. When viewed from above and below, they appeared serviceable. It wasn’t until we pulled them that we could see the failures just below deck level. We were very lucky we discovered the problem in time to prevent a catastrophic failure.
Mechanical or swaged?
Mechanical terminals offer the hands-on sailor a distinct advantage over swaged terminals by permitting replacement of rigging wire and terminals without the need for specialized swaging equipment or tools. This is critical to the long-distance cruiser, since a failed fitting will inevitably happen hundreds, if not thousands, of miles from the nearest rigger and rigging supplier.
Recently, we replaced the remaining old wire of Carina’s standing rigging while at anchor in the rural island group of Vava’u in the Kingdom of Tonga. We were able to tackle this project, necessitated by the discovery of corrosion and more broken strands in our rigging wire, because all our stays and shrouds are fitted with Sta-Lok mechanical terminals.
When disassembled, the 11-year-old Sta-Lok terminals appeared to be in very good condition. We cleaned, inspected, and reused them, replacing the old wedges with new ones. Our experience has made us appreciate the Sta-Lok system sold to us by a rigger who also happened to be a former cruiser.
Swaged terminals may be less expensive than mechanical terminals and they have a reputation for superior strength. However, the process of swaging results in work-hardening of the stainless steel, which causes brittleness and susceptibility to stress corrosion, and the specialized equipment needed to form swaged fittings is impossible to find in remote areas anyway.
The extra cost of mechanical terminals is mitigated by the fact that they can be reused when re-rigging, generally with the need to replace only the wedge, a minor expense. Any of the available mechanical systems, if appropriately sized, will be more than adequately strong. All currently marketed brands of mechanical terminal claim operating ranges between 90 and 100 percent of the breaking strength of the wire. At least two brands offer Lloyd’s listing or certification.
With mechanical terminals, the same terminal body may be used with an end fitting of a threaded stud, fork, or eye. This universality allows for the wire of a stay to be end-for-ended without the need to change any terminal fitting.
Based on our experience, we would highly recommend using mechanical over swaged rigging terminals.
Mechanical rigging options
The most common brands of mechanical terminals are made in the UK: Sta-Lok (Sta-Lok Terminals, Ltd.), Norseman (Navtec), and Hi-Mod (Petersen Stainless Rigging, distributed by Hayn Marine in the USA), a relatively new product that is gaining in popularity. Blue Wave terminals (Blue Wave A/S) are made in Denmark and sold through dealers in North America. A previous relationship with Suncor Stainless resulted in the similarly designed product labeled Quick Attach, which seems to be intended primarily for lifeline applications. All these brands are constructed of type 316 stainless steel and are marketed for use with stainless-steel wire rope. Internet prices for the different systems at the time we were researching this article were similar.
All the brands work essentially the same way: a wedge or a cone (based upon wire type) is inserted on the end of the stainless-steel wire rope and then the wedge-wire assembly is compressed onto the wire as the two sections of the terminal are threaded together using hand tools. Wedge design for all systems varies with wire type, except in the case of the Blue Wave and Quick Attach systems, which have a universal wedge (that they call a “jaw”) for each wire diameter.
One design distinction of note: the Sta-Lok wedge is compressed inside the male-threaded terminal section (called the socket), such that when the terminal is assembled, the wedge is internal to the walls of both the male- and female-threaded terminal sections (called the former), doubling the wall thickness securing the wedge. The Norseman, Hi-Mod, and Blue Wave wedges are internal to the wall of only the female-threaded body section of the fitting. What this doubling means in terms of breaking strength we cannot say, as little objective testing data is available.
Sta-Lok and Hi-Mod both claim to hold to the full breaking strength of the wire, though only Sta-Lok offers certification of this specification by Lloyds of London. Norseman literature makes no specific claims regarding strength and there have been reports of failure under testing (see Good Old Boat, March 2000). The Blue Wave product carries Lloyds certification of its breaking strength specification at 90 percent of the wire’s breaking strength, though there is a note in their literature that indicates that wire breaking strength may be “decreased by 0 to 15 percent” when using these terminals. Most owners we interviewed seem happy with the performance of their fittings, regardless of which brand they own.
In the second part of this article, to be published in the September issue, Leslie and Philip will discuss lessons learned and the specific steps involved in replacing their rigging.
Philip DiNuovo and Leslie Linkkila came to cruising and boat ownership as adults and quickly developed a passion for small-boat travel. In 2003, they quit their professions and left the Pacific Northwest behind. Now in the South Pacific, Philip and Leslie have had to learn to service nearly every system aboard Carina, their Mason 33.
Thank you to Sailrite Enterprises, Inc., for providing free access to back issues of Good Old Boat through intellectual property rights. Sailrite.com