A special pulley silences a protesting engine belt
Issue 70 : Jan/Feb 2010
My wife clapped her hands over her ears. “What is that awful noise?” she exclaimed. I knew what it was. I had just flipped the field switch on our new Balmar high-output alternator and the tortured belt was protesting under the sudden burden.
“Not to worry, Marilyn. Just a bit of belt slippage. I’ll tighten it a little and that’ll quiet things down.”
I idled the engine, opened the engine box, and looked down at the dancing diesel beneath my feet. I could tighten the belt again, or maybe put a little soap on it to quiet it down, but I knew that would not solve the problem. The problem was that the belt could not deliver the extra power the new 85-amp alternator demanded.
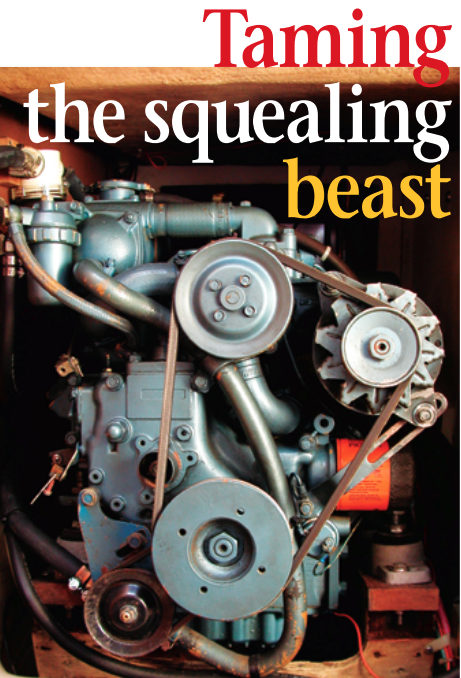
My engine was a two-cylinder Yanmar (2GM20FC) and, like the one-and three-cylinder freshwater-cooled GM series, it used a small belt to drive the raw-water pump and a separate 1⁄2 -inch belt to drive both the freshwater recirculating pump and the alternator. This worked reasonably well with the alternator supplied with the engine, but the added load of an 85-amp, hot-rated alternator exceeded its limits.
As I thought about tightening the belt, I considered the water-pump bearings and the extra heavy loads I would be placing on them, as well as on the front main bearings. Maybe for occasional use it would pass, but Kuan Yin was a cruiser, so the system would be under heavy loads and frequent use. Dealing with a bearing failure at sea or in some remote part of the world is not on my list of fun things to do.
Pinpointing the problem
This was a problem that demanded a solution, but first I had to determine just what was the problem. I did a little research into the power-handling capacities of the belt. I found that the 1⁄2 -inch belt is capable of delivering the power required by the alternator, but it has to be wrapped a minimum of 160 degrees around the alternator’s pulley to do it. I looked at the alternator and made a guesstimate of 120 degrees. The three points of the belt path simply did not wrap the alternator pulley sufficiently to give enough contact area for the belt to do its job.
I considered a larger pulley for the alternator, but that would require higher engine RPM and still wouldn’t solve the problem. The solution was to give the alternator more belt wrap. I could do that easily by simply running a belt from the power-take-off pulley (PTO) on the front of the engine. I would then have about 170 degrees. But if I did that, I would not have any way to drive the cooling-water recirculating pump. I looked into purchasing the optional PTO sheave from Yanmar but, without a way to tension the belt between it and the fixed water pump, that would not work. What I needed was a way to tension a second belt between the PTO and the freshwater pump. An idler? An undesirable solution. Besides, there was no place to mount one.
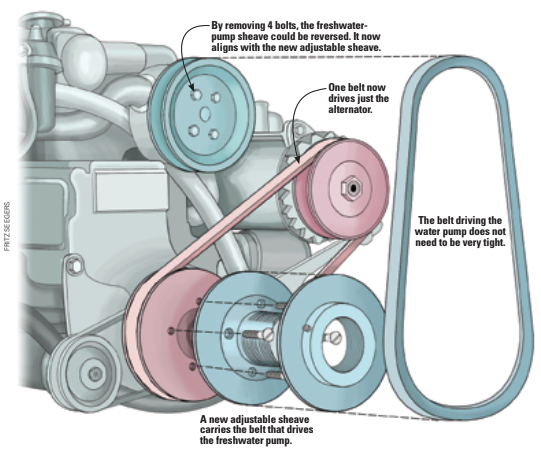
Then it struck me. How about using an adjustable, variable-pitch sheave mounted on the PTO? As it would be driving only the water pump, the load would be relatively light for its size and belt wrap. If I sized the new pulley correctly, the pump would run close to the same speed. Here’s how I did it.
Variable-pitch pulley
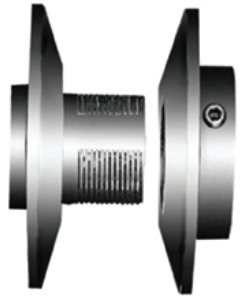
I looked in the Yellow Pages for a distributor of bearings and other power transmission-related hardware. I found what I needed at Dixie Bearings in Jacksonville, Florida. I bought a Browning Model #1 -VP6-016, a variable-pitch pulley with an outside diameter of 6 inches. That comes very close to the outside diameter of the engine PTO. Although the suggested list price was more than $100, I paid about $25 for mine and have seen them online for less than $20.
When you have it in your hands, you will observe that the two cheeks of the sheave unscrew. One half has the hub; the other screws onto it and uses a setscrew to lock it into place. The pitch-diameter of the pulley is determined by how far the other side is screwed onto the hub. As you can see, this is a perfect way to adjust the distance between two fixed points and tension a lightly loaded belt.
Measure twice, cut once
Two features of the Yanmar GM series engine made this job possible and easy to accomplish. The first is that Yanmar has drilled and tapped its PTO for four 8 x 1.5 mm machine screws on a pitch circle of 82.5 mm. (Yanmar recommends a Grade 8 bolt with a torque of 20 to 21 foot pounds. That’s about as tight as you can get them with a regular screwdriver.)
I like to check to make sure the drawing in the manual agrees with the reality. I made a paper pattern of these holes, checked them with a caliper, then checked the accuracy by making a cardboard pattern. I went through this trouble because on my installation the PTO is within 6 inches of a bulkhead and I could not easily check the dimensions on the PTO.
I considered drilling the holes myself, but because I did not have a drill press, and accuracy and precision would be required for the pulley to run true, I took the fixed half to a machinist. He precisely drilled and countersunk four 9 mm holes. (A little slop to make lining up the holes easier.) I tightened the flathead machine screws in the usual cross pattern with a dab of red Loctite on the threads.
The second stroke of good luck is found in the dished sheave that drives the water pump. When the four bolts holding it to its mount are removed and that sheave turned front to back, the pulley aligns precisely with your new adjustable sheave on the PTO. You can check yours by stretching a piece of string over the rear face of both pulleys. It should line up perfectly without any distortion in the string.
Measure for the belts
After bolting the fixed half of the variable-pitch pulley to the PTO and loosely screwing on the adjustable half to the engine, all that remained was to determine the new belt sizes. My wife’s fabric measuring tape worked just fine for this task. For both sets of pulleys, I measured around the outsides of the pulleys and subtracted twice the height of the belt (about a half inch).
I slipped the new belts on. For the water pump belt, I simply screwed the adjustable portion of the sheave (a bit of fussing and wiggling is necessary here) until I’d removed the slack from the belt. I then tightened the setscrew. (Some blue Loctite here is a good idea.)
I used a flat bar (my windlass handle) as a lever to tension the new alternator belt. The bar makes it easier to hold the tension on the belt with one hand as you tighten the bolts with the other. You want to get the belt tight enough so it doesn’t slip, but not so tight you overload the bearings: 3⁄8 to 1⁄2 inch of belt movement in the center with moderate finger pressure is about right. When you pluck the belt, think bass, not banjo.
The screaming beast has been tamed. My wife is happy and so am I. Now when I start the engine and flip the alternator field switch, the only sound we hear is the lugging down of the engine as it goes to work.
Philip Lange was educated as a mechanical engineer. He’s been on the water and messing about in boats since 1969. With his wife, Marilyn, Phil built what Jim Brown (its designer) considered the best Sea Runner 37 he’d seen. They cruised South and Central America for 12 years and are currently rebuilding a 35-foot Crowther catamaran with hopes of cruising once more.
Thank you to Sailrite Enterprises, Inc., for providing free access to back issues of Good Old Boat through intellectual property rights. Sailrite.com