Keeping the water outside, where it belongs, calls for the best in materials and design
Issue 14: Sept/Oct 2000
I’m sure most older boats at one time or another have had a seacock that’s corroded to the point of being inoperable. Perhaps they even have a hose clamp that is waiting to fail or a hose ready to rupture.
When a hose fails or a clamp breaks and the hose is pushed off the seacock by water pressure, the boat will quickly fill with water and sink. An automatic bilge pump may not be enough to save the boat. It will run until the battery is discharged. It may or may not keep up with the leak. Failures of this sort come at the most perverse times, when the boat is unattended, in the middle of a rainstorm, or in the middle of the night.
A boat doesn’t have to be completely full to sink. As it floods, it will lose stability much faster than it will lose buoyancy. This is exacerbated by something called free-surface effect. To get a better understanding of free-surface effect, fill a shallow baking pan about half full of water and try walking around with it (best done outdoors). Note the wave that forms in the pan and how the water sloshes back and forth, changing the balance of the pan. Then stand inside your boat on the centerline and just shift your weight from side to side in time with the roll you cause. You will be amazed at how much roll you can induce in your boat just by shifting your weight a foot off center if you time the weight shift right. Now in your mind combine the two effects. The water inside your flooded hull will shift back and forth just like the water in the baking pan. As the hull floods, the wave inside the hull will represent a considerable weight, shifting in time with the roll. The wave will weigh more than you do, and it will move farther off center. It will accentuate any pitch or roll motion and can roll the boat into a knock down or pitch pole long before the hull completely loses buoyancy.
Water can enter a boat very quickly. The failure of a 3/4-inch fitting two feet below the water’s surface will allow water to enter a boat at roughly 16 gallons per minute. If the fitting is less than 2 feet below the water, the water will enter more slowly. If the fitting is deeper than 2 feet below the waterline, the water will enter more quickly, due to the increased pressure. When a boat is flooding at a gallon every four seconds, time is critical. The crew must find the leak and stop it or at least reduce the flow rate very quickly. A proper seacock is the best defense in this situation.
Check fittings
The magnitude of the problem caused by the failure of one little fitting can send us scurrying into the bilge to check the fittings on which our flotation depends. It is advisable to make a list of all the points that water could enter the hull. This list would include all the seacocks, all the through-hulls that don’t have seacocks, the stuffing box for the propeller shaft, the rudder shaft seal, the exhaust system, and possibly the keel bolts. Keep the list where you or your crew can refer to it when confronted with flooding from an unknown source.
Bilge pumps have limits
Bilge pump ratings are not calculated at a head pressure of 6 feet above the pump, with an internal hose-friction factor included. No, they are calculated at the pump discharge point, with no hose to impede the water flow.
A bilge pump rated at 2,000 gallons per hour may only deliver half that and even as little as one third under adverse conditions. Let’s use the example of a 2,000-gallon-per-hour pump and assume it can deliver 1,000 gallons per hour to the boat’s overboard discharge. That is a rate of 16.7 gallons per minute, just about the flow rate of a ¾ inch hole two feet below the water line.
To quote Practical Sailor’s Nick Nicholson (October, 1997), “Submersible centrifugal bilge pumps dominate the electric bilge pump market and with good reason. They are simple, reliable, easy to install, and cheap. The gap between real-world performance and the nominal output of these pumps, however, is so great that, in our opinion, it borders on the irresponsible.”
Siphon back
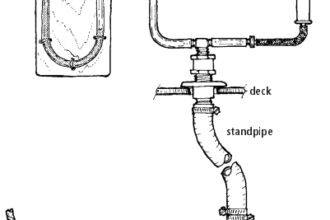
When I bought my current boat, it not only had a corrugated hose on the bilge pump discharge (creating severe internal friction on the discharge side of the pump) but it also led directly to an open through-hull fitting, about halfway up the boat’s topsides. When the boat heeled under sail, this fitting was under water, and if the bilge pump primed the siphon at that moment, water would flow backward into the boat when the pump stopped. This problem is fairly common. It is desirable to mount pump discharge through-hulls as high up on the hull side as possible to prevent them from being submerged when heeled.
Through-hull fittings are bronze, Marelon, or plastic fittings that permit you to fit valves (seacocks) or hoses to the inside of the hull. A through-hull fitting will rarely leak. The valves attached to it are another matter, however. The fiberglass boat business has, at times, been only marginally profitable, and builders have always been on the lookout for cost savings. One of the popular methods they used was to substitute bronze, or even brass, gate valves for real seacocks. This was true particularly, but not exclusively, for boats built in the Far East. There is a material used in Asia called “red brass.” This is not bronze, but a poor relation. This material is soft and corrodes easily. Many valves were, and continue to be, made of this material.
Fell apart
The head seawater intake of a Cheoy Lee Offshore 26 I had in Singapore was made of this red brass. I was ignorant of the problem until the valve fell apart as I was attempting to close it. We were several miles offshore at the time, and the instant panic this created had to be experienced to be believed. My wife was at the helm, and I was playing “Dutch boy at the dike” with my finger in the hole. I could not leave the location, and she could not help. After the panic subsided, I stuffed a towel in the hole to stem the flow and reached for the duct tape. I taped over, around, and over the valve again and again until the flow was down to a small trickle the bilge pump could keep up with. We doused sail and headed for our anchorage under power. The problem was fixed by replacing the valve with a bronze ball valve and through-hull. I put the boat on a tidal grid and changed it all out at low tide. A faulty valve came close to costing us our boat and maybe our lives. There was no rescue service in Singapore at the time, and we were very much on our own.
Seacocks have changed over the years, and sailors have a greater selection of types to choose from. The traditional seacock is a tapered barrel plug with a hole through it, mounted in a bronze housing. These seacocks are fairly heavy and expensive but can be completely disassembled and rebuilt when necessary.
Lighter than bronze
In recent years, Forespar has introduced a glass fiber-reinforced nylon ball valve designed as a seacock. These valves work well, but they have some negative aspects. They are physically larger than the traditional ones and extend out from the hull farther. I installed Forespar valves in my Pearson Ariel as well as the newly acquired boat. They have the advantage of being corrosion-free, so they require less maintenance. A cup of vegetable oil poured into the closed valve once a year will lubricate the balls and keep them free to turn. These Marlon valves are the only plastic valves that should be considered for service as seacocks. The cheap plastic ball valves intended for domestic plumbing applications are definitely not acceptable for use as seacocks.
Another option for today’s sailors are bronze ball valve seacocks. These are similar to the valves manufactured for industry in massive quantities, so the price is right and the quality high. Apollo is the name of one brand of valve carried by chandlers and catalogs. These valves are as sturdy as the traditional valves and have the advantage of Teflon seats that close easily. They require little maintenance other than some grease on the ball once in a while.
Bronze ball valves are sometimes also used as seacocks, but they do not have the cast base that is required for bolting to the hull, and they have tapered pipe threads on both ends, while a true seacock has a straight thread on one end for accepting the through-hull. This allows for proper clamping of the through-hull and seacock to the hull and backing block. When ball valves are used as seacocks, they depend on the strength of the through-hull (and a mounting nut) to support them, and are thus less resistant to a side load or side impact. While the use of ball valves was common at one time, it is better to use a real flanged seacock.
None working
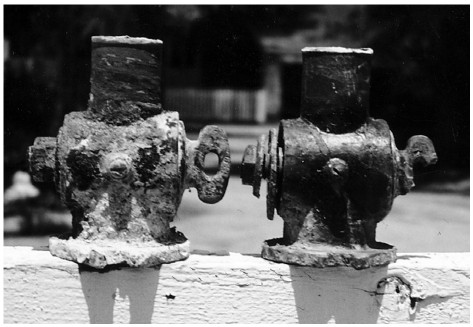
When I purchased my current boat, not one seacock was operable. All had broken handles or torn-up threaded parts. Some had been leaking for a long time, and were covered in green corrosion. The first project for the new boat was to replace these fittings.
The major question was whether they could be removed. I made up a stainless steel bar that fit inside the through-hull that engaged the protrusions on the inside diameter. I rotated the bar with a Stillson wrench from outside the hull while my wife held on to the valve with another Stillson on the inside. This approach worked for all but one valve. No matter how hard we tried, this through-hull would not release its grip on the valve. It was only a 3/4-inch valve, and the protrusions in the through-hull rounded off before we could break it loose. What to do? Most through-hulls have a mushroom-like flange on the outside of the hull and a threaded stem penetrating the hull. I decided the only way to remove the through-hull and its attached valve was to remove the mushroom flange on the outside. I used a high-speed grinder to take the flange off, being careful not to grind into the fiberglass of the hull. I then pushed the assembly up into the hull for easy removal. I have since heard of a person who used a Dremel tool to carefully cut V-shaped pieces out of the mushroom flange with the point of the V pointing inward at the edge of the through-hull. He then put the Dremel tool inside the through-hull and finished the cut from the inside. He achieved the same result as I did but was perhaps a little neater. The only fault I see with this method is the danger of cutting into the laminate when cutting the pipe from the inside. One would have to be careful or use a gauge of some sort.
Backing blocks
All holes though the hull, especially those below the waterline, need to be reinforced on the inside of the hull to distribute stresses over a wider area. This requires backing blocks of wood or fiberglass sheet to transfer the load. I reused several of the old backing blocks and made new 1-inch-thick pads for those locations that did not have any. I cut a hole of the right size in the center of the pad and made sure the edges did not interfere with existing hull structure and bulkheads. A good rule of thumb for the size of a backing pad is that the overall pad diameter should be three times the size of the fitting. Thus, a 1-inch through-hull would have a 3-inch diameter reinforcing pad or block. This size can be modified to allow for location and structural interference.
The inside and outside surfaces of the hull were sanded clean and smooth. I dry-fitted the new through-hulls and made sure the length of the through-hull thread was just long enough to allow maximum threads to screw into the seacock without having the through-hull bottom out in the seacock. I was careful to shorten the threaded sections where needed and to file the threads smooth.
Once all was satisfactory, I used 5200 sealant on both sides of the hull as the caulking. These will never come out again in my lifetime. (Consider a removable sealant for this -Ed.) My wife was inside the hull, and I was on the outside. Working together as a team, we assembled the through-hull/seacock/pad combination. I tightened the through-hull from the outside, and she held the seacock on the inside.
Partial clogging
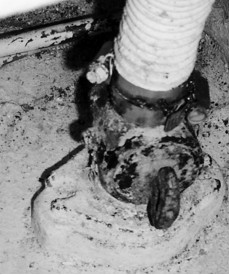
When I removed the old seacocks, I also threw away all of the old hoses. A piece of hose may look OK on the outside but be damaged on the inside. Sometimes the reinforcing wire of engine-cooling water hoses will come loose on the inside and partially clog the passage, but the obstruction may be totally undetectable from the outside. Quality hose is not cheap, but in the overall cost of things, it is a wise investment. Do not wait until it fails or until you change a seacock. A good rule of thumb is to change hoses every 10 years, regardless of condition. Hoses harden in time, show external cracks, and are damaged around the hose clamps by engine vibration.
On the subject of hoses, there are recommended hoses for specific purposes. My bilge-pump hose was ribbed internally, when it should have been smooth-bore to reduce friction. Is this being too picky? Not at all.
As a general statement, hoses should be smooth inside and suited for a specific use. Engine exhaust hose is usually wire-reinforced and specially made to resist exhaust gases. Water hose for the engine’s cooling-water system can be fabric-reinforced as long as it does not have to make any sharp turns where it might kink or collapse. In this case, use wire-reinforced, non-collapsing hose. Hoses attached to through-hull fittings should be of premium quality and resistant to chemicals and fuels that may be in the sea water.
Recommended uses
Drinking-water hose should be FDA-approved. Sanitation hose should be strong and resist odor permeation. FDA-approved vinyl hose is a good selection for non-pressurized lines, bait wells, shower drain sumps, and holding-tank vents. Most marine stores and catalogs have lists of recommended uses for their hoses. Make a list of your specific needs and special situations such as bulkhead penetrations, sharp bends, or high pressure, and be guided by the descriptions in the catalogs. Cheap hose is just that, false economy that could sink your boat or cause you a nasty day cleaning up a holding tank leak.
A final consideration should be given to hose clamps. We all know that hoses below the waterline need to be double-clamped for safety, but the type of clamp makes a difference.
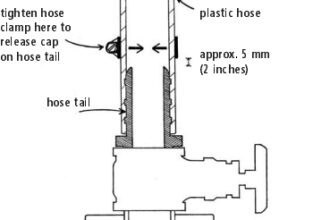
Most of us use stainless-steel hose clamps, and the suppliers will assure us that their particular clamps are stainless steel, but there are differences in clamp design and materials. Most hose clamps sold as stainless steel are grade 304 stainless, which is strong but prone to corrosion. It is better in a marine environment than plain steel, but it’s not as good as 316-grade all-stainless-steel hose clamps. The 316 clamps cost three times as much, but are worth it. The 304 clamp has a screw mechanism that penetrates the band and chews into the hose itself. The 316 clamp has a smooth, unperforated band surface and rolled edges that will not cut into the hose. Screw and band threads are pitched to stay tight and not loosen, even with continued exposure to vibration. All we are likely to find in a hardware store is the 304 version. I’ve bought so-called “all stainless steel” clamps only to find the band was stainless but the screw was plated steel and quickly rusted. Test for non-stainless screws with a magnet; 304 and 316 alloys are non-magnetic. For the number of clamps we need on our boats, the extra money spent on genuine 316 clamps is really insignificant compared to the trouble failed clamps can cause.
There is no question we get what we pay for in the marketplace, so a boat is no place to scrimp on quality. You can’t walk home when the boat sinks. Buy quality, inspect often, change before failure. Be smart and sail safely.
Bill is a marine surveyor/boatbuilder who’s been living, eating, and sleeping boats since he assisted at Pete Layton’s Boat Shop in the ’50s. He’s worked for Charlie Morgan (Heritage) and Don Arnow (Cigarette). And he’s owned a commercial fiberglass boatbuilding company.
Thank you to Sailrite Enterprises, Inc., for providing free access to back issues of Good Old Boat through intellectual property rights. Sailrite.com