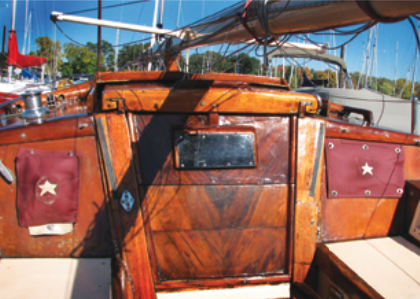
The covers match up on both sides of the companionway. A set of twist-lock fasteners atop the cabin allows the cloths to be unbuttoned at the bottom and. folded up to reveal the instruments when they are needed.
Issue 76 : Jan/Feb 2011
Your white plastic instrument covers are deteriorating in the sun, they don’t fi t as tightly as they did when they were new (they used to snap on, remember?), and some have begun to crack a bit around the edges. One of these days, when a fine breeze pipes up, they’ll blow off and go to whatever marine heaven awaits good old instrument covers. That final resting place probably won’t be on your boat.
The reason you have these little covers is to prevent your expensive instruments from deteriorating and their transparent plastic faces from yellowing from UV exposure. But replacing the covers isn’t easy. There’s a good chance that your instruments may not be manufactured anymore and the corresponding covers aren’t available. If you’re lucky enough to fi nd a replacement cover, the price may surprise you; a small plastic lid may cost $20 plus shipping and handling. You probably have a number of instruments, so you do the math.
When I checked around to replace the white plastic instrument covers on my 20-foot custom wooden sloop, Persistence, the cost made me think. I needed three covers: for my knotmeter, for my depth sounder, and for my through-bulkhead compass. The simple round covers for my analog knotmeter and depth sounder were still in production, but my compass was no longer being made, nor was its cover.
As a confirmed do-it-yourselfer (I built my own boat, so I am relatively fearless), I decided to make my own. I pieced the old broken compass cover together with tape and attempted to lay up a replacement cover of fiberglass and epoxy. The result looked terribly rough and unshippy. This plan might have worked, I suppose, if I’d kept it up, but I lost heart after I laid up the first layers and stepped back to regard the mess.
I began rethinking instrument covers. Do they have to be white circular plastic? Must they snap on? What else might protect my instruments from the elements and the sun, look good, last a long time and, oh yes, not cost a small fortune?
After a little thought, I figured that two simple cloth covers might do fine. The two instruments could be protected by one cover, and that would need to be flat. The other cover, for the bulkhead compass, would need to be rounded. In my workshop, I found some pieces of 5.4-ounce Sunbrella left over from a sun cover project for my genoa. It was a tanbark color, which would look good against Persistence ’s deeply varnished woods.
Instruments first
I took aboard a piece of light cardboard and masking tape and began to paste together a makeshift pattern to fit over the knotmeter and the depth gauge. I left a margin of several inches around both sides and the bottom. I wanted the top to fit under the trim that protects the edge of the cabintop. I marked where the six fasteners would go.
When I transferred the pattern to the Sunbrella, I added several inches all around it. Then, at each edge, I folded 2 inches of cloth back to form a double-faced area and shot it with a little bit of 3M Super 77 spray adhesive to tack it in place. With my wife’s old sewing machine, I sewed down this hem using UV-resistant thread.
The cover at this point looked bland and unstylish, so I thought a bit of decoration was in order. In my scrap bin, I found a piece of cream-colored leather salvaged from a broken office chair. I drew a star decoration (on boats, a star signifies good luck) and added this decoration to the cover (see “A star is made,” page 67).
A star is made
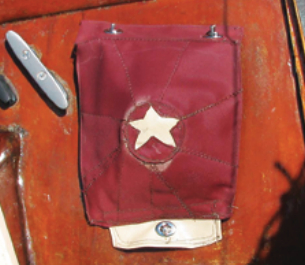
To make my star decoration, I used a patch of the tanbark material and a piece of leather. But, here’s the secret: the leather itself is not star-shaped; a cutout in the fabric forms the star, letting the contrasting color of the leather patch on the inside show through.
On the cloth patch, I drew a chalk outline of the star. I followed that up with a second dotted chalk line about 1⁄2 inch in from the fi rst. The unbroken chalk line was the outer edge of the star; the inside dotted line was where I would be cutting a star-shaped hole out of the middle of the piece of cloth.
Snapping a new disposable razor-sharp blade into my lock-back knife (a new job needs a new tool), I cut out the star along the dotted lines, folded it under to the unbroken line, and smooshed each hem down so the cloth would accept a bend. In short order, I had a cutout of a star in the patch of Sunbrella.
The tanbark-colored compass cover is made of leftover Sunbrella. The star decoration is cream-colored leather scavenged from an old office chair. The eyelet in the leather tab at the bottom can be secured to a twist-lock on the cabintop to expose the compass.
I turned the small cloth patch over to reveal what would be its hidden side, straightened out the folded-over material, and shot it with 3M Super 77 spray adhesive. I folded the hems down to their lines and, after a few minutes when the glue had set, carefully stitched the edges with the sewing machine.
I sewed the cloth patch with the star shape to the leather. To hold everything in place, I spritzed the inside of the panel and then smooshed that down over the leather with its cream-colored side facing out. I then sewed around the whole star with a straight stitch, working at a slow speed for maximum control. (For ultimate control sometimes you have to turn the sewing machine wheel by hand.) A second set of stitches convinced me that sucker wasn’t going anywhere. It looked pretty too.
Compass cover
The other cover had to fit around the compass, which stuck out a few inches from the bulkhead. Since it wasn’t flat, this posed a new problem. Moreover, because the compass is set into the forward-leaning bulkhead, I had constructed a shim of solid mahogany to level it. This shim was about 2 inches thick at the top and tapered to a point on the bottom. To accommodate the outward bulge of the compass, I had to shape the cover. To do this, I marked a 4-inch circle in the center of the pattern and cut slits radiating out to the edges. By sliding the outer edges over one another slightly, I created a curved form.
I added a matching leather star patch on this cover too, but made this patch round rather than square. I added a long flat panel on the top for two twist-lock fasteners and attached a section of leather along the bottom for another twist-lock fastener. The whole cover fi t loosely over the compass, protecting it and the mahogany shim better than the old plastic cover had done. With twist locks on it, I knew this cover would not fall out or blow away.
Fitting the covers
There is a little trick to getting these cloth panels on straight. The instrument cover to starboard went on first, with the top edge of the cloth butting up against a piece of mahogany that edges the cabintop.
First, I fitted the nickel-plated brass twist-lock fasteners into the edges of the cloth covers. I lightly laid the eyelet in the marked area and, with just a nick of a sharp knife, cut tiny holes for the prongs. Once the eyelet was in, I could insert the washer on the opposite side and fold over the prongs to lock the eyelet in place. Next, I cut the cloth out of the center of the eyelet where the stud would pass through. This required a razor-sharp knife blade.
I held the panel up against the bulkhead, marked the holes for the top left and right fasteners and, only then, drilled an undersized hole to screw in the twist-lock fastener itself. Only after these two critical areas were in place did I complete the rest of the panel’s fastenings. Later, I went back, unscrewed the twist-lock studs, and saturated the holes with epoxy to encapsulate the wood. This procedure makes the holes very strong and I don’t have to worry about rot.
The compass cover to port went on the same way. To ensure I’d have a flat, unwrinkled, and taut panel, I was careful to make up the eyelets before drilling the holes for the studs. I also fitted another twist-lock fastener atop the cabin on each side so I could fold up the cover from the bottom and affix the bottom eyelet to the top twist-lock stud. This way, I can readily see the instruments without totally removing the covers — and I never misplace a cover.
I now have two fine cloth covers for my instruments and can be proud of this custom installation I did myself. It’s distinctive, cost very little money, used up some materials I had lying around, and gave me some satisfying time in my home workshop. I’ve had them on for a couple of seasons and they hold up very well, as Sunbrella should. They have survived wild winds of about 75 miles per hour — but not from a sudden Lake Superior storm. My boat is a trailerable craft and even my old 4 x 4 can sometimes reach a little above posted speed limits, especially going downhill. Even flapping wildly for miles, the custom cloth covers hold on just fine.
Marlin Bree is a veteran Lake Superior sailor and marine journalist. He has written award-winning articles about his adventures on the world’s biggest, and arguably sometimes baddest, lake and several books, of which the latest is The Dangerous Book for Boaters. His website is www.marlinbree.com.
Thank you to Sailrite Enterprises, Inc., for providing free access to back issues of Good Old Boat through intellectual property rights. Sailrite.com