Soften the helm and sharpen performance

Issue 78 : May/Jun 2011
I am often asked by owners of good old boats what they can do in the way of upgrades or changes to make their boats perform better. Depending upon the specific boat, there may be several areas where improvements can be made. The key in almost every case is the budget set aside for the changes. I also have a general rule of thumb that you do not want to make expensive changes to your boat and then, on your first sail with the altered boat, say, “I think I can feel the difference.” If you are going to make a change, make it significant enough that the results are obvious and, of course, positive.
Taming weather helm
A common complaint I hear about is weather helm. If you have a full keel, a modified full keel, or a rudder on a skeg, your rudder has no balance area and that can exacerbate helm pressure. If you have a spade rudder, you can add more balance area forward of the stock to reduce helm pressure, but that is only a band-aid on the weather-helm problem.
Why do so many boats have too much weather helm? I don’t know. If we leave sail shape aside for the moment, weather helm is usually caused by the mast being too far aft or the keel being too far forward. These are hard things to change.
Keeping your mast tuned can reduce weather helm. If your masthead is drooping off to leeward when you are on the wind, this can increase helm pressure. You can remove rake from the mast to move the center of pressure of the sail plan forward. You can’t, within a reasonable budget, move your keel.
If you have split appendages, you could add area aft on your keel fin, but I think the location of the leading edge has far more to do with it than where the trailing edge ends. Bill Garden once sent me a formula and diagram that used only the leading edge of the keel and the end of the boom as determinants for helm balance.
Over the years, I have found no reliable formula for helm balance and I have come to trust my eye and a few basic rules of thumb. So, if we want to address helm pressure issues, where do we start?
Sails come first
The most obvious upgrade is sails. While your old Dacron sails may still be intact, the chances are that their original designed-in shape has long since departed. The old, stretched-out sail will increase heeling moment while not delivering the drive you need for good performance. This can affect heel angle significantly, and increased heel angle usually brings with it an increase in helm pressure or weather helm. This is particularly prevalent when the mainsail gets that “catcher’s mitt” shape with the maximum draft moved back into the last one third of the chord. Modern sail materials will allow the sail to maintain its designed shape far longer and the only caveat here is that new matrix-style fabrics do cost more than Dacron.
You might consider going to a full-battened mainsail, which is more forgiving to trim and tends to hold its shape longer. It’s also easier to furl, especially if you have lazy-jacks. Full-battened mains can look just fine while being way out of trim. I want a main to tell me when it needs trimming. On my boat I have two full battens at the top and two half battens at the bottom. This is a good arrangement for boats under 40 feet as it is a little more sensitive to trim adjustments. I also like telltales on the leech at the batten pockets.
I think, on most older boats, you are better off staying with a normal roach curve rather than adding roach. The new boats you see with exaggerated roaches usually have either no standing backstay or a running backstay that can be eased in tacks while the mast is supported by spreaders swept up to 30 degrees. Most older boats have in-line spreaders with forward and aft lowers and a standing backstay that will catch the exaggerated roach each time you tack. This can be a real problem in light air when there is not enough wind to push the roach over the backstay.
The typical good old boat will be a masthead sloop with probably a far bigger foretriangle than we see today on modern fractional-rigged boats. This means that the choice of jibs and genoas is paramount.
Boats of that era usually came with a number-one genoa with an LP of at least 150 percent and sometimes as high as 160 percent. We loved overlap in the old days and much of that love came from the way the CCA and IOR rules measured rated sail area. I think today you can sail quite effectively with a max LP of around 135 percent. Of course, if you pole the jib out in light air downwind, you will not be as fast but, upwind, I think a good new jib with 135 percent LP will work just fine. Of course there is no one ideal LP number and if you sail on San Francisco Bay you might be better off with a 100 or 110 percent-LP working jib. Part of the beauty of a lower-LP genoa is ease of tacking, especially if you have forward lower shrouds. An asymmetric chute or “screecher” on a roller furler can also be a nice addition.
Add sail area forward
If your boat suffers from excessive weather helm even with good sails, you have several choices: you can move the mast forward, you can move the keel aft, or you can add a bowsprit. Obviously, the first two options are pretty much out of the question. What you are after here is to move the center of pressure of the rig forward.
A chunky-looking wooden bowsprit can do the job but a tubular bowsprit would perhaps look better while also eliminating the need for whisker stays. You can also move your anchor rollers out onto the sprit. You will have to add a bobstay and, down near your bootstripe, a bobstay chainplate. This can be external and bolted on with a Y-shaped bracket or it can be done by cutting a slot in the stem and glassing in the Y-bracket on the inside. This looks nicer.
“How long should my bowsprit be?” My advice here is that the cost of adding a bowsprit will have little to do with how long it is — that’s just extra tubing. If you go ahead with this change, be bold so in the end you can say, “Wow! That really made a difference.” I can’t just give a number to cover all boats but I’d guess, for the typical 35-footer, I would start at 30 inches. There is very little chance you’ll add enough to give the boat lee helm.
I’m frequently asked, “Should I add an inner forestay so I can carry a staysail?” If your boat has a long J dimension and a big foretriangle, the answer is, “Yes you can.” If your foretriangle is short on J, you may not have the room for an inner forestay. The big question will be about how to anchor the tack point of the staysail. You can add a chainplate and tack fitting on your forward bulkhead at the foot of the V-berth but you may need to beef up that bulkhead.
I like to see the tack point as far forward as possible. People call this a “Solent stay” and ideally it would go almost to the stem. That way, the center of pressure of the staysail or storm jib is well forward and your performance and balance will be better. If you added a bowsprit, you could keep your old stemhead tack fitting and use that for the staysail.
With the tack point established on the deck, you next have to decide where the head of the new staysail will go on the mast. If you have double spreaders, the obvious place is at the upper spreaders where the mast is well supported.
On a single-spreader rig, the new inner forestay will terminate about halfway between the spreaders and the masthead where there is no support. That’s the bad news. The good news is that those old mast sections were usually stout and boats like the Valiant 40 and the Tayana 37 could get by with just adding running backstays to offset the load on the inner forestay. Many Valiants did not add runners but relied upon a standing intermediate shroud that I finally realized did little or nothing at all. The answer to the running backstay question will depend entirely upon how stiff your mast section is.
Remember, if you choose to increase the size of your rig, that’s a major change. You are going to need new chainplates and probably new knees or more reinforcement to the bulkheads. This is where you should consult a designer. For instance, the typical bobstay sees a far greater load than does the headstay, so it will need to be of a greater diameter than the headstay. I am always conservative with rigging diameters.

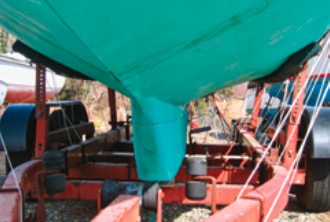
Rudder and keel remedies
“What can I do with my clunky old rudder?” Good question. If your boat has a full keel or modified full keel, the answer is simple: “Not much.”
The best thing to do would be to check the rudder blade for symmetry and make sure that, over the years, it has not gone concave in its section.
The next thing to address would be the trailing edge. I see old rudders on which the radius of the trailing edge is over 1/2 inch. This is too much, and in almost all cases you do not want a radius on the trailing edge of your rudder. You want a nice crisp flat with sharp corners to discourage the water flowing over the rudder from wrapping around the trailing edge to get from the high-pressure side to the low-pressure side. A 1/4-inch flat trailing edge should work.
On some boats, big round trailing edges can result in a “collapsing vortex” that you would feel as a low-frequency flutter that can be quite pronounced. This flutter can also be a product of asymmetry in the blade, so make a template and check to see that both sides of your rudder are the same sectional shape.

If your prop is in an aperture, don’t forget to clean up the edges of the aperture.
You need to do the same things — check for symmetry and trailing-edge treatment — if you have a spade rudder. If your rudder happens to have that sexy looking scimitar shape like the old C&C rudders had, it has a minimal chord at the upper end. This is good for reducing interference drag but it sure doesn’t help the rudder work. You would be better off with a rudder blade that came snug up to the bottom of the hull so the rudder can benefit from some end-plate effect off the hull that will help keep the flow over the blade attached. We have done new rudders for a few boats that originally came with the scimitar blade and the results were always very good.
New rudders are expensive, and you don’t want to have to change your rudder tube and bearings or you can get into major surgery and great cost. However, if you suspect the steel web inside your rudder has suffered major corrosion, this might be a good time to consider a change in your rudder’s planform as you rebuild the rudder.
You can do little to your keel that will not run into big money. Again, symmetry is important and you want to avoid that big fat radius at the trailing edge. A lot of old boats’ keels have blunt leading edges. A parabolic shape works best, but the only way you can alter your large-radius leading edge is to get a new keel made or add a false leading edge to what you now have.
I have had clients who added draft by bolting on additional span to their keel. This can be done in timber lifts faired to the existing keel and glassed over. This will not help stability but it will give you a more efficient keel for upwind work. You can do it in lead if you feel your boat is overly tender but I’m seldom in favor of adding weight to any boat. If you want to increase stability, and you have a nice deep bilge, you can glass in some lead ingots. The key here is to get the new lead as low in the boat as possible. If you have a shallow bilge, this is probably not going to help.
Keep in mind that, if you make a major improvement in the boat’s stability, you are going to put greater loads on the rig and your existing rigging, chainplates, and knees may all need beefing up.

Return on investment?
I had a client, I’ll call him John, who owned one of my Cheoy Lee 43 motorsailers and loved it. From time to time, though, he would call me and discuss the possibility of doing a new custom boat. I tried hard to sell him, but he would always come back at me with, “How can you improve on perfection?” He even talked about buying another CL 43 MS so he could keep one in Maine and one in Florida.
It was clear that John wanted to spend some money but wasn’t ready yet for a custom project. I suggested a change to his rig. I had already added a tall rig and a bowsprit to another CL 43 MS and that owner had liked the change. But John had another idea. His idea was to get rid of the original spruce spars (it was a ketch) and replace them with an all-carbon rig. We are talking big money here, about $60,000.
I explained to John that the carbon rig would make the boat stiffer and probably result in a change in the motion in terms of pitching. With the weight of the heavy spruce sticks gone, the boat should feel like a new boat. John had GMT build him beautiful carbon spars painted in a faux-wood finish.
John was very happy with the change. I was chatting with him one day and he was raving about some rough offshore work he had done recently. I casually asked him, “Can you tell the difference in the boat with the new carbon rig?”
He answered, “Not really.”
I eventually designed a new custom boat for John.
Robert Perry is a contributing editor with Good Old Boat. Over the course of a long career designing sailboats, he has figured out some of what makes them good. He hopes that owners of old boats can benefit from what he has learned.
Thank you to Sailrite Enterprises, Inc., for providing free access to back issues of Good Old Boat through intellectual property rights. Sailrite.com