A knot you can trust with your wine
Issue 54 : May/Jun 2007
The hackamore knot is well worth knowing. It has at least three distinct uses for which it is invaluable. The first of these is as an emergency hose clamp.
I once used the remarkable constricting power of this knot to jury-rig a flexible hose when there was no available hose clamp. I used thin and slippery cordage. To get extra pressure, I hauled on the non-loop ends one at a time, adding incrementally to the pressure, but with care not to over-tighten one side to the extent that the knot lost its symmetry. It worked for me in desperate circumstances when I had no alternative, but is not a serious or permanent substitute for a proper hose clamp.
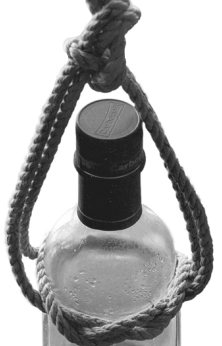
The second of this knot’s uses is that it can be tied around the neck of a bottle and then formed into a carrying handle. If the bottle has a rim, the knot in a smallish-diameter line will grip very securely to the neck while you demonstrate the epitome of sang-froid as your highly prized wine bottle descends into the cooling depths. It’s never let me down, but you might just want to test it a few times before entrusting to it the safety of a 1965 vintage.
Thirdly, this knot can be used to rig a jury mast with the loop forward and two ends as shrouds. Alternatively, cut the loop into two ends and rig four stays. But I have never seen it recommended for the purpose as there are knots specifically designed for the job.
Decorative hitch
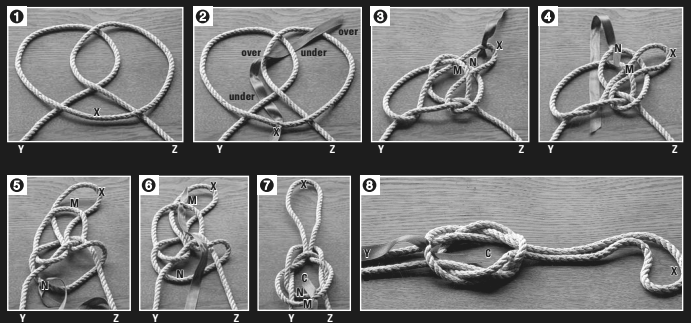
Form two loops as though beginning a decorative hitch for a key ring. Take the left side of the right loop and lay it over the right side of the left loop (Photo 1). (Note: this may sound difficult, but following the photos is easy. Give it a whirl. Your editors were able to do this correctly on the first try and found it to be an amazing knot. –Eds.)
Take the bight of rope at X and weave it under over under over until it emerges at the top of the knot as in Photos 2 and 3 (before and after, the ribbon traces the path through the maze). The loop X and the ends Y and Z will not move from their positions from now on.
Slide your hand up under the knot and grasp the bight of rope N, where it crosses under the loop X, and while keeping the shape of the other parts of the knot as they are, draw bight N down the underside or back of the knot as you pull your hand out. It ends up crossing under the two ends Y and Z. (Before and after steps shown in Photos 4 and 5.)
Next, pull the other bight of rope (M), crossing over loop X down over the front of the knot until it ends up crossing over Y and Z. (Before and after steps are shown in Photos 6 and 7.)
The knot is now complete (Photo 8) and can be tightened on anything placed through its center (C ). To tighten, take loop X in one hand, both ends Y and Z in the other and pull apart. The ends Y and Z can be joined with a bowline to form a loop of the same size as loop X, creating a convenient handle for carrying.
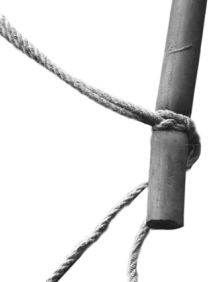
When you have mastered the hackamore or jug sling, watch how it moves when you tighten it, and you will notice that your hands are moving apart far faster and further than the inexorably tightening knot. This is velocity ratio creating serious mechanical advantage. I have crushed soft-wood to splinters with it; just look at the squashed hose in the photo. Please do not try it on your finger to see how tight it can be; not only will it crush the life out of your finger but there will be no easy way to get it off the hapless digit. Like all constrictor knots, it is designed not to loosen.
Thank you to Sailrite Enterprises, Inc., for providing free access to back issues of Good Old Boat through intellectual property rights. Sailrite.com