How one owner designed and built a sturdy sea hood

Issue 70 : Jan/Feb 2010
Magnolia, my 1970 Cheoy Lee Offshore 27, came from the builder without a sea hood, either as an oversight or a budget decision; probably the latter. A walk on the docks of any marina or yacht club reveals that Magnolia was in good company: other boats of the same vintage also lacked sea hoods.
A sea hood has two advantages. First, in brisk weather, a sea hood prevents boarding seas or heavy spray from finding its way under the forward edge of the companionway slide and into the cabin. Second, a sea hood provides an attachment point for the forward edge of a dodger, an item that further contributes to keeping things dry below. In fact, a properly designed dodger allows the companionway slider to remain open in most weather. Because offshore sailing figured in my cruising plans for Magnolia, I added a sea hood to the projects list for her refit.
It was natural to think first of building my sea hood by laying up fiberglass in a mold — because that’s how fiberglass boats are built. That would be a two-step process: make a mold; mold a sea hood. Then it occurred to me that I could eliminate one step if the mold itself could be the sea hood.
Conforming to curves
I wanted the sea hood to be strong and aesthetically pleasing, and to look as though it came with the boat. Magnolia’s cabintop and companionway hatch have the same curvature, and I felt the sea hood should follow suit.
I’ve seen boats with crowned cabintops and flat companionway hatches or cabintops with one curvature and a hatch with another. Owners of these boats would have to decide whether to make the sea hood follow the curvature of the cabintop or that of the hatch. If, for the sake of simplicity, you are tempted to build a flat sea hood, remember that a flat top must be much more heavily built to have the same strength as a curved one.
When the hatch is open, the hatch slide has to clear the inside of the sea hood, so the critical measurements are the length and width of the hatch and its height above the cabintop at its corners. I found there was a difference in height between the forward and after corners for, while the track was straight, Magnolia’s cabintop curved slightly downward at its forward end. I allowed for this difference in my design. These measurements determined the inside dimensions of the sea hood, to which I added 1⁄4 inch for clearance.
Attachment options
During my ruminations about design, I thought about three methods for attaching the sea hood to the cabintop. In the method I eventually used, the sea hood is glued to the cabintop with epoxy and a fillet added between the sea hood and the cabintop for strength and appearance. However, this is the preferred method only if the cabintop and new sea hood are going to be painted as part of the project, which I planned to do. Otherwise, the transition between the painted sea hood and the gelcoated cabintop at the fillet edge would be obvious and unattractive.
The other two methods I contemplated both offer solutions to the painted sea hood/gelcoated cabintop problem. One forms a sharp angle between the sea hood sides and the cabintop that would disguise the paint line and slight differences in color and gloss because light would strike the two surfaces at different angles. The other employs a flange that makes the sea hood removable.
Assembling the sea hood
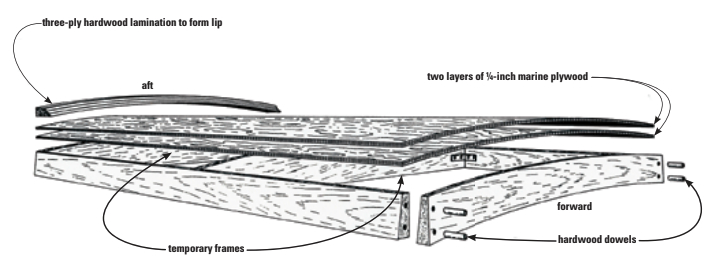
I used mahogany for the sides of my sea hood because I had some on hand, but any decent hardwood is suitable. I tapered the side and end pieces from bottom to top at an angle to agree with the slope of the cabin sides. To shape the top and bottom edges of the end piece, I first made a pattern by “spiling” the curve of the cabintop onto a board (see “An old carpenter’s trick,” page 38). The corners are simple butt joints held together with epoxy, with dowels to hold things in alignment while the epoxy cured.
An old carpenter’s trick
A pattern of the curvature of the cabintop can be made by “spiling” (also called scribing). This is depicted in the photograph by my “hand model,” Gary Moore. For this picture, Gary held a 1 x 4-inch board on edge against the forward edge of the companionway hatch. Then, with the point leg of a pencil compass riding along the cabintop, he scribed the curvature of the cabintop onto the face of the board with the pencil. He was careful to hold the compass so the legs remained vertical during the entire scribe, rather than radiating out from the cabintop. When Gary was finished, I carefully cut along this scribed line with my band saw (a saber saw would work), tested for fit, and made minor adjustments with a rasp.
I laminated the top using two layers of 1⁄4 -inch marine plywood. (A third layer could be used if the span is great and/or there is little curvature.) Since a sea hood has only three sides, I needed a temporary aft end in order to make the plywood conform to the desired curvature. I also found that a temporary center beam was necessary to make the plywood conform properly. I attached these temporary components to the sides with small angle brackets so I could easily remove them later.
To ensure the plywood wouldn’t stick to the temporary frames, I covered their tops and ends with waxed paper. I glued the first plywood layer to the sides and end piece with epoxy and held it in place with small panhead sheet-metal screws. After the epoxy had cured, I removed the screws. Here’s a trick: I heated the heads of a couple of stubborn screws with a soldering iron to melt the surrounding epoxy and make their removal easier.
I attached the second layer of plywood to the first using screws spaced about 3 inches apart. To make sure the top layer would be drawn down tightly to the first, I made sure that the screw holes (pilot holes) in the top layer were large enough so the screw threads didn’t bite.
After doing a dry fit, I liberally coated the matching plywood faces with unthickened epoxy and allowed it to soak in for about five minutes. Next, I recoated any dry spots that appeared. I then thickened a batch of epoxy with colloidal silica just enough so it wouldn’t run and spread a generous coat on one of the adjoining faces. After aligning the top layer of plywood over the bottom layer, I drove in the screws in the center fore-and-aft row. Alternating from side to side, I then drove screws in rows parallel to the center row, working from the center toward the edges. In this way, the epoxy was squeezed from the top center to the edges without trapping air. I immediately scraped away the squeezed-out epoxy to avoid having to sand it away later.
Filleting the inside corners
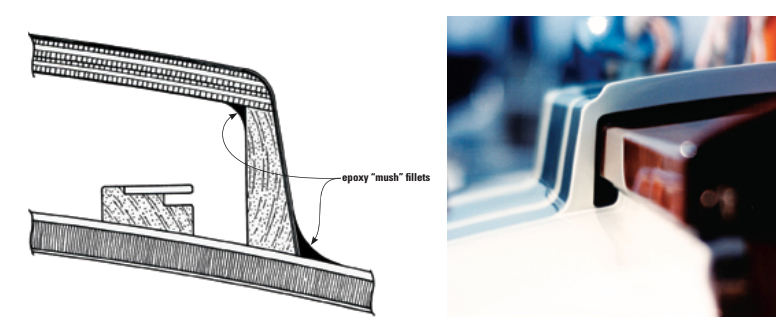
After the epoxy cured, I removed the temporary frames so I could finish the inside of the sea hood. First, I applied an epoxy mush fillet along all the inside corners. Since this fillet is structural, I made the mush by thickening the epoxy with microfibers (cotton fibers). After wetting out the corners with unthickened epoxy, I dabbed the mush into place with a Popsicle stick. Then I dragged a tongue depressor, held at a 45-degree angle, along each corner, smoothing the epoxy mush into a uniform fillet. I scraped up the excess mush forced out on either side of the tongue depressor with a second tongue depressor sanded to the shape of a chisel. I did a good cleanup job to avoid the laborious task of sanding cured epoxy later.
When the fillet had cured, I scrubbed it thoroughly with a wet washcloth to remove the amine blush while trying to avoid excessively wetting the uncoated parts of the wood. (Amine blush forms on the surface of epoxy as a by-product of the curing process. If not removed, it will inhibit adhesion of additional coatings, such as epoxy, paint, and varnish. Fortunately, it’s water-soluble and easily scrubbed away.)
I then sanded off the gloss and removed any irregularities with 80-grit sandpaper wrapped around a dowel.
Glass for strength
For extra strength, I lined the inside of the sea hood with a layer of 6-ounce fiberglass cloth, which I dry-fitted, cutting slits in the corners to allow the cloth to conform and overlap at the corners. Satisfied with the fit, I wet the cloth out with epoxy resin using a disposable brush. I wet the cloth out thoroughly but was careful not to apply too much resin, since this would cause the cloth to “float away” from the wood.
When the epoxy was partially cured, I trimmed away the overhangs with a sharp utility knife and applied a second coat of resin. (If additional coats of epoxy are applied after previous coats have only partially cured, no amine blush will have yet formed and a full chemical bond between coats will occur. That makes the washing and sanding step described previously unnecessary.)
Reinstalling the frames
After the epoxy had fully cured, I reinstalled the temporary frames because the laminated top had sprung back somewhat at the open end. Of course, I had to trim the frames to allow for the corner fillets. Next, I trimmed the plywood top until it was flush with the sides and rounded all the outside corners using a sharp block plane followed by sandpaper wrapped around a block of wood, the idea being to create a shape that complimented the style of the cabin. I then filled all the screw holes made during the laminating process with a putty of epoxy and microballoons. After the putty had cured, I sanded it flush with the plywood surface.
Because intuitive engineering told me two were better than one, but a third was unnecessary, I applied two layers of 6-ounce cloth. I applied these in one continuous operation, trimming away the excess cloth when the resin had partially cured. I followed this with an additional coat of resin to fill the weave of the cloth. As before, I cut the cloth at the corners so it would drape smoothly. After an overnight cure, I sanded the outside of the sea hood to remove any lumps and bumps. I filled low spots with epoxy putty made with microballoons. After this had cured, I sanded it to a smooth, fair finish.
Finishing details
My cabintop is lower forward than aft, which meant that water would become trapped under the forward end of the sea hood. To prevent that, I drilled 3⁄8-inch limber holes in each forward corner of the sea hood at the bottom edge. In order to control the location of the hole exactly, I drilled a guide hole in a wood scrap and clamped the scrap to the sea hood side with the guide hole in the exact position I wanted. Then, to maintain a seal on the wood, I carefully coated the limber holes with epoxy.
I wanted a lip on the aft top edge of my sea hood for two reasons: it would give me a place to attach a dodger and it would strengthen the otherwise unsupported aft edge. Oh, and for one more reason: I felt it would look good.
I made my lip by laminating three 1⁄4-inch layers to the top of the aft edge. Laminating in three layers rather than bending a single piece of wood to the sea hood would help to maintain the curvature in the sea hood top and be stronger. To give the lip an attractive shape, I made the top layer narrower than the second and the second narrower than the bottom. I beveled the forward edge of each layer 45 degrees, so that the three layers formed a continuous slope when stacked. To make assembly easier, I dry-fitted the layers to the sea hood and screwed them in place so they couldn’t slip and slide around. I then disassembled them, applied epoxy to the adjoining surfaces, and screwed them back in place. After the epoxy had cured, I removed the screws, filled the screw holes with epoxy putty, and sanded the lip to shape. I formed an ogee shape (an S-shaped curve) at the ends of the lip and sanded a shallow cove in the taper where the forward edge joins the sea hood top, using a dowel wrapped in sandpaper. I slightly rounded all other edges, then sealed the lip and after edges of the sea hood with three coats of epoxy.
Next, I removed the temporary frames and sealed the screw holes with epoxy. I noticed there was a little “spring-back” in the after edge of the sea hood. To restore the proper shape for attachment to the cabintop, I cut away enough of the aft temporary frame to allow it to be C-clamped back in place during the mounting process.
Fitting the sea hood in place
First, I thoroughly sanded the cabintop where the sea hood would be attached. I then carefully set the sea hood in its proper position on the cabintop and, at the corners, drew location lines on the cabintop. Next, I turned the sea hood upside down and coated the entire bottom edge, as well as the cabintop where the sea hood would join it, with unthickened epoxy.
I made an epoxy mush by adding colloidal silica to my remaining epoxy and applied it to the bottom edge of the sea hood. I was careful to use enough for a continuous seal but not so much that an excessive amount would squeeze out on the inside edge where it could not be cleaned away. I set the sea hood in place, guided by the location lines on the cabintop, and weighed it down by placing a bucket of water on top. I cleaned away the epoxy that squeezed out along the inside edge of the sea hood as far as I could reach by using a tongue depressor shaped like a chisel.
On the outside, I added additional epoxy thickened with microfibers (for strength) to form a fillet between the sea hood side and the cabintop. To shape the fillet, I dragged a short piece of PVC pipe through the epoxy mush and cleaned up the squeezed-out excess with my tongue depressor. To protect the limber holes, I inserted a 1⁄4 -inch dowel which I had rolled up in waxed paper. It was a little bit difficult to form the fillet around the dowel, but I dabbed a little extra mush around it and sanded it to shape later.
When the fillet had cured, I sanded it to remove irregularities. I found some imperfections that needed filling. For these, I mixed a putty of epoxy and microballons which, as well as being easier to sand, also spreads more smoothly. When that had cured, I sanded it with sandpaper wrapped around a piece of PVC pipe. Satisfied with the shape, I then coated it with unthickened epoxy. After this had cured, I sanded it smooth to create a paintable surface. For now, the project was finished awaiting subsequent painting of the entire boat.
Paul Ring is a contributing editor with Good Old Boat. He has sailed, repaired, modified, restored, and built boats for the past 42 years. Magnolia, his restored Cheoy Lee Offshore 27, graced the cover of Don Casey’s book, This Old Boat. Paul currently sails his Nonsuch 260 with first mate, Barbara Brown, on Mobile Bay. He has written many how-to articles for sailing publications.
Thank you to Sailrite Enterprises, Inc., for providing free access to back issues of Good Old Boat through intellectual property rights. Sailrite.com