Low-wattage lighting at low cost
Issue 107 : Mar/Apr 2016
One of the best things that has come along for boaters (and homeowners) lately has been LEDs for lighting. They’re cooler in operation, seemingly last forever, and use very little electricity. Boaters find that instead of burning 15 or 20 watts (1 to 2 amps) per bulb, they burn maybe 3 or 4 watts. Five of these use as much power as one of the old-style incandescent bulbs and they last as close to forever as I’ll ever hope for.
Unfortunately, one of the worst things about them is their price. Even when shopping online, you’ll find that a replacement twin-pin 12-volt bulb costs $8 or $10. On top of that, the lamp itself can run more than $100. But why spend that if you can make your own lamp — bulb and all — for less than $10?
With a little research, it’s possible to cherry-pick the LED itself and make the lamp meet your special purpose. In my case, I needed a lamp that wasn’t too bright so it would just illuminate the toilet in the head without ruining my night vision.
In the past, night-vision bulbs were always red, and it’s no problem to find a red LED if that’s what you prefer. However, red light makes it difficult to read charts; any red ink on a chart disappears in red light. So, I’ve come to prefer white LEDs.
A few years ago I made a lamp with a base fashioned from the top of a peanut butter jar. That bulb, however, pointed in the wrong direction, was too dim, and was blocked by a towel rack.
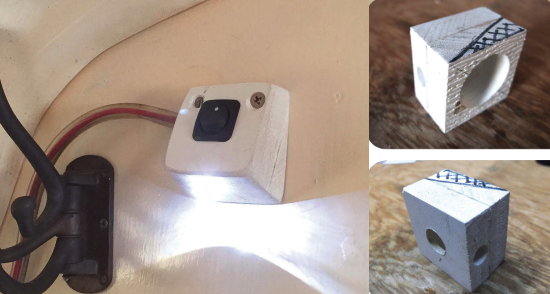
Targeted lighting
This time, I made the base by cutting it out of two piecesof 3⁄4-inch plastic. I had to cut one piece at a 15-degree angle so, instead of pointing down or straight out, the LED would point directly at the toilet. I glued the two resulting pieces together and, when the glue dried, hollowed out the base with Forstner bits at my drill press. I had to drill a hole just big enough to hold the glued LED in place with enough space behind it to hold the wires. Also, there had to be a hole in the front for the switch. I like the look of rocker switches, so that’s what I used. Some might prefer a toggle switch, but I thought that might get toggled accidentally. The result is a nice clean design.
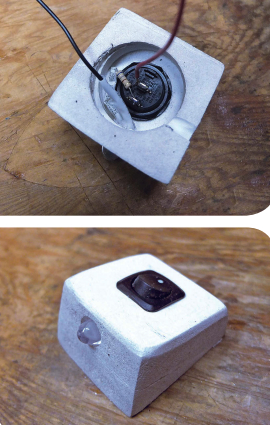
Assembling components
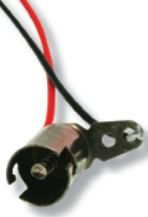
Before it went belly-up, I used to go to the local RadioShack and rummage through the parts bins until I found the bits and pieces I needed, such as an LED with the right specs. For this lamp, I used RadioShack part #276-0005, Ultra High Brightness 10mm White LED, 2.85 candles, 10-degree viewing angle, pulling 20mA.
There has to be a resistor in line to limit current. If you just hooked up an LED to a 12-volt battery, it would go off with a single bright flash and leave nothing but a burnt smell in the air . . . which is why they invented resistors.
My favorite uncle, a merchant marine ship’s radio officer, made a crude attempt at teaching me Ohm’s Law, but it didn’t stick. Happily, there are online Ohm’s Law converters (see “Resources” below). You feed in the voltage, input the current demanded by the LED, and it tells you the size of the resistor. If you happen to have a 24- or 32-volt system, then use whatever resistor turns up in the converter. You can find the color code of the resistor online (see “Resources”). You can go blind trying to read the color codes on resistors so I just try them all with a multimeter.
Although the website told me to use a 600-ohm resistor, in most cases I just use a 470 ohm. Whatever. If you need a lot of light, you can use as many LEDs in the same fixtures as you like, wired in parallel, but each LED should have its own resistor. You also need a switch. But that’s all.
I always solder the components, something I also learned from my uncle. The proper technique was featured in a recent article in Good Old Boat (see “Electrical Soldering,” May 2015). Heat the wires and let the solder flow. Try to get a heat-shrink tube over the parts so they don’t short out when you jam them into the base.
I used a length of #16 red wire — red for positive (+) — first to the switch, then red from the switch to the resistor. The current draw is so small that almost any common marine-grade wire will get 12 volts to the light without dropping the voltage more than 3 percent.
The resistor is soldered directly to the long lead of the LED. The short arm is soldered to a length of black wire, which goes to ground (-) at the battery. The wires can be any length you like but will be connected, either by soldering or press fitting, to the house-current lead.
There should also be a fuse somewhere in the circuit. My lamp is wired to a #14 house-current pair used only for lighting with a 2-amp fuse at the fuse panel, which is enough to handle all of my LED lights at the same time. The wires can lead out through the back of the lamp into the bulkhead or out the side, as I have done. Either way works.
After a summer’s use, I can say this has been a perfect project and should outlast the boat.
Cliff Moore is a contributing editor for Good Old Boat. His first boat was a Kool cigarettes foam dinghy with no rudder or sail. Many years and many boats later, he’s sailing a 26-foot AMF Paceship 26 he acquired and rebuilt after Hurricane Bob trashed it in 1991. He is the editor of a community newspaper.
Thank you to Sailrite Enterprises, Inc., for providing free access to back issues of Good Old Boat through intellectual property rights. Sailrite.com