Replacing tired or truant screens in old opening ports
Issue 107 : Mar/Apr 2016
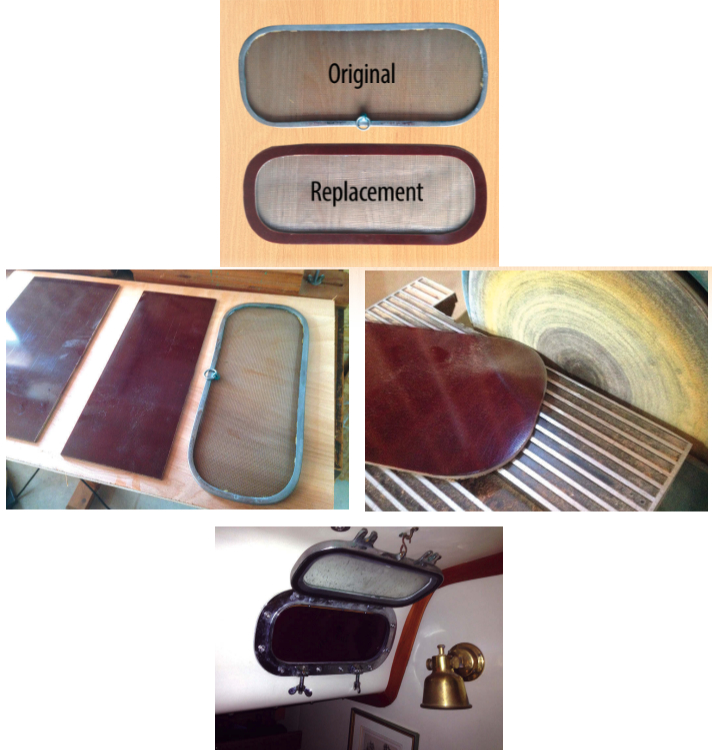
Your boat may be fortunate enough to have been built with quality cast-aluminum or, even better, cast-bronze opening ports. The nicest ports have heavy safety glass lenses that stay clear and, short of needing new gaskets from time to time, are just as functional and beautiful as they were when new. It’s probably safe to say that, when new, all these ports came with insect screens. By now, those screens are probably torn, damaged beyond repair, or lost.
If you’re lucky, replacement screens will still be available from the manufacturer of either the boat or the ports. More likely than not, though, your boat’s maker is long gone, along with the maker of the ports, and you must forgo opening your ports on hot and buggy nights. You have little choice then but to make your own new screens. This is a fairly simple project that won’t break the bank.
Frame and screen choices
Make the frame from a light and rigid material that’s easy to work with. I purchased a 12- x 12-inch sheet of 1⁄8-inch-thick machinable Garolite (LE) from McMaster-Carr. I was lucky that my port opening was exactly 12 inches wide so the 12 x 12 size was perfect for making two 12- x 5-inch frames. Larger sheets are available if your ports are larger. Originally known as Tufnol, this material was used for making the shells of early lightweight blocks that owners of boats built in the 1960s will remember.
If you have a surviving screen, as I do, you’re in luck. Just trace the outside perimeter. Otherwise, you’ll have to make a pattern by trial and error. After roughing mine out, I fine-tuned the shape with the help of a stationary edge sander. It took several trips between the shop and the boat to get a perfect fit. (This was fairly easy for me as Secret Water spends her off-season in my shop surrounded by tools.) At this point, you’ll have a solid fitted piece. You could quit right here if you wished to make a set of blackout panels for running at night or sleeping late.
I decided a 1⁄2-inch-wide frame would work well. The original cast-bronze frames were narrower but, with the Garolite, the little extra width helped make the frames more rigid.

After placing the material on the saw table in just the right spot, I very carefully raised the saw blade to cut the long runs. This technique creates a nice straight inside edge. Next, I roughed out the inside corners using a hole saw chucked up in the drill press. I did the final fitting with a drum sander in the drill press. With some fine sandpaper, I knocked off the sharp edges and scuffed up the side to which I would glue the screen.
Fiberglass, aluminum, stainless steel, and bronze screen materials are all available from McMaster-Carr. All have their pros and cons. I chose fiberglass because, well, I had some already. I installed it simply by stretching it over the frame with the abraded side up and tensioning it slightly with pushpins. I made the bond using Permatex Flowable Silicone Windshield & Glass Sealer, which is sold in small tubes at auto parts stores. It works very well as an adhesive in this application because it flows on so well: just let a bead flow onto the screen. When it has cured, trim the screen to suit. The final product is not quite as firm as one made of aluminum or bronze, but it fits and functions very well as a suitable replacement.
The last challenge is how to keep the screen in place. This will vary between designs. On my cherished Allied Seabreeze 35, each bronze port frame has four small pins: two across the top and two across the bottom. These serve to keep the screen from falling out. My new screens are held in place by a friction fit aided by the little bit of silicone that oozed over the edges. Depending on the design of your ports, you may have to get creative.
Coastal Maine cruising may not be famous for hot summer nights, but we can grow mosquitoes with the best of them. Standing by to repel boarders!
Art Hall, his wife, Sandy, and their not-so-inclined-to-sail Pekingese, Kitri, can be found sailing their 1975 Allied Seabreeze 35, Secret Water, on Penobscot Bay, Maine. Occasionally they’ll push way Down East in search of solitude. Art enjoys the challenge of keeping a good old boat going strong from season to season, decade to decade. Secret Water turned 50 years young last summer and is now on her way to a century.
Thank you to Sailrite Enterprises, Inc., for providing free access to back issues of Good Old Boat through intellectual property rights. Sailrite.com