Here’s how one sailor rebeds portlights and hatches
Issue 42 : May/Jun 2005
The rebedding or replacement of hatch and portlight inserts, a process referred to as glazing, is a common chore on older sailboats. Plastic inserts (called “lights” in the glazing industry) eventually become weathered, scratched, and crazed. Weathering and crazing can make it almost impossible to see through them, and they give your boat a tired, worn look. Glass, another material commonly used for glazing hatch and portlights, can become cracked, broken, chipped, and pitted.
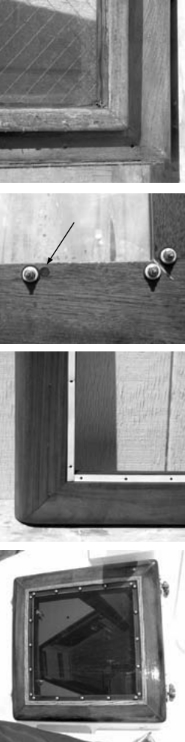
Hatch or portlight installation is a project that most sailors can satisfactorily accomplish on their boats without needing to call in the professionals. The example used in this article is a teak-framed hatch taken from my 1977 Hans Christian 38. The suggestions and techniques provided here can be used for glazing hatches and ports constructed of any materials and on any type of boat.
Existing inserts
The existing inserts may be constructed of tempered glass or a variety of plastic materials. They may be trimmed in wood or metal (typically bronze or aluminum). Some installations forego the trim and secure the inserts using fasteners alone. Regardless of the method used, all installations must be waterproofed against wave and weather.
Removing the old insert
Hatch and portlight inserts may be held in place with a combination of screws, trim, and marine caulking or sealant. Removing an old insert may be as easy as removing the fasteners and applying hand pressure to the inside surface of the insert. However, depending on the holding strength and tenacity of the original caulking, the job may be more difficult. Take care not to damage the wood trim or mounting surfaces during removal.
In some cases, as when 3M 5200 caulking has been used in the original installation, it may be necessary to use means other than brute force to remove the old insert in order to prevent damage to existing surfaces. One way to accomplish this is to pull piano wire or guitar string along the seam between the insert and the mounting, separating the two.
When using the wire method, first drill connecting holes at 90-degree angles through the existing caulking on the inside and outside of the insert mounting. Thread the wire through the connecting holes and pull it along the seam of the sealing surface. Wear leather gloves to prevent cutting your hands. Take care to prevent damage to the wood or metal trim beneath the insert. Generally, this method will make quick work of the toughest removals.
Surface preparation
The recessed wood or metal framework where the new insert will rest must be thoroughly cleaned of old sealant to prevent water penetration. Scrape off the old sealant and wipe the area with solvent. Acetone is generally good for this purpose but, depending on the chemistry of the old caulk, it may be necessary to use some other solvent (a little trial and error may be required if the sealant type is unknown). This may be followed by a light sanding.
If the original frame is constructed from wood, it’s a good idea to plug old screw holes. Use 1⁄4-inch to 3⁄8-inch wood plugs set with epoxy or good wood glue. Sand them flush. Drill new mounting holes in the frame to match those in the insert. This will provide a clean bite for the screws.
Layout
If you don’t plug the old holes, the new insert must be marked and drilled to match existing screw holes in the frame. The old insert can be used as a template to mark the new insert. Clamp the two together and drill holes in the new insert using the holes in the old one as a guide.
If the placement of holes in the new insert will be different from the old, as might be the case for wood framing after filling screw holes, start by marking hole locations on the protective paper covering attached to the face of the new insert using pencil and rule. Drill holes in the plastic (polycarbonate or acrylic). Drill additional holes along the outside perimeter of the insert at approximately 6-inch intervals. The inboard placement of these holes will depend on the width of the framing where the insert rests.
(Note: It is critical that all holes be made oversized to allow for the difference in thermal expansion between the glazing material and the substrate. Failure to do this will cause the holes to crack. The expansion rate for acrylic and polycarbonate are similar, but the expansion rates of both fiberglass and steel are roughly six times less than the plastics. This means that in general terms you can expect a 1⁄16-inch-per-foot of length dimension change between the glazing material and the boat over a 100-degree F change in ambient temperature. –Ed.)
When properly sized and sealed, attachment points may be through-bolted using machine screws and nuts, a method of attachment that is structurally superior to the use of wood or sheet metal screws. The use of wood or sheet metal screws is acceptable, but don’t be afraid to improve upon the manufacturer’s design if you know a better way.
Fit-up
The new insert can now be fitted in the hatch frame without the use of sealant. The insert will be held in place temporarily using masking tape. If required, new holes can be drilled in the framing material using the holes in the insert as a guide.
Thoroughly clean the frame mounting surfaces before the trial fit. A minimum clearance of 1⁄16-inch per foot of span is required between the outside edge of the insert and the inside edge of the framing in order to allow for thermal expansion of the plastic. Once the insert appears to be properly aligned (measure the gap all the way around), apply several pieces of masking tape that overlap the outside face of the insert and the frame. This marks the exact location of the insert and act as a roadmap for the final installation.
Record the insert orientation by marking one of the strips of tape with an ink pen (realign this mark when doing the final installation of the insert). Once the tape has been installed and marked and holes have been drilled in the framing material, cut each piece of tape between the insert and framing using a razor blade. The insert can now be removed for application of a sealing material.
Don’t make the mistake of foregoing the application of masking tape markers, as it is very easy to misalign the insert during final placement. Depending on the type of sealant used, it may be impossible to reposition the insert after it has come in contact with the sealant. It’s not a bad idea to have a partner to assist with initial alignment and the placement of the insert.
Sealant application
Assuming the insert and frame have been pre-drilled, it’s time to set the new insert permanently. Because many sealing compounds may contain hazardous materials, it’s a good idea to apply them in a well-ventilated area and to wear eye protection and gloves.
Some caulking and sealing materials can damage plastics and should never be used with plastic materials. Silicone is the only sealing material that can safely be used with all types of plastics. Silicone adheres particularly well to plastics, is highly elastic, and is long-lived. A new product manufactured by BoatLIFE, called Life Seal, is a combination of silicone and polyurethane and is safe to use with plastics. It is claimed to be superior to silicone alone in terms of life and elastic properties.
Materials that should not be used in combination with polycarbonate or acrylic inserts are polysulfides and stand-alone polyurethanes (Life Seal seems to be the exception). No matter what sealant is used, read the product label before use, paying special attention to any incompatibilities.
Thank you to Sailrite Enterprises, Inc., for providing free access to back issues of Good Old Boat through intellectual property rights. Sailrite.com