There’s more to their lines than meets the eye
Issue 77 : Mar/Apr 2011
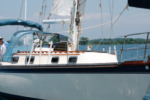
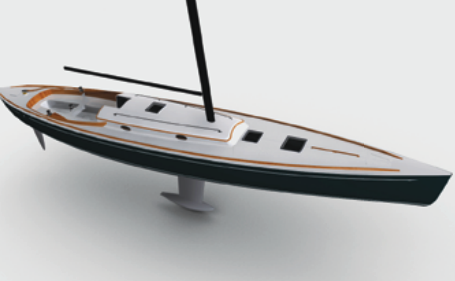
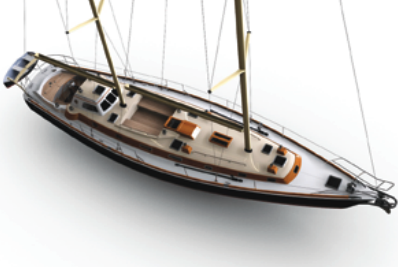
A typical fleet of good old cruising boats will show tremendous variety in the design and layout of their decks. The typical fleet of modern raceboats will show a remarkable sameness and consistency in their deck designs and layouts.
A raceboat deck is relatively easy to design and lay out. The cabin trunk is narrow and very short and the cockpit is huge. There is a lot of room to lay out gear so the boat will operate at peak efficiency. The older cruiser most probably has a long and wide cabin trunk, a smallish cockpit, a plethora of hatches, and numerous other features designed to make cruising more comfortable. Unfortunately for this boat, the deck plan did not get much attention or priority in the design and development stages and the result can be a boat that is awkward to operate, uncomfortable, and not able to sail to its potential. In this article, I’ll describe the process I use to design the deck of a cruising boat, working all the time to achieve a balance between aesthetics, safety, comfort, efficiency, and performance. My very first fiberglass molded deck was the Valiant 40, once called “a shoebox on a banana.” Yes, it did not have the most graceful of cabin trunks, but I have learned.
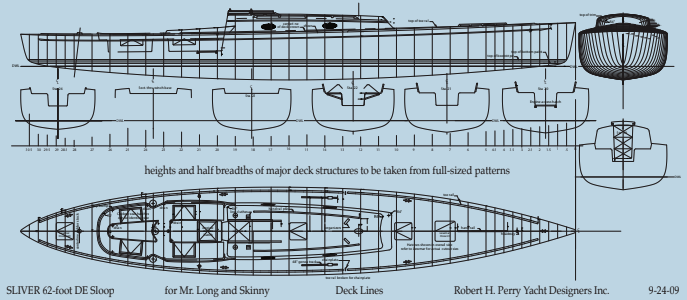
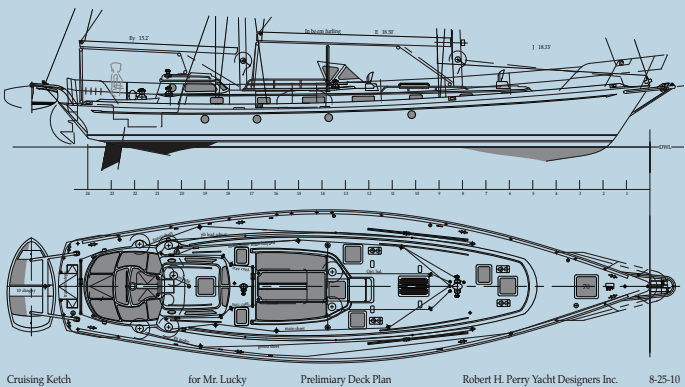
Cruising boat design, for me, begins with the interior layout and a hull shape. Once the interior, the preliminary deck design, and the hull shape are nailed down, I can move on to designing the actual deck “lines.” This drawing is similar to the hull-lines drawing in that it describes in great detail all the contours and dimensions needed for the builder to reproduce the shape I have drawn.
With a cruising boat, the deck design is largely controlled by the overall aesthetic goal for the boat and by the interior layout — where bulkheads are located will have a large effect on how the deck is laid out.
Sidedecks and cabin trunk
My first job on the deck is to see how much sidedeck I can get. I almost always try for at least 24 inches on boats under 50 feet, but I don’t always get it. I also don’t make the cabin trunk parallel with the sheer in plan view. That’s boring. I like to have the cabin trunk taper in from the sheer as it goes forward. I like the sides of the cabin trunk to gently roll inward as they go forward and I always use a changing camber for the cabintop. But that ideal 24 inches of sidedeck can get pretty hard to preserve. Toerails or bulwarks will take up space, stanchion bases take up space and, before you know it, you have lost substantial sidedeck. If you make the cabin trunk narrower, you may start losing headroom below where you need it for the accommodation plan to work. Some clients want a wide cabin trunk because it increases the feeling of spaciousness below. I like wide sidedecks and I do what I can to make them as wide as possible.
Builders from time to time will take shortcuts with deck shapes and the result can have a profound effect on the overall look of the boat. When I did the Baba 40, I had nice wide sidedecks until a dealer convinced the yard to make the cabin trunk wider. As usual, I did not find out the change had been made until I saw the modified boat. They gained no headroom and lost sidedeck, all to make the boat feel roomier below. Today, drawing with the computer, I can design the deck lines and print them out full size on Mylar. This will greatly reduce the chance of the builder deviating from my plan.
Where to place hatches is always a challenge. I want a hatch over each living area and I want the hatch to be big enough for someone to crawl out of in case of emergency. I like a hatch directly over the galley for ventilation while cooking and I like a really big foredeck hatch that I can get sails in and out of easily. Hatch locations also have to take into account running-rigging leads so an open hatch does not lead to a broken hatch.
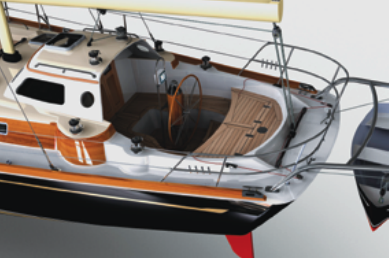
Cockpit
With the cabin trunk defined, I can move on to the cockpit design. It’s amazing how much cockpit volume modern designs with extra-wide sterns can have. The boat from the 1960s or ‘70s is not so well endowed. Sterns were narrower then and this drove the cockpit design. The choice of wheel or tiller also has a big effect on the cockpit layout.
Some of my clients demand a bridge deck for safety reasons. Other clients want no bridge deck so there are fewer steps to the companionway. I have no personal preference, although sometimes the bridge deck will provide some volume below that you can use. If a boat is to be built in (or sold into) Europe, ISO standards place limits on cockpit volume and therefore influence how cockpits are designed.
I think long bench seats, so you can nap in the cockpit on a nice day, are a must. But, if you have a wheel, you may need a T-shaped cockpit well for wheel clearance and that can cut into the length of the cockpit seats. If you have a tiller, you can have your long seat but how wide should the cockpit well be? I think 22 inches is the best width for the well — it allows you to sit to weather and brace your feet on the edge of the leeward seat. But 22 inches is too narrow for most other cockpit functions, so here a compromise must be made.
Cockpit seatback or coaming height is almost always a problem. A client once asked for 15-inch-high seatbacks. I told him that was too high but, in the end, I had to admit they were very comfortable. But you now have a 15-inch-high step to get over when you leave the cockpit, and that’s not very safe. I often try to carve away the coaming thickness in way of the access forward to make the step-over easier.
Aesthetics can also play a role in seatback height. A low coaming can be attractive but, if it gives you an 8-inch-high seatback, you will not be comfortable when that edge digs into your kidneys. In the end, I usually shoot for 12 to 14 inches but I will go no lower than 10 inches.
Sometimes, I stop the coaming short of the wheel or tiller so the helmsman will have no seatback and will essentially be sitting on the deck. I like this arrangement as it gives the helmsman the greatest number of options for sitting.
The designer must also take into account how the accommodations are spread aft under the cockpit and cockpit seats. This will impose headroom and clearance issues that may affect the heights of the cockpit sole and seats.
I usually make the cockpit well 17 inches deep and I like the seat tops to be 22 inches wide. I know that sounds like a lot but trust me on this one.
Cockpit-locker hatches have to be as big as practical so you can get large cruising items, like a deflated inflatable dinghy, in and out without too much effort. I also like a cockpit hatch with a false bottom so it’s just a shallow pan for lines and winch handles.
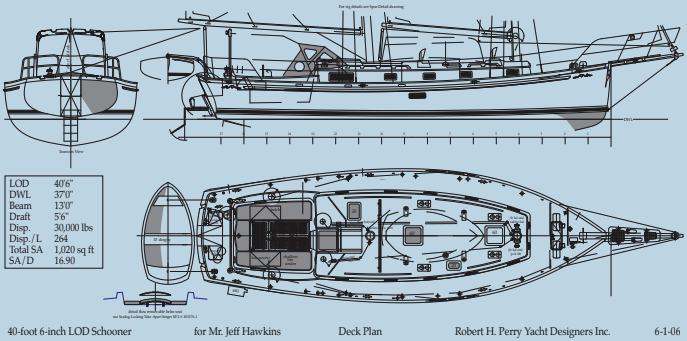
Rigging and headsail sheeting
At this point the deck “blank” is pretty much finished. House contours have been defined, hatches laid out, and the cockpit is established. Now we can start the fun of laying out the essential gear that will make the boat easy to sail.
Let’s start with the chainplates. The typical good old boat is probably a masthead sloop or ketch. If you want the boat to go to weather well, you are going to need your chainplates on a line 12 degrees off-center from the tack point of the jib. This generally puts your chainplates smack in the middle of the sidedeck. This is not so good. You don’t want to come inboard because a narrow chainplate base can increase the loads on the rig dramatically. If you go outboard, you will not be able to sheet your genoas in tight enough to give you good upwind speed. A modern fractional-rig boat often has no overlapping genoas, so the chainplates can be out at the rail without affecting upwind speed.
With big genoas, you also need to have a good long length of genoa track so you can get the correct sheeting location for each sail. I like to put the front of the track just forward of the mast and on a 10-degree line from the genoa tack. The aft end of the track will have to accommodate the genoa with the biggest LP on a 7-degree line from the tack, and I always add some length so the sail is not sheeting to the very end of the track. In a perfect world, I like another genoa track as far outboard as I can place it and slightly forward of the inboard track. This outboard track is very useful when reaching and you want to move the clew outboard and forward. If you have a roller-furling genoa, you may need to have a longer genoa track to accommodate the change in lead angle as you roll up the sail to reef it.
If the boat is cutter-rigged, the staysail tracks will most probably have to go on top of the cabin trunk to get a good sheeting angle.
I’m reluctant to get into the argument of where the mainsheet traveler goes. We all have our opinions on that. I like end-boom sheeting, so my preference is to have the traveler in the cockpit.
Winches and line leads
Winch placement is pretty much a matter of taste. I like the primaries to be close to the helm but still accessible from forward of the wheel. Secondary winches can be used for furling lines but most cruisers don’t need them for spinnaker sheets unless they choose to do some racing. When I designed the Valiant 40, I brought all the halyards and reefing lines aft and each one to its own dedicated winch. That’s expensive. Today, with line clutches, we can use two winches to handle multiple functions.
Although there are advantages, especially on bigger boats, to leaving the halyards on the mast, clients today seem to want all the halyards led to the cockpit. You end up with a lot of lines in a small space and a lot of clutter, but it is convenient. My big concern in laying out the winches is to avoid friction and too many lead changes in the lines. This is not hard to do on a racing boat. On a cruising boat with a busy deck it is a challenge. I always insist on the builder having all the gear on hand before finalizing the deck. That way, the layout can be at least mocked up to allow leads to be corrected and winch placements adjusted for the best performance.
If you add a hard dodger to your boat, you may run into problems with your original winch placements. You need clearance for the winch handles. If you are designing a new boat with a hard dodger, you can work around the dodger, but it still makes winch placement aft difficult.
The final touches
At this stage in the deck design I can start sprinkling all the additional items the boat needs or the client requests around the deck. Some clients want the dinghy to be carried on deck. That’s a challenge. Life-raft stowage is also difficult on a busy deck. Vents will go where I can find room and handrails where they will be within easy grasp. I may need to find room on the bow for the windlass and a deck washdown system is nice to have. Well-placed mooring cleats are a must.
When I think I am done with a new deck design, I’ll send it off to my pal Don Whelan at Harken. He will go over my specifications for the gear and make the appropriate changes. Then it’s time to show the design to the client — and the fun starts all over again as we enter the revision process.
Robert Perry is a contributing editor with Good Old Boat. His career as a yacht designer is now entering its fifth decade, which means it spans the heyday of the good old boat era and the age of carbon fiber, and from drawing with drafting pens to 3D computer modeling.
Thank you to Sailrite Enterprises, Inc., for providing free access to back issues of Good Old Boat through intellectual property rights. Sailrite.com