These new clamps have potential, but failed our test
Issue 41 : Mar/Apr 2005
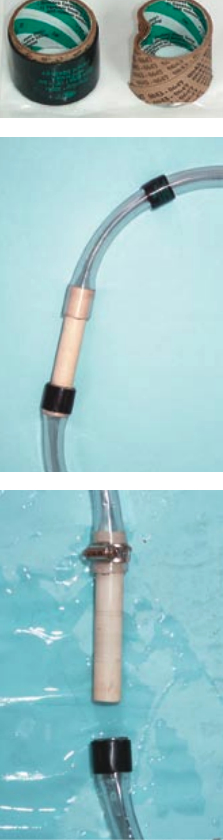
The editors of Good Old Boat asked me to evaluate some new hose clamps made by Gates Rubber Company and marketed as Power Grip heat-shrink hose clamps. When the samples arrived there were four sizes: from 1⁄2 inch to 11⁄16 inch; from 11⁄16 inch to 13⁄16 inch; from 15⁄16 inch to 1 1⁄16 inches; and finally from 1 1⁄2 inches to 1 3⁄4 inches. All sizes were to fit the outside diameter of the hose.
I chose to test the 15⁄16- to 1 1⁄16-inch hose clamps. There were four samples. The outside diameter of the hose I chose to make up as the test specimen was 1 1⁄16 inches. It had an interior diameter of 3⁄4 inch, and I had the appropriate pipe and hose barbs for the test.
I used a piece of water hose from my boat as being representative of a hose aboard ship. This was a clear vinyl food-grade hose. I made up the section of hose with barbed hose connectors, male and female at the ends, clamped by the heat-shrink hose clamps. I cut the hose in the middle and inserted a piece of smooth but sanded PVC pipe with a heat-shrink hose clamp on each end of the pipe such as I might use to transition from flexible hose to a rigid water pipe.
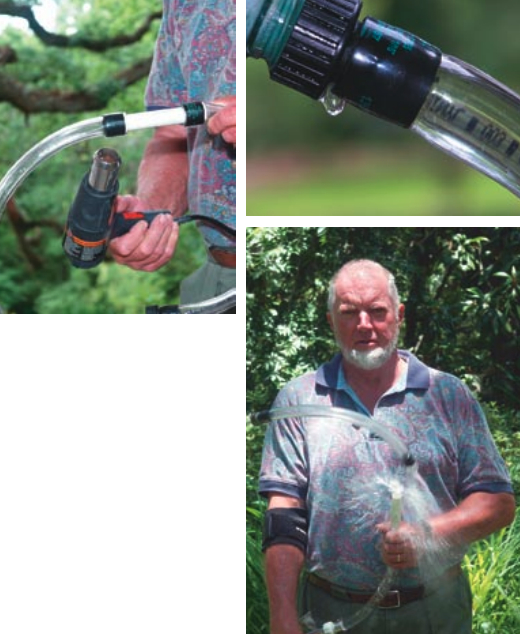
Applying the heat-shrink hose clamps was interesting. I used a heat gun with two settings, one for 500 watts and one for 1,500 watts. I tried the heat gun on an unused heat-shrink hose clamp and determined the lower setting was better, as the higher setting can melt the hose clamp if you’re not careful. I did melt one of the larger hose clamps just to see what happened. The answer was nothing: no fire, no smoke. The hose clamp simply melted.
No way to tell
One of the difficulties I encountered in applying the hose clamps is that there is no way to tell when you have shrunk the hose clamp to the maximum shrinkage or maximum tightness. I eyeballed the hose clamps as I worked and shrank them until the hose they were applied to began to be squeezed by the clamp. I kept the heat on a little beyond this point just to be sure they were at maximum tightness.
The samples came with a cardboard tube inside each hose clamp and instructions to keep them on the cardboard tubes until ready to apply. When you are ready to apply the clamps, the cardboard tube should be removed by sliding the clamp off of the tube or crunching the cardboard tube and removing the clamp. I found out the hard way why the cardboard is important. The final hose clamp was not applied for a day. I had removed the cardboard tube earlier and then was interrupted. In the short time I had the clamp out of the tube and in ambient temperatures, it shrank enough to be hard to position over the pipe. These things are really heat sensitive.
My test procedure was to attach the female end of the test section to a regular garden hose attached to the city water supply. No pressure reducer was inserted as I wanted to see if the test section would stand up to normal dockside water pressure (about 50 psi). I screwed a nozzle on the male end of the test section to provide a way to release the pressure when the test was completed. The test would be simple: turn on the water and see if the heat-shrink hose clamps held. If there were no leaks, they passed the test.
Fully assembled
The test section was fully assembled, the photographer was ready to record the event, and the hose was connected. I closed the nozzle as I wanted to try a full-pressure test as one would in real life.
Action, camera, water! Did I get wet! The hose clamp applied to the pipe section blew off. Not good. I salvaged the test by using a cork and a stainless-steel hose clamp to seal up the end of the test section.
Encore! Action, camera, water! I got soaked again. This time the other end of the pipe blew off. I then used a stainless-steel hose clamp and a cork to seal off the remaining end of the test section. I turned on the water and it held . . . but not for long. This time the hose clamp just leaked but did not blow off because it was over the barbed section of the female fitting. It was a little leak this time but not one you would like on your boat.
Conclusions
First, the hose clamps are closed cylinders and therefore must be fitted over the end of a hose, as opposed to a metal clamp which can be opened and placed over an existing hose which is already hooked up. This would be a detriment on most boats.
Second, the process requires a 110-volt electrical source in order to operate the heat gun. In addition, you need to heat the hose clamp evenly around 360 degrees of its diameter, something which is not always feasible if the hose is located in an awkward spot. If you cannot evenly heat it, it will surely leak.
Third, there is no indicator to tell if the clamp still needs to be heated or if you’ve heated it too much. Lots of trial and error here.
Fourth, the clamps either blew off or leaked. Enough said.
Fifth, these are a one-time use item. They are tough enough; I cut one with a serrated knife and will vouch for their toughness. If you had one installed onboard, it would take some time to remove it when necessary. Perhaps you could use a soldering iron to melt it, but you would need 110-volt power or a 12-volt soldering iron.
I’m sure the manufacturer, in controlled conditions, can make up a nonleaking test section, but I could not do so in the field.
For those reasons, it is my opinion that this concept is not ready for use on any boat with which I’m associated.
Thank you to Sailrite Enterprises, Inc., for providing free access to back issues of Good Old Boat through intellectual property rights. Sailrite.com