For taking in air with grace, nothing beats them

Issue 91 : Jul/Aug 2013
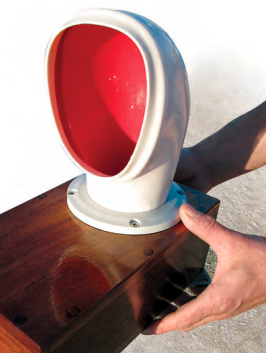
The best way to keep the inside of a boat fresh and free from mildew is to ensure that it’s adequately ventilated. Dorade boxes are one very efficient way of channeling air belowdecks. The principle of the Dorade box is simple. On the top, at one end, is a cowl vent. At the other end, inside the box, is a ventilation pipe that runs through the deck. A baffle is fitted into the top of the box between the vent and the pipe and the box is given drain holes at deck level. The idea is that air entering the cowl vent flows under the baffle, up around the ventilation pipe and down again into the boat. Any rainwater or sea spray that enters the cowl is trapped in the box by the baffle and the vent pipe and escapes out the drain holes.
When we decided to make Dorade boxes for Sigfrid, however, we found ourselves puzzling over the details. How high should the ventilation pipe stand above the deck to ensure that no water would come in? How close could it be to the top of the box before it started to obstruct the airflow? How big did the box need to be and how deep should we make the baffle?
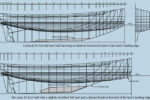
We could, of course, have estimated all of these and would have achieved a reasonable result but, as we were hoping to create a truly effective system, we contacted Joseph Fricaud, who had recently retired as the head of Meta in France. In the 1970s, Meta, a highly regarded boatyard, commissioned from a selection of naval architects a portfolio of designs they called “Fobato.”
This was a series of drawings of all the details — such as hatches, companionway ladders, and engine beds — that are common to most boats. These drawings were for sale at a reasonable cost and were intended to give amateur boatbuilders access to what, in a professional boatyard, would have been called “stock designs.”
Although Fobato has sadly been discontinued, Joseph Fricaud had already been kind enough to send us two of these drawings. He was equally helpful with the Dorade boxes.

The design
When our drawing arrived, it took a few minutes of study before we understood what we were looking at. Not only did it contain the detailed information about air gaps and sizes that we had been hoping for, it also showed an unusual method of providing for drainage at the bottom of the box.
Conventional boxes have small openings, or limber holes, cut into their bottoms to provide an escape route for the water. Although these are effective as drains, there is always the possibility of water becoming trapped, leading to fungal growth, rot, or corrosion in the damp corners that result.
The boxes designed by Meta had four “feet” and were supported off the deck on studs, creating an air gap of 1⁄8 inch all around the bottom and entirely removing the possibility of trapped water. As an additional benefit, the boxes could be easily removed for cleaning and maintenance by undoing the nuts on the tops of the studs.
Modifying the design
The Meta design was for boxes made of steel. As we intended to use wood, we first had to re-draw the design, preserving the relevant dimensions. At the end of this process, we came up with the following sizes. We would make the sides 7⁄16 inch thick and the top 9⁄16 inch. The boxes would be 10 1⁄2 inches long, 6 inches wide, and 4 3⁄16 inches high. The ventilation pipe would stand 2 5⁄8 inches above the deck.
The thickness of the lumber used for the sides and top was not based on any calculation or principle but simply on what was available, as we intended to use some reclaimed mahogany we had on board.
On the original steel boxes, the feet were welded in place. Ours would be made from stainless steel and screwed to wood. For the studs, we would use 1⁄4-inch bolts fastened up through the deck. The nuts and washers that secured the bolts to the deck would become the spacers to create the drainage gap at the bottom of the box.
Construction
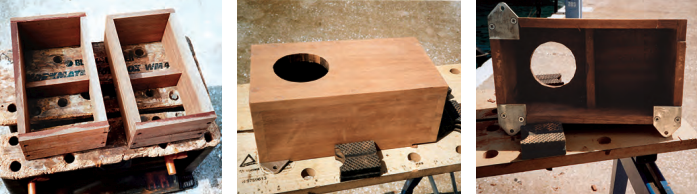
The first step was to prepare one of the 7⁄16-inch-thick mahogany boards so it was 3 5 ⁄8 inches wide. We then cut four pieces 9 5⁄8 inches long to make the sides, two for each box, and four 6 inches long to make the ends. We glued and screwed these together using 1 1⁄4-inch #6 brass screws and a single-part polyurethane adhesive. Next, we fitted a baffle halfway along each box with the top of the baffle level with the top of the box. These were 1 3⁄4 inch wide and made from the same mahogany.
We cut the tops slightly oversize from the 9⁄16-inch-thick board, screwed and glued them in the same manner, allowed the glue to dry, and planed them to size. As we intended to varnish the boxes, we counterbored the screw holes to set the screw heads 3⁄16 inch below the surface. We cut the stainless-steel feet from a piece of 3⁄16-inch flat bar with a 4-inch angle grinder, then finished them off with a file. We “polished” them as well as we could, using successively finer grades of wet-and-dry sandpaper. The final stage in making the feet was to drill the holes: one of 1⁄4 inch for the studs and three of 3⁄16 inch for the screws. Since we didn’t have access to a drill press, this became the most time-consuming and difficult part of making the boxes. We used sharp cobalt bits in a hand-held electric drill, running the drill as slowly as possible to avoid overheating the bits.
Trimming the boxes
The boxes were now essentially complete, but they needed to be trimmed to fit the camber of the deck. This was to ensure that when they were finally fitted, the sides would be vertical and the tops level.
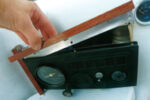
To do this, we placed and carefully adjusted them using small blocks and wedges. We determined their lateral position by measuring from a string stretched along the centerline of the boat, and adjusted the fore and aft position using a similar string between two shrouds. We eyeballed the levels with the help of a long straightedge laid from box to box.
Once we were happy with their positions, we marked the shape of the deck onto the boxes in pencil using a small scribing block. We then removed the boxes from the boat and planed the bottoms to the pencil lines.
Finishing the boxes
With the boxes shaped to fit the deck, we were ready to fit the feet. We laid them in position on the bottom of the box and scribed the shape with a sharp knife. Using a tenon saw and a chisel, we then trimmed down the corner of the box, between the scribed lines, to create a 3⁄16-inch-deep recess for the foot. As the feet had been made by hand, to ensure we got a good fit we marked and fitted them individually, screwing them in place as we went.
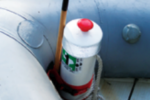
We then carefully marked out and cut a hole in the top of the aft end of each box and fitted the cowl vents. Finally, we plugged the screw holes and sanded and varnished the boxes.
The ventilation pipe
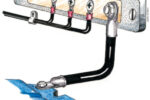
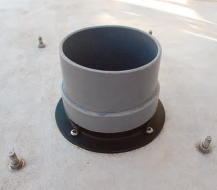
We assumed it would be fairly easy to find some sort of off-the-shelf fitting to make the ventilation pipes to carry air belowdecks. We were wrong. None of the people we approached could supply us with a 4-inch-diameter pipe with a flange at one end that would allow it to be fastened to the deck.
We already had two mushroom vents where we planned to put our Dorade boxes, and we decided we could use the bases that were already fastened to the deck as they had flanged 3 1⁄2-inch-diameter pipes that stood 1 inch above the deck. We would just need to extend these short “upstands” to the needed height.
Ideally, this could have been achieved with a piece of plastic pipe with an inside diameter that matched the outside diameter of the upstands. The best we could find was a length of plastic drainpipe with an outside diameter equal to the outside diameter of our vent bases. We cut short lengths of the pipe and slit them lengthwise, opening them to fit as collars over the upstands and the extensions. We glued the parts together, using one of the plumbing glues that actually melts and welds the plastic, and filled the slits in the collars with small strips of the same plastic. The resulting joint was strong and watertight.

Installing the boxes
After removing the tongue-and-groove headliner inside the boat, we carefully put the boxes in place and, using the feet as a guide, drilled the holes for the 1⁄4-inch bolts. As we made the holes, we dropped the bolts into them from above to ensure that the box remained in position. Once all four holes were drilled, we removed the box. We inserted the bolts from below, fastened them in place with a nut and washer, and cut off the ends about 1⁄2 inch above the tops of the nuts to create the studs.
We installed the boxes by slipping the holes in the feet over the studs and securing each foot with another nut. The feet, resting on the nuts already on the studs, elevated the boxes to provide drainage.
Conclusion
Sigfrid has been our home for 12 years, over which time we have steadily modified her to suit our tastes. One result of this has been that we are very cautious about making any more changes. At the end of a project we often find ourselves unhappy with the result, until we have had a couple of days to get used to it.
The Dorade boxes were different. Not only do they enhance the look of the vessel, they also supply a much needed boost to the airflow through the interior. As well as helping to reduce the condensation in the mornings, they keep our boat ventilated when we are ashore for the day or when the hatches are closed because of the weather.
Richard Toyne and his partner, Magali Bellenger, live aboard Sigfrid, a 34-foot 6-inch steel ketch. When they are not exploring the Western Mediterranean, they work to finance future voyages. Richard writes for magazines and does carpentry work, ashore and on boats, and Magali makes and sells jewelry.
Thank you to Sailrite Enterprises, Inc., for providing free access to back issues of Good Old Boat through intellectual property rights. Sailrite.com