Replacing a reclusive transmission component

Issue 78 : May/Jun 2011
I am meticulous about maintaining my sailboat. I perform routine maintenance on a schedule and I address little problems that arise immediately, before they turn into more serious issues. Let’s face it, a breakdown can be dangerous, inconvenient, and embarrassing.
Diversion, our Morgan Out Island 33, is more than 30 years old. With 2,500 hours on the engine and transmission and our yearly trip to the Bahamas approaching, I wanted to confirm that everything was OK. The Bahama Out Islands are a cruisers’ paradise but a serious mechanical problem down there could turn our adventure into an ordeal.
While I have never had a problem with my transmission, it had been a concern. The maintenance regime seemed minimal for such a complicated piece of machinery. According to the manufacturer, all I had to do was change the fluid once a year, check its level regularly, make sure all the bolts were tight, and verify that the cable drew the unit into gear properly. That’s it. My local marine transmission supplier confirmed this. In his words, “When it goes, it goes.”
The manual for our Velvet Drive Model #71 indicated that symptoms I was noticing meant the damper plate should be replaced. Damper plate? I’m familiar with the mechanical aspects of a boat, but this was a new one for me, so I looked it up.
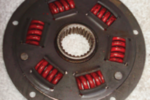
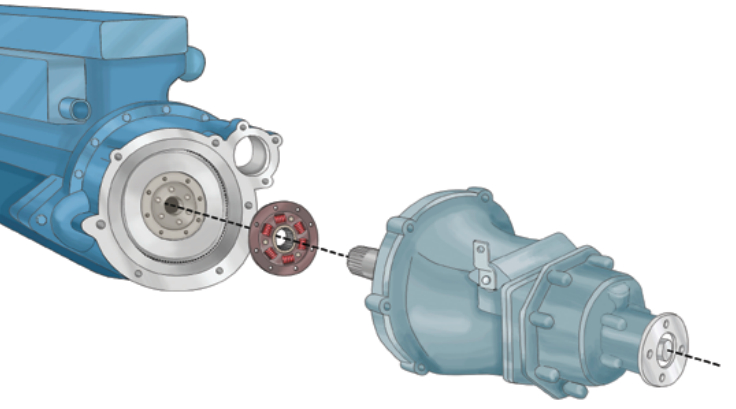
The transmission damper plate is a clutch-like device bolted to the flywheel and an integral part of the mechanical propulsion system that links the engine and transmission. When the shift lever is moved from neutral to forward or reverse, the damper plate absorbs the shock so the transmission doesn’t have to. When it fails, the prop stops turning.
A failing damper plate produces distinct symptoms. With your engine operating at idle speed, slip the transmission into gear. If you hear a rattling sound (mine sounded like engine-valve knock), and the rattle disappears as you raise the rpm above 1,000, your damper plate is probably worn but still has some life left in it. However, when you shift into gear and hear a “clunk,” the plate is beginning to deteriorate. Eventually, it will break apart and you’ll lose propulsion. When that happens, most boaters assume the transmission has failed. More likely, it’s only the damper plate. While damper plates are generally reliable, they don’t last as long as transmissions. The consensus among my more knowledgeable friends was that at 2,000 to 2,500 hours, the springs on a damper plate will begin to loosen. A transmission will probably last twice that long.
I had been hearing that telltale rattling noise for a long time and wasn’t too concerned. I occasionally checked the shaft for slippage. Everything was operating fine . . . but those engine hours.
Labor-intensive fix
All marine transmissions use damper plates or something like them. The most common marine transmissions, Velvet Drive, Hurth (now ZF), Paragon, and Twin Disc all use damper plates, the exact type being determined by the transmission model and the engine it’s paired with. The good news is a damper plate is probably one of the least expensive replacement parts you’ll purchase for your boat. The plate for my Velvet Drive matched to a Perkins 4.108 was $65. However, the estimate to replace the plate was $2,000 to $3,000.
Why so much for labor? Think of what has to be done. The damper plate is bolted to the engine’s flywheel. For it to be removed, the transmission must be detached from the engine. If the engine and transmission are small enough and accessibility is good, they can be removed from their mounts in one piece, disassembled, the plate replaced, and everything put back together again. However, to accomplish this, every fixed connection — fuel, electrics, cooling, exhaust, shaft coupling, control lines, and hydraulic lines — must be disconnected.
In my case, which is typical of most vessels over 30 feet, the engine and transmission were too large and heavy to remove. My Perkins weighs more than 400 pounds; the transmission weighs 145 pounds. What’s more, the access panel through which the engine would have to be extracted is so small that many parts, including the manifold, alternator, and starter, would first have to be removed. A more practical method for my setup was to unbolt the transmission from the bell housing and slide the transmission back to expose the plate.
Knowing that replacing a damper plate is labor-intensive and therefore expensive, you may wonder if you can do the job yourself. I did it and you can too. Knowledge is the key to success.
Advice and planning
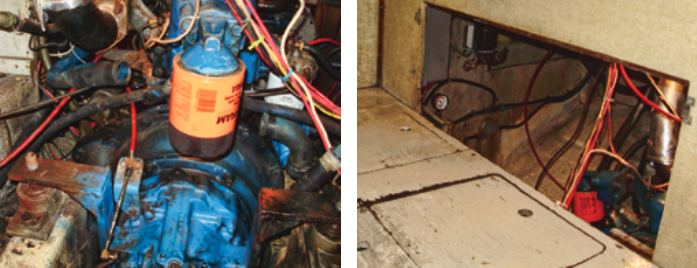
Before I picked up a wrench, I searched for expert advice. I discovered that several of my boating friends had made the same repair, albeit in trawlers. While their information proved valuable, my situation was a bit different. Compared with my engine compartment, their engine rooms were enormous. They talked of placing an I-beam above the transmission and using a chain hoist to support it and slide it back. My engine compartment is under the cockpit. Access to the back of the engine and transmission is through a side panel in the quarter berth or through the cockpit locker. I spent hours studying the limitations while trying to devise a plan.
Should you choose to tackle this project, be advised that each vessel is unique but, while engines and transmissions vary, the procedure for replacing a damper plate is fairly standard.
Study the transmission, bell housing, and engine. Identify where one part joins the other so you don’t remove the wrong bolts. In most cases, the bell housing stays fixed to the engine. The damper plate is quite small. On my 50-hp engine, it was less than 6 inches in diameter, small enough to pull through the bell housing once the transmission was unbolted and slid back.
Look for accessories that can be removed to create needed workspace. Visualize what can happen when the transmission is loosened from the bell housing. If the hull below it is wider than the transmission, it will be necessary to support the transmission to prevent it from sliding down into the bilge. Then the routine is straightforward:
- Remove any engine parts that impede your work.
- If the rear motor mounts are on the transmission, block the engine.
- Block the transmission if necessary.
- Loosen the bolts holding the transmission to the bell housing.
- Slide the transmission back.
- Remove and replace the damper plate.
- Reassemble all the parts you took off the engine.
Nothing to it! However, a few tidbits of information will help you with this repair.
Safety and preparation
With any repair of this nature, safety is a major consideration. Think of where you will be working. You will be surrounded by sharp objects: seizing wire, metal brackets, and hose clamps. Wear long pants, a long-sleeved shirt, and shoes. Gloves are great if they give you the freedom to work, otherwise they’ll be a hindrance. I used an old pair of lightweight sailing gloves, the kind without fingertips.
Tools
If you perform your own maintenance, you probably have all the tools you need:
- Socket wrench, ratchet drive, breaker bar, and extensions
- Open- and box-end wrenches
- Allen wrenches
- Punch
- Miscellaneous tools for working in confined spaces
The punch is for marking the coupling halves so you can reinstall them in the same position.
I also used “shorty” wrenches, fingertip ratchet drives, and crowfoot wrenches. A crowfoot is the head of an open-ended wrench that accepts a socket extension and a ratchet. They are used for blind bolts that cannot be reached straight on and do not provide swinging room for a flat wrench.
Equipment
- Proper lighting — essential
- Blocking materials — a bottle jack or pieces of wood — to support the engine and/or transmission
- Paper and pencil to take notes on your disassembly
- Penetrating fluid for loosening rusty bolts — I had very good results with PB Blaster
- Masking tape, marking pen, plastic bags, punch, and hammer — you’ll want to tag, bag, and mark equipment you have removed
- Plastic wire ties with which to temporarily tie back cables, wires, and hoses out of your work area
- Containers to collect fluid drained from the engine and transmission
- Rags, paper towels, and a waste container to keep your work area reasonably clean
- Band-Aids, hand cleaner, and bilge retrieving tools — as careful as you are, mistakes can happen
Create a work area
Clear everything you can from your work area to create space. I did most of my work through the access panel in the quarter berth. I removed everything normally stowed there and in the the cockpit locker, where there was another access.
Shut off the electrical power to the engine. If you are afloat, close the raw-water intake seacock. Pump out the transmission fluid and dispose of it properly. If you are disconnecting any portion of the freshwater cooling system, drain that also.
Remove equipment and accessories to gain extra space on and around the engine. The heat exchanger is secured to the back of my engine. I removed it and the associated cooling pipes to create space. This exposed most of the bolts that secured the transmission to the bell housing.
As soon as you start to remove parts, mark them and make notes — it’ll make reassembly easier.
Loosen the top bolts on the motor mounts — all four of them — a few turns. This will minimize any chance that excessive movement will pull the motor mounts from their mountings on the engine beds. If you don’t touch the lower bolts, the engine should remain aligned to your original specs.
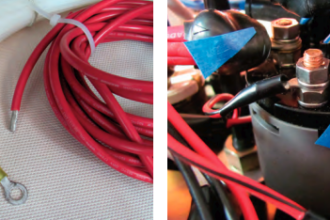
Remove all cables, hoses, and wires that lead to the transmission and use wire ties to secure them out of the way. These connections include:
- Shaft coupling — mark each half with a punch to aid in reassembly
- Shift cable
- Neutral-interlock wires
- Oil hoses
- Grounding straps
Block the engine
Make sure the engine sump is rigidly braced to the hull. If it’s not, brace the sump pan to the hull. Place a large piece of 3/4 -inch plywood in the bilge sump and set a bottle jack on it. Fit a small piece of wood on the riser and under the bell housing or in the space aft of the oil pan — not on the oil pan as it’s probably not strong enough.
If a jack won’t fit under the engine (this was my situation), cut a variety of thicknesses of wood for blocking. I started with a short length of 2 x 4 and cut pieces of 1/4 -inch, 1/2 -inch, and 3/4 -inch plywood the same size. I nailed and braced them together, then wedged in tapered 1 x 2s for a tight fi t. I knew I had done it correctly when I could slide a feeler gauge under the rear motor mount. Have a few extra wedges available. The wood may compress slightly, requiring you to drive in one or two more when you’re reattaching the transmission.
Support the transmission. Either block it from below or support it from above.
Unfasten the transmission
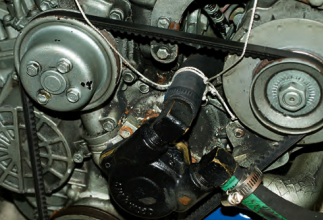
Identify the nuts that secure the transmission to the bell housing. On the Velvet Drive, the bolts are on the lip at 1, 3, 5, 7, 9, and 11 o’clock positions. The top four are visible and can be removed with a socket extension and ratchet. I couldn’t see the two lower bolts. When I finally located them with my fingertips, the only wrench that worked was a shorty box end. The nuts and lock washers come off and the threaded posts remain on the bell housing.
Wedge a flat scraper between the front lip of the transmission and the back of the bell housing. It should release with minimal effort.
Slide the transmission back to expose the damper plate. The transmission shaft is relatively short (about 2 inches on the Velvet Drive). However, you will need about a foot of space to work in when unbolting the damper plate. With the motor mounts still attached to the transmission, you have a choice.
If you have blocked the transmission, you can remove the brackets from the transmission case. This leaves the mounts on the rail and the transmission free to be pulled back and raised over the coupling. Alternatively, you can loosen the mounts from the hull, slide the transmission back on the rails, and tilt it up and over the shaft coupling half. I did the latter.
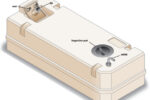
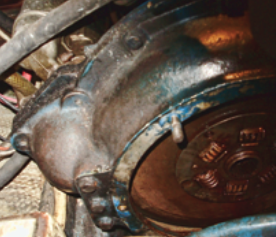
Look in the bottom of the bell housing. Any metal parts are probably from the damper plate. A large accumulation of oil is the result of a bad seal on the transmission. If you have had any problems with your transmission, now is the time to take it out and replace it with a rebuilt unit.
The object of the exercise
Remove the damper plate. Typically, this part is attached with flush-fit Allen bolts that are very tight. After all, they haven’t been touched in many years. Take a deep breath. These are not bolts you’d want to break off, as drilling them out successfully would be very challenging.
I was faced with five bolts. Two of them came out quite easily. I soaked the others with PB Blaster, tapped them forcefully with a hammer, and left them for 24 hours. The next day, they loosened easily.
If your bolts still won’t budge, don’t rush it. Try a second application of penetrating oil before going to another technique. Other ways a mechanic suggested for removing difficult bolts were to use an impact wrench or use an extension on the Allen wrench for better leverage.
Replacing the plate is straightforward. The fl at side of the plate fi ts against the flywheel. If you think you’ll ever do this again (or hope the next owner may someday think of you fondly), coat the Allen bolts with anti-seize compound before installing the plate. Tighten the bolts securely.

Reassembly
Slide the transmission back into place. To make aligning the shaft to the damper plate hole easier, remove two of the upper stud posts on the bell housing. Cut the heads off a couple of 4-inch-long case-hardened bolts with the same thread (case-hardened because you really don’t want them to break off). Hand-tighten these long studs into the bell housing and use them as guides as you slide the transmission into position.
For this stage, have someone available to turn the engine to align the plate with the splines on the transmission shaft. Usually, a breaker bar on a socket on the main pulley bolt will provide enough leverage to turn the engine the small amount needed for the shaft and hole to line up. When they are aligned, the transmission and bell housing joint will be flush. Run the nuts onto the studs, replace the aligning studs with the original ones, and tighten all the nuts.
Reattach all the items you removed, using your notes to do it in the right order. While you have all these parts disassembled, you have a great opportunity to replace any suspect items that might otherwise be diffi cult to reach, such as the transmission-oil lines, shift cable, and various hoses and hose clamps.
Touch up and test
You’re just about finished. Remove the blocking, retighten the upper engine-mount bolts, align the coupling halves, and adjust the shift cable. Use a brass wire brush to remove any rust spots and touch up with engine paint. Refill the fluids you drained and clean your work area and the bilge. Then start the engine.
While a test at the dock is prudent, a sea trial is better. Run your engine at various speeds for an hour and take the boat back to the dock. Check and retighten the bolts and hose clamps — and be prepared to retighten them after your next few excursions.
Before I began this task it seemed monumental. I thought the difficulty for the project, on a scale of 1 to 10, was probably an 11. After doing it, I think it probably was an 8, mainly because of the confined workspace. While this is not an easy repair, it can be accomplished without any specialized tools and in a reasonable amount of time. You’ll need patience, attentiveness to detail, and the spirit to invest your time (rather than your money) in your vessel. When you have completed this repair, you will have learned a great deal about how your boat is put together.
Bob and Joyce Tigar began their marriage and sailing on small inland lakes in the Midwest in the late 1960s on a board boat, then moved to larger sailboats on Lake Michigan. Since moving to southeast Florida 12 years ago, they sail their Morgan Out Island 33, Diversion, on annual trips to the Bahamas, adventures in the Florida Keys, and weekend excursions around southeast Florida.
Thank you to Sailrite Enterprises, Inc., for providing free access to back issues of Good Old Boat through intellectual property rights. Sailrite.com