Get more years from an aging backing plate
Issue 70 : Jan/Feb 2010
Most outboard motor-mount backing plates these days are made of plastic. For decades, however, those on most boats were a thick hunk of sturdy plywood that deteriorated over the years, cracking around the edges, and delaminating. With a little shaping, fitting, and a few special touches, though, you can fix up your old plywood outboard motor mount to make it stronger, better looking, lighter in weight, and ultimately, more secure as a mount for your engine.
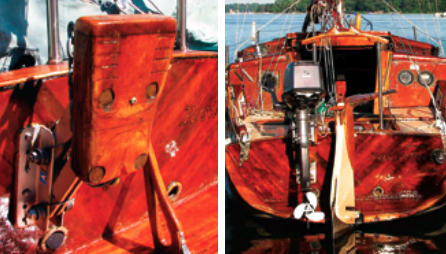
I had a special reason to fix up mine. Because Persistence, my 20-foot custom wood/epoxy sloop, would be going into service on Lake Superior — an often boisterous body of water — I had ordered an extra-large swing-down motor mount good for up to 15 horse-power. The aluminum swing arms were big and sturdy, as I wanted, and looked fine on the boat, but the 2-inch plywood backing plate was all wrong for my 5-hp outboard. It was way too big and out of scale — the plate stuck out from around the engine like Dumbo’s ears.
To begin the fitting process, I mounted my outboard on the plywood plate on the boat and, with a marking pen, drew the actual area I wanted to retain. This would lighten the unit a little but, most important, it would slice away the ugly extra plywood that stuck out on each side and just didn’t look very nautical or do much for the boat’s aesthetics. I also checked for the depth of the outboard’s prop, following the manufacturer’s recommendations of about 2 inches of water above the outboard’s baffle plate.
Trimming off the excess
After taking off the engine, I unbolted the four stainless-steel bolts that held the mounting board to the aluminum lifting bracket and cut off the excess plywood with a saber saw. I also trimmed the top — this is where the plywood goes bad anyway after a few years and begins delaminating — and epoxied on a 1-inch-thick piece of mahogany. This would protect the open edges of the plywood and also provide a little room to later on adjust the depth I wanted my prop to be in the water.
I also marked the areas on the forward face of the mounting board where the engine’s two clampdowns screwed against the ply to hold the engine to the mount. I hollowed these clamping areas to a depth of about 1⁄8 inch so the outboard’s clamps would fit inside the board’s recessed areas and could not slide out. I also marked the aft face of the plate where the outboard’s frame pressed against it and lightly recessed this area for a better fit.
I stepped back, feeling good. Now I had the outboard fitting really well and slightly inside the mounting plate, rather than simply resting on it. It would not slide around.
I continued my customization. On some outboards, the swivel bracket has a metal plate running horizontally across its aft section with a small hole in the center. Mine did. I marked the hole’s position on the plywood and drilled a hole for a stainless-steel screw. After working the screw in and out, I swabbed epoxy into the hole to wet out the fibers and let it dry. This waterproofed the hole. When I mounted my outboard, I inserted the screw into the horizontal bracket and screwed the bracket tight to the mounting board. This gave the engine one more mounting point and some extra protection from vibrating off. I am certain it will also frustrate thieves who do not know this trick.
Padlocked and chained
For heavy-duty theft protection, I planned to chain my outboard to the bracket. To do this, I epoxied a 3⁄8-inch eyebolt up through the bottom of the plywood plate. I whacked off a goodly length of my anchor chain (the good stuff) and secured that through the epoxied-in eyebolt at the bottom of the ply. A padlock at the top through the outboard’s frame secures the chain. This chain-and-padlock combination looks massive and it is. Does it work? Well, I haven’t had my outboard stolen yet.
After I had worked out all the details on the custom motor mount, I took off the mounting board and fittings and ground off the old varnish. I then coated it twice with epoxy and swabbed on a couple of coats of UV-resistant varnish. The plywood still looks good after 25 years of service and the mahogany top piece looks outstanding. From time to time, I’ve tossed a new coat of varnish on to protect the wood.
The end result looks good and is highly functional. I have recommended my technique to other sailors whose plywood outboard backing plates have become weathered and begun delaminating at the top.
My own system has also survived storms and high waves on Lake Superior. One storm in particular, called the “Green Storm,” had Persistence in the grip of its 100 mph-plus downbursts, with the outboard almost sideways to the water, straining mightily. Between bursts, the sloop would right herself and the screaming prop would slam into the water, making the outboard bracket groan with the torque. I never worried, at least, not about my outboard — it was on for keeps.
Marlin Bree built his own 20-foot boat, Persistence, and has sailed her extensively on Lake Superior, chronicling his adventures in magazine articles, for which he has twice won (in 2004 and 2008) the West Marine Writers Award from Boating Writers International, and books, which include Wake of the Green Storm.
Thank you to Sailrite Enterprises, Inc., for providing free access to back issues of Good Old Boat through intellectual property rights. Sailrite.com