Here’s a handier way to keep it in place
Issue 47 : Mar/Apr 2006
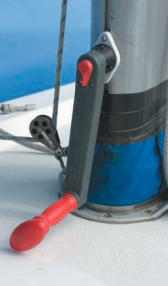
Our boat has halyard winches to port and starboard near the base of the mast and another winch on the boom for the outhaul and reefs. It did not take us long to realize that we would rather have a winch handle at the mast waiting for us, rather than having to go forward with one hand occupied holding one. The vinyl pocket I tied to the base of the mast held the handle, but it was no quick-draw holster. The handle would not come out at all unless the pull was pretty much straight up. In calm conditions, this was OK for a standing person. In rough conditions, the crew was wise to sit, rather than stand. In any case, the halyard winches were at deck level and so needed to be operated from a sitting position. Using the vinyl pocket while sitting was awkward.
The solution came in the form of a very interesting product called a Vertical Winch Handle Holder, made by Helm and sold in chandleries. These plastic assemblies can be screwed to a flat surface, and will accept a locking winch handle and hold it safely in place. The handle can be rotated to the storage angle of choice.
We have had two of these in our cockpit for a decade. I knew right away that I wanted one at the base of the mast, but there were two problems. First, there are no flat surfaces on the back of the mast where the handle would need to go so it would not foul sheets in a tack; and, second, I do not like to drill holes in a spar.
I saw a lot of spars fail in my dinghy-racing days. The failures almost always were located where the spar was drilled or where a hole was cut for some fancy piece of rigging. Holes weaken a spar. They are needed to make an extrusion work as a spar, but any extra holes are not welcome. The answer was to mount the winch handle holder to the sail track with toggle nuts.
Sail groove magic
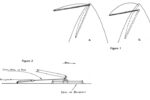
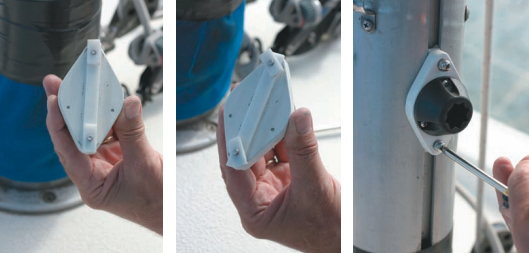
I made the mounting base from African mahogany and polycarbonate. It could be made from other materials. The design is obvious from the pictures. Wood screws mount the holder to the wooden base. A rectangular piece of polycarbonate spans the two machine screws and is sized to be a close slip fit in the sail-track groove. It should be nearly the thickness of the lip of the groove, but a little less. Two smaller rectangular pieces of polycarbonate function as toggle nuts. They were drilled and tapped for machine screws, but the tap drill I used made for a tight fit on the screws rather than a slip fit.
The thickness of these parts should be such that they will fit behind the lip of the sail groove. They must also be long enough so they cannot rotate full circle in that space. Typically they can be the same thickness as the long rectangular piece. The screws will need to be fitted to a custom length unless you are lucky. They need to be long enough to push the toggle nuts behind the lip of the sail track but not so long that they contact the back of the sail track when the screws are fully tightened. This requirement can be met with shims or by cutting down the screws. I was able to use additional nuts under the screw heads to shorten the screws to the proper length.
If you need to cut the screws down, fit nuts on the screws first and cut them with a hack saw. Back the nuts off to reform the threads at the end of the screws and then clean up the ends with a small file.
Installation is interesting. With all the rectangles lined up, they push into the sail groove. Turning the screws will rotate the nuts behind the lips of the sail groove until they contact the outer edges of the inner slot. Then they will hold themselves while you tighten the screws. Removal is the reverse of the process. When the screw is backed out, it first unclamps the nut and then rotates it to align it with the slot. Magic.
Thank you to Sailrite Enterprises, Inc., for providing free access to back issues of Good Old Boat through intellectual property rights. Sailrite.com