The less costly route to water independence
Issue 72 : May/Jun 2010
When we decided to transit the Panama Canal and head across the Pacific, we knew we would face a problem that had cropped up occasionally during our years of Caribbean cruising. Caribee is a 1968 Nicholson 32, an excellent sea boat and a great little cruiser. Her only serious flaw for long-distance cruising is one shared by most compact boats: limited water storage. So when we committed to a major refit before this cruise, installing a watermaker was high on the list of projects.
We wanted a robust system built from non-proprietary components that could be purchased from industrial suppliers in any major country and at a price that wouldn’t wreck the cruising fund. As we started the project research, we realized that watermakers are not really the esoteric devices we had supposed. They are, in fact, little more than a collection of pumps, hoses, valves, filters, and connections much like any other water system. OK, one of the filters is pretty high-tech and the pressures are higher than those on common plumbing arrangements, but the principles are essentially the same. We could build a system that met our needs without using too many parts that had that expensive little word “marine” attached to their names. (For another version of building your own watermaker, see Good Old Boat’s January 2003 issue.)
How it works
In its most basic form, a reverse-osmosis (RO) watermaker consists of a high-pressure pump that delivers seawater to a specialized filter element and housing (the membrane and pressure vessel) that removes the salt. A hose carrying seawater enters the pressure vessel and two hoses exit it, one carrying the product water at low pressure and the other carrying the rejected seawater.
A flow-restricting valve on the seawater exit hose creates high pressure on the seawater side of the membrane, forcing some of the water through the membrane pores (the product water) while the salt and other impurities are blocked from passing.
That’s the whole concept in a nutshell: just a pump forcing seawater through an extremely fine-filter membrane (on the molecular level) and removing the salt. The primary conceptual difference between this and any ordinary filter is that only a portion of the liquid passes through the membrane and the rest is rejected (and carried overboard as higher-salinity brine). In an ordinary water filter, all the water passes through the element and only particulate matter is removed.
Sourcing the parts
That’s the theory, but building a workable system will require several more components. Everything you need is commercially available from a variety of outlets, but sourcing components may be the most time-consuming part of the project, especially if you’re intent on getting the most for your money, as I was. While several good suppliers exist, it is seemingly impossible to find a single source that carries most of what you need at a competitive price. Typically, a vendor will have some of the required parts at a good price, but other parts will be expensive or unavailable. Others may have just the part you’re looking for at a bargain, but it may be difficult to find that out. The sources I’ve provided should help, but be prepared to spend time comparison-shopping, and even scrounging a bit, to uncover the best values. Don’t forget to check eBay.
Power for the pump
You’ll get the most bang for your buck by powering the high-pressure pump with your engine. Driving the pump with a V-belt off the propulsion engine is a simple and elegant solution. It’s also possible to use a DC motor of 12-, 24-, or higher voltages or a 120- or 240-volt AC motor. If you do this, however, it will be an electrical-energy-intensive enterprise. Output may decrease substantially, especially if you use a small 12-volt motor in an effort to reduce electrical draw. Unless you have an abundance of energy (from solar or wind sources, for example) or are already running an AC generator, it doesn’t make sense, except where mounting issues require it.
The system I describe is belt-driven. If you want to drive your pump electrically, you can find motors suitable for the task at most electrical supply outlets. It’s then a matter of installing a coupling (often available as an option from pump manufacturers) and wiring the motor. One advantage of powering the high-pressure pump electrically is that it allows the safe use of a simple needle valve for pressure regulation. More on this later.
Follow the water flow
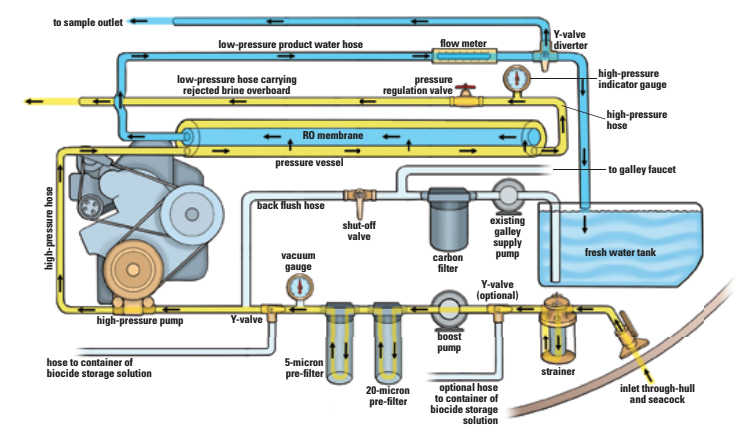
The easiest way to understand how the system works is to visualize the path the water takes as it reaches each successive component. The seawater enters through a standard through-hull and seacock arrangement. It’s best to use a dedicated through-hull so as to prevent any possibility of water starvation or air intrusion. If you want to install a system without hauling the boat, you could tee off an existing inlet and add a dedicated through-hull at the next haulout. Just make sure the flow is not restricted and no fitting on the same circuit is opened to the atmosphere while the watermaker is running. This could allow air to be pulled into the system and damage the high-pressure pump. For the same reason (and to prevent any floating oil from entering) the inlet should be well below the waterline at all angles of heel. A through-hull of 3⁄4 -inch diameter is adequate and should be considered a minimum size.
The hose leading from the through-hull to the next element, a raw-water strainer, can be ordinary clear fiber-reinforced marine hose or any other good quality hose suitable for marine plumbing applications. The strainer should be a screen-type unit that can be opened for cleaning. Two good choices are the Shurflo models 253-221-01 and 253-220-01. Both use 3⁄4 -inch connections.
Boost pump
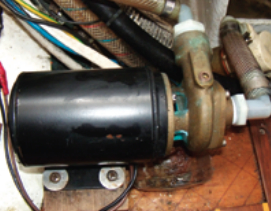
Another length of the same type of hose leads from the strainer to the boost pump, a small 12-volt pump of either the impeller or centrifugal type. It should deliver a minimum of 5 gallons per minute to provide a safety margin above the high-pressure pump’s flow requirements. Two suitable models are the March Pumps model 809-BR-HS-C-12, delivering 7.2 gallons per minute and the Jabsco Water Puppy model 18660-0121, rated at 6.3 gallons per minute. Of the two, the Jabsco is considerably more affordable.
You can eliminate a boost pump from the system if you’re certain your high-pressure pump will always be below the waterline at all angles of heel. To safely skip this component, you must make sure all fittings between the through-hull and the high-pressure pump are completely airtight so air cannot enter the system and cause pump-damaging cavitation. Even if you think you don’t need a boost pump, it will prove useful in clearing the pre-filter housings of residual air following filter replacement.
Some designers recommend installing a Y-valve diverter downstream of the raw-water strainer and upstream of the boost pump. This allows using the boost pump to flush, clean, and pickle the membrane. This is not a bad idea, and probably should be done as a way to provide a flushing option, but I prefer to place a Y-valve downstream of the pre-filter housings (described next) and use the high-pressure pump for cleaning and pickling. In this case, the existing galley pressure-water pump (if you have one) would be plumbed for use in routine back-flushing. You can have both options available by simply installing both Y-valves.
Pre-filters
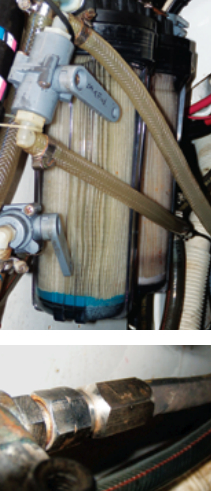
After leaving the boost pump, the water travels through another length of the same type hose to two sediment pre-filters. I like standard 10-inch housings and filters, which are commonly available and inexpensive. The Wateranywhere company offers standard clear-plastic filter housings with 3⁄4-inch connections. The first housing will be fitted with a 20-micron filter element and the second with a 5-micron element. The 5-micron filter is the important one for protecting the membrane, but the 20-micron element will take most of the abuse and become clogged faster. Use pleated-polypropylene filters in preference to the spun variety, because they have more surface area and can be cleaned several times before they need to be replaced. Wateranywhere has standard 10-inch, 5-micron, pleated-polypropylene cartridges and 20-micron blown-polypropylene cartridges.
Vacuum gauge
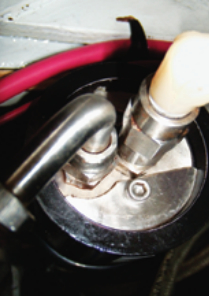
Immediately downstream from the second pre-filter is the place to fit a vacuum gauge. While not required equipment, it will alert you when the pre-filters are starting to become clogged or your feed-water supply is restricted for any reason. These are available from suppliers of hydraulic and industrial equipment.
Just downstream of the vacuum gauge (if fitted) is the place to install the Y-valve diverter I referred to earlier. This will allow you to attach a length of hose leading to a container filled with storage or cleaning solution.
High-pressure components
The next length of standard hose leads to the high-pressure pump. That’s the end of the line for the low-pressure components (for now), and this is where things start to get more expensive.
There are many choices available for the high-pressure pump. What you’ll be installing is some brand of triple-plunger pump that can supply a minimum flow of 3 gallons per minute at a minimum pressure of 800 pounds per square inch (psi). The pump should be capable of considerably higher pressures (1,200 psi or higher) so it isn’t operating near the limit of its capacity and to allow for wear. This is the same general type of pump used in all sorts of industrial applications, including pressure washers and car washes. You can spend a lot of money on this pump but you can also buy one at a reasonable cost that will get the job done (see “Pressure pump choices,” page 37).
Pressure pump choices
One of the main determinants of the cost of the high-pressure pump is the material from which the pump manifold is constructed. Stainless steel is the most expensive but not necessarily the best. It’s prone to crevice corrosion and electrolysis when in contact with seawater, especially stagnant seawater. Bronze is probably the best but it’s relatively expensive. Two models from Cat Pumps, the 277 and 271, are often used in reverse-osmosis applications. BPH Pump and Equipment offers the bronze-alloy model 277 3FR7 for $1,071 and the stainless-steel model 271 3FR1 for the attention-grabbing price of $1,852 — about the cost of the entire watermaker I propose building. It is possible to find discounts, but you won’t be likely to use the name Cat Pumps and the word cheap in the same sentence.
There is a third option, and the one I chose: pumps fitted with forged-brass manifolds.
You can buy at least two or three brass pumps for the price of a single bronze Cat pump, making the question of longevity somewhat moot, in any case. General Pump builds model TT9111, featuring solid-ceramic plungers and a forged-brass manifold. It delivers 3 gallons per minute at 1,500 psi with a maximum pump speed of 1,750 rpm — ideal for engine-driven applications on a sailboat. When a 7-inch pump-pulley is matched to a 6-inch engine-pulley, you can operate the watermaker at any engine speed between 1,000 and 2,000 rpm. The pump uses a standard 24 mm, solid, keyed, drive shaft. General also supplies a matching electromagnetic clutch/pulley combination with a choice of pulley diameters. The TT9111 represents an excellent value and is readily available from several suppliers. It was recently offered by Delaware Sales and Service and by Pressure Washer Parts. Annovi Reverberi builds a pump with similar specifications available from Delaware Sales and Service. Other makers of suitable pumps include Giant and Comet.
Brass pumps, though, come with a big caveat: none of these brass pumps is rated for use with seawater.
Some believe brass to be an unsuitable material for a reverse-osmosis pump manifold, because when left in contact with seawater it can suffer dezincification. This is a process whereby the zinc component of the brass, being highly reactive on the galvanic scale, is selectively removed from the alloy, leaving behind a porous, copper-rich structure with little strength. This problem is preventable if you back-flush the system with fresh water immediately after every use (always a good practice regardless of the materials used).
There is no doubt that good bronze alloys are superior to brass but, when the price difference is factored in, it’s hard to justify buying a bronze pump. In the event that you find the pump’s service life to be inadequate, you can always replace it with a more expensive pump at a later date. I’ve used an Annovi Reverberi forged-brass pump for four years without problems, and know other sailors who have been using brass pumps for long periods with no evidence of corrosion or dezincification.
I purchased locally a slightly used Annovi Reverberi forged-brass pump that delivers three gallons per minute at 1,500 psi with a maximum pump speed of 1,750 rpm. It was already fitted with a clutch-and-pulley assembly, but I did see on eBay a remanufactured clutch/pulley combo with a 7-inch pulley, designed for a 24-mm shaft.
High-pressure hose
The hose between the high-pressure pump and the inlet fitting of the pressure vessel should be rated for pressures of at least 1,300 psi. Quality hose of this strength has a minimum burst pressure of 5,200 psi. There is nothing wrong with using higher-pressure hose, if that’s what your local hydraulic hose supplier stocks. Hose rated SAE 100R2AT is reinforced with two braids of high tensile steel, providing excellent abrasion resistance. Hydraulic equipment suppliers are also sources of fittings, couplings, and gauges. All such parts should be stainless steel, bronze, or even brass, but not steel. Gauges should be rated for corrosive liquids.
It’s a good idea to buy your main high-pressure components first (pump, pressure vessel, and pressure-regulation valve) and take them with you to a local hydraulic equipment supplier to ensure that couplings and parts you buy will fit together properly. If you don’t have a well-equipped supplier in your area, there are many online sources. Hose prices can vary widely, but should range between $2 and $5 per foot.
Membrane
Next comes the pressure vessel. This long slender tube, rated for a pressure of 1,000 psi or higher, houses the membrane. It comes with end-caps that have fittings for the membrane on the inside and for the hose connections on the outside. All connections use O-rings to ensure leak-free seals. Most seawater reverse-osmosis pressure vessels are constructed of fiberglass-reinforced plastic (FRP) or some similar composite material. I’ve heard of homemade pressure vessels made from heavy-gauge stainless-steel pipe but have never met anyone who used one.
The most efficient size for a typical sailboat installation is the 2 1⁄2 -inch by 40-inch size. If you have to use two 21-inch units, it will cost you almost twice as much for the same output. Remember, even though the unit is about 42 inches long on the exterior, it’s narrow and, for the price of some extra hose, you can mount it anywhere. You can almost double the output with an additional pressure vessel and membrane. In warm seawater of average salinity, the system will produce about 23 gallons per hour with one 40-inch membrane and about 43 gallons per hour with two.
Wateranywhere sells a complete FRP pressure vessel. There are several membrane manufacturers, including Hydranautics, Koch, AMI, and Filmtec (Dow Chemical). I continue to have outstanding service from a Filmtec membrane, which still gives full production with minimal reduction in water quality after four years of almost daily use. Wateranywhere sells the Koch, the AMI, and the Filmtec models.
Pressure gauge
Two hoses exit the pressure vessel: the product-water hose and the seawater hose. The seawater hose is another section of hydraulic hose, and leads first to a pressure gauge and then to the pressure-regulation (flow-restricting) valve. Gauges of this sort should measure pressure up to at least 1,000 psi and are available from suppliers of hydraulic and industrial equipment.
Regulation valve
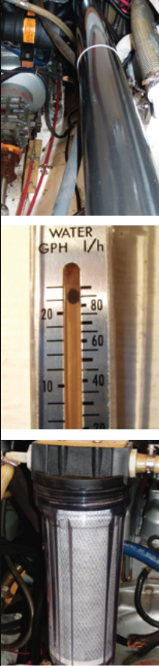
The regulation valve must be rated for pressures of at least 1,000 psi. A higher rating is better in order to provide a safety margin. Cat Pumps valve model 7070 meets the requirement but, like their pumps, is expensive. Both Delaware Sales and Service and Pressure Washer Parts offer this valve.
You can also use a simple needle valve but there is a danger in this for an engine-driven system. Once the needle valve has been adjusted to maintain the operational pressure of 800 psi, any substantial increase in engine speed can over-pressurize the system, potentially damaging the membrane.
For the difference in price, you might decide it’s nonetheless worth the risk and, if you’re very cautious, it shouldn’t pose a problem. I decided to take the risk. Most suitable needle valves sell for less than $50, so you could afford to buy two membranes for the difference. Pressure Washer Parts sells a brass needle valve using a stainless-steel needle and Grainger Industrial Supply sells an all-316 stainless-steel model. If you use a single-speed electric motor to drive the pump, the constant flow rate means you can use a needle valve without the risk of over-pressurizing the membrane.
The pressure-regulation valve is the last stop for the hydraulic hose. An ordinary low-pressure hose carries the rejected brine away from the valve and overboard via a through-hull, normally about 5⁄8-inch and made of plastic, located above the waterline.
Product-water path
The product water exits through a low-pressure hose that leads first to a flow meter. The meter should have a measurement scale a little higher than your maximum expected output. I found a Dwyer Instruments model RMB-84-SSV panel-mounted meter reading to 40 gallons per hour on eBay (Dwyer Instruments also sells direct to consumers from its website). If you plan to use two membranes, you should buy a meter reading to at least 50 gallons per hour.
The last part is another Y-valve diverter that lets you direct the fresh water (via ordinary marine-grade drinking-water hose) to either the sample outlet or the freshwater tank. After the watermaker has run for a couple of minutes, the water should be drinkable. You can then divert the water away from the sample outlet and to your tank or tanks.
For a convenient way to back-flush the system with fresh water, you can tee into your galley pressure-water plumbing at a point downstream from the carbon filter. If you don’t have a carbon filter in the system, you’ll need to install one. You can use the same kind of housing that is used for the pre-filters. Wateranywhere sells standard extruded-carbon filter cartridges. Run a hose from that point to a shut-off valve and on to another tee located in the low-pressure seawater supply hose at a point between the pre-filter housings and the high-pressure pump. When that valve is opened, fresh, carbon-filtered water will flow through the system, flushing away the residual seawater.
Brimming with water and pride
If you think this sounds like a complex project, it’s probably because many of the components are unfamiliar to you. Even though there is “some assembly required,” it’s really not very different from other plumbing projects once you have gathered all the pieces of the puzzle together. Some of the parts are complex, but you don’t have to understand how they work to connect them together into a reliable system. If you need motivation, check the prices of ready-to-install watermakers now on the market, and calculate your savings. Remember, if you order a complete package, you’ll still have to do most of the same work to get it installed. When you’re sitting in that remote anchorage with your water tanks filled to the brim, you may not be able to resist feeling a little smug about the high-output system you built yourself — for a relative song.
Randy and Cheryl Baker have been living aboard and cruising Caribee, their 1968 Nicholson 32 sloop, since 1992. They completed a major three-year refit and upgrade in Trinidad in 2004. After 16 years of cruising the Caribbean, they transited the Panama Canal and sailed across most of the Pacific in 2008. Caribee is now in Tonga.
Thank you to Sailrite Enterprises, Inc., for providing free access to back issues of Good Old Boat through intellectual property rights. Sailrite.com