Issue 9 : Nov/Dec 1999
When you purchase an older boat, it’s inevitable that some things will need to be changed, repaired, or enlarged. Holding tanks are often on the list of things that must be added or enlarged. An older boat may lack any holding tank at all, and many newer boats have tanks that are too small.
There are a number of commercially available tanks listed in boating catalogs, however these may be in shapes that don’t use the available space on your boat to its best advantage. And it may be expensive to have a custom tank made for your boat. If you like working on your boat and have the time and inclination, you can make your own holding tank. Tanks of a wood/epoxy composite have been used successfully for many applications.
The first step in designing and building a holding tank is determining its location. Several criteria are obvious. The holding tank should be located close to the head. It should have a fairly direct route for the hoses to run from the head to the tank and from the tank to the deck pump-out fitting. Ideally, the tank should be as low as or lower than the head. You will have fewer odor problems if you can avoid waste collecting in the hoses. If you have to pump the head uphill to reach the holding tank, the chance of waste remaining in the hose is greater. Another criterion is accessibility. After you have constructed it, you have to be able to install the tank in the area you choose. This area can be any shape. Available spaces in boats usually have sides and edges of varied angles. This is what makes commercially available tanks so inefficient in using your space.
Make a mock-up
The next step in designing your tank is making a mock-up of it. Using cardboard from an old appliance carton and a roll of duct tape, make a full-size model of the tank. Rough dimensions and angles can be figured with a ruler and bevel tool. When making the tank model, be sure to determine where the inlet and outlet hoses will be located and leave room for routing them to their destinations and attaching the hoses and hose clamps after the tank is in place.
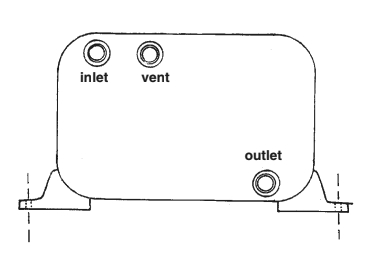
Also leave room for the vent hose at the top of the tank. The inlet hose should connect to a 1 1/2-inch thru-hull at the top of one side of the tank. The outlet hose should connect to a 1 1/2-inch thru-hull at the bottom of one side of the tank. The vent hose should be at least 5/8-inch with an appropriate thru-hull in either the top of the tank (ideal place), or on one end as high as possible.
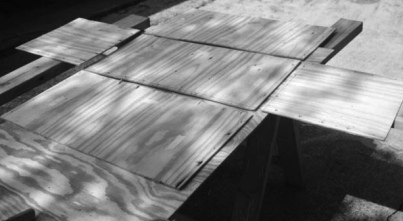
Once the model is constructed, you are satisfied that it is going to fit, and it is the most efficient use of the area selected, you can begin construction. For tanks in the 20- to 30-gallon range, purchase a sheet of 1/4-inch exterior BC-grade plywood (the type with one smooth side). For an estimate of tank size, use the formula for rectangular tanks: U.S. gallons = H x W x L / 231. Take your mock-up model of the tank apart, and use the pieces as patterns for your tank. Mark your tank pieces on the sheet of plywood, making sure the smooth side of the plywood is to be the interior of the tank. After the pieces are marked on the plywood, cut them out using a sabre saw. It might be wise to label the pieces.
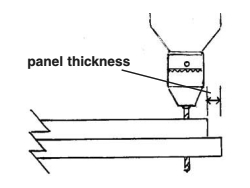
Using a 1/8- to 3/16-inch drill bit, drill holes along all the edges of the pieces about 1/4 inch from the edge, 1 1/2 inches apart except for the edges of the sides adjacent to the top and the edges of the top of the tank. When drilling the holes, place pieces that will be adjacent together and drill through both of them so the holes will be aligned (see illustration at left).
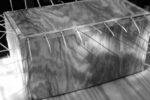
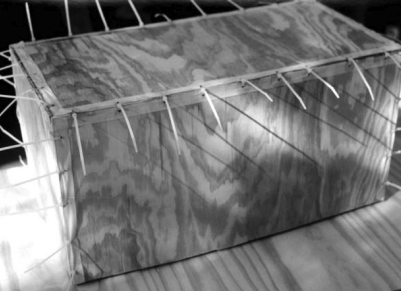
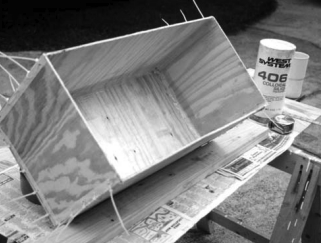
Now assemble the tank by stitching the pieces together using heavy monofilament fishing line or small nylon wire ties, which are my preference. Before stitching the pieces together, place a strip of 1-inch-wide masking tape along the outside edge of the pieces covering the holes. This will prevent the epoxy from leaking through when gluing. When stitching the pieces together, leave the knots or clamps of the wire ties on the outside of the tank where they can be cut off later (see illustration “a” on Page 58). After the tank is stitched together, except for the top, which is completed last, use scrap blocks of wood to prop the tank on newspapers, arranging the joint you want to work on first with its apex down (see photo on Page 59).
There are a few precautions to observe when working with epoxy. Although the fumes from epoxy resin are not as pungent as those from polyester resin, you must have proper ventilation. Use disposable latex gloves and wear an old long-sleeved shirt. Most marine catalogs carry the necessary supplies.
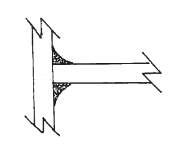
Mix epoxy resin and hardener and, using a disposable acid brush, paint the area along the interior edges to approximately 3 inches from the joint. Now add some West System 406 filler to the epoxy/hardener mix to make a putty of mayonnaise consistency and, using a tongue depressor, work it into the joint on the inside of the tank. Note: depending on the temperature, do not mix up more epoxy/hardener than can be used in 8 to 10 minutes as it will “kick” before it can all be used. The putty mixture should extend about 1 inch on both sides of the joint and cover the stitches.
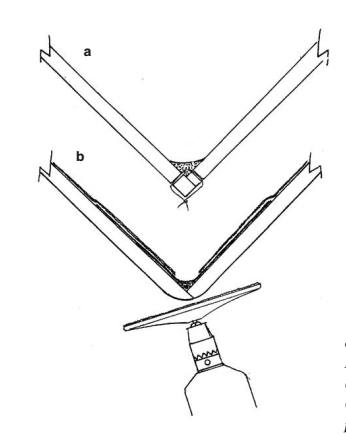
b. Cover the corner with cloth. Overlap cloth with cloth from panels. Round outside corner.
Now, cut a piece of 4-inch wide fiberglass tape the length of the joint. Lay this tape over the putty, and extend it up on both sides of the tank. Using an acid brush, thoroughly wet out the tape with an epoxy/hardener mix with no fillers. Repeat this process with all the interior edges of the tank, turning the tank as you work with each joint. When the epoxy has kicked, cut the monofilament line or wire ties using a pair of diagonal pliers and remove the masking tape on the exterior of the tank.
Sand the area, and round the edges and corners into a smooth radius. Turn the tank upside down and, using an acid brush, paint an area 3-inches wide along the exterior corners with epoxy/hardener mix. Now lay a piece of 4-inch wide fiberglass tape over the joint, wet it out with epoxy/hardener mix, and squeegee out the trapped air. Allow this epoxy to harden before proceeding.
Next, cut pieces of 6-ounce fiberglass cloth to cover the interior panels of the tank. Cut these pieces to overlap the 4-inch wide tape on the interior corners. Sand the rough edges around the interior joints and wipe down with a Scotchbrite pad and water to remove the dust and any “blush” on the cured epoxy. This blush is a film that forms on the surface of epoxy when it cures. It is water-soluble and washes off easily. After the surface has dried, wet the interior of the tank with epoxy/hardener mix, using an acid brush or a 1- or 2-inch disposable paintbrush. Lay the pieces of fiberglass on the interior panels of the tank, wet them out, and squeegee the panels to be sure the cloth is fully saturated and trapped air is removed. While laying the cloth on the interior of the tank, also put a layer of cloth on the piece of plywood that forms the inside of the top of the tank.
For rigidity, add one or more baffles to the interior of the tank. Cut a piece of plywood that will fit snugly across the width of the interior of the tank. It should be cut so that when it is in place there is at least a 1-inch clearance on the top and 2 inches of clearance on the bottom. This is so waste will not hang up in the tank. When it is in place, lay the tank on its side and work in a mixture of epoxy/hardener with filler into the joint in a 1-inch radius fillet on both sides of the baffle and tank. Cover this joint with 4-inch fiberglass tape. The baffle can be covered with fiberglass cloth either before or after it is epoxied in place, making sure the edges are saturated with epoxy and covered with the cloth.
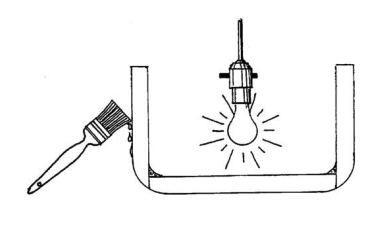
The interior now gets a minimum of 20 mils of epoxy barrier coat. This translates into at least six coats of epoxy rolled on the interior surfaces with a foam roller and brushed out to remove any air bubbles. The interior should be kept warm with a fairly high wattage incandescent light bulb while the epoxy cures. This will ensure that there is maximum cross-linking and curing. Watch out for any potential fire hazard. Also apply the barrier coat to the inside of the piece for the top of the tank.
The outside of the tank does not need to be covered with cloth but should be given a coat of epoxy/hardener mix to protect it from abrasion. Additional abrasion protection can be achieved with a layer of cloth, but it is optional depending on the location of the tank. If the cloth is added, it should be done before the thru-hulls are installed.
Determine where you want the thru-hulls located, and cut a slightly oversized hole for each one. Place masking tape over the holes on the inside. Then turn the tank so the holes are up, and thoroughly coat the edges of the holes with epoxy/hardener mix and allow it to cure. Remove the tape and — with a rasp, file, or coarse sandpaper — enlarge the hole so the thru-hull will fit. Make sure no bare wood is exposed. The thru-hulls can now be installed with a good bedding compound. If a gauge is desired, it also should be installed in the top, following the same procedure as for the thru-hulls.
You are ready to install the top of the tank. With an acid brush, coat the top edge of the tank with the epoxy/hardener mix. Then mix in a little filler, and coat the top edge of the tank again. Lay the top on the tank, making sure it is aligned. Place a weight on the top to ensure that it doesn’t shift and, after scraping off any excess from the outside of the joint, allow it to cure.
After it has cured, sand the edge, rounding it into a 1/2-inch radius, as fiberglass cloth doesn’t like to go around a sharp corner. Coat the top and adjacent sides with epoxy/hardener mix for about 3 inches, and cover the corner with 4-inch wide fiberglass cloth tape. Wet the tape out with the mix, squeegee out any air, and allow it to cure.
The tank is basically finished. If fasteners are required to prevent the tank from shifting after installation, tabs made from the plywood should be fastened to the tank with epoxy/hardener and filler added (see illustration on Page 56). These tabs should be coated with epoxy and cloth for added strength. Fasteners are attached to these tabs to hold the tank in place. For appearance, the tank may be painted. When installed, the hoses should have double hose clamps with top-quality stainless steel clamps on each thru-hull.
The actual construction of the tank is much less complicated than it would seem from reading this article. It isn’t difficult and results in an excellent tank. Holding tanks may not be a topic you like to think about, but as more waters are declared no-discharge areas, the topic becomes more important.
Questions are asked regarding epoxy/wood composite tanks for potable (drinking) water and fuel tanks. They have been used for both with success. However, the Gougeon Brothers (West System) does not encourage their use for potable water and gasoline fuel. The rationale is that because they cannot control the cure process to ensure the proper resin/hardener ratio and cure temperature (temperature should be several hours at 150 to 200oF) for the barrier coat, they don’t encourage its use. With potable water tanks, improper cure may possibly result in extractives in the water. In commercial manufacturing applications, this process is strictly controlled and, as a result, epoxy-lined containers and pipes are used in many applications that carry the food and drinks we use each day.
Regarding fuel tanks, the Gougeon Brothers’ literature is ambiguous. With gasoline tanks, the constantly changing fuel chemistry, because of fuel additives and blends, does not guarantee that in the future fuels will be compatible with epoxy coatings. However at present, there is no problem. So Gougeon does not encourage composite tanks for gasoline. Diesel fuel poses no threat to epoxy, and it is often used to repair metal diesel fuel tanks.
However, before constructing a diesel fuel tank with epoxy/wood composite, the Gougeon Brothers recommend checking with your insurance carrier regarding any restrictions on their use. Any increase in your insurance premium might offset any savings in the construction of the tank.
Holding tanks, however, have no such restrictions. In fact, the U.S. Coast Guard does not certify any holding tanks, only the head itself and its discharge into the waters. A home-built epoxy/wood composite holding tank is an excellent way to get the most tank for your space at an economical price.
Norman Ralph, and his wife, Jeanette, discovered sailing with the help of their grown son. It worked out for everyone — they bought his boat. A trip to the Gulf Coast exposed them to the concept of year-round sailing, and they began plans for early retirement in Louisiana where the water never freezes.
Thank you to Sailrite Enterprises, Inc., for providing free access to back issues of Good Old Boat through intellectual property rights. Sailrite.com