Cautious amateurs start with a kit — for an asymmetrical spinnaker
Issue 76 : Jan/Feb 2011
Never say “never.” For nearly 20 years, I have loudly proclaimed that I would never sew a sail for Mystic, our C&C 30. I had my reasons.
It’s a huge and daunting project. There are headboards and corner patches requiring the services of a veritable sewing machine from hell. I always thought the sailmaker’s craft was not for the untrained or faint of heart. Sail shape is too critical to leave to rank amateurs. Our lives could depend upon the quality of our sails. I felt I wasn’t worthy.
But over the years of sailboat ownership, Jerry and I have repaired and modified a lot of sails. In addition to that, I have sewn miles of stitches on Pacific blue Sunbrella (Mystic’s color) making sailbags, mainsail covers, winch covers, and assorted trim. Then I did the same in brown Sunbrella for our Mega 30 project boat, Sunflower.
Much of this sewing was done on a home sewing machine. But eventually we bought a Sailrite Ultrafeed, an industrial-strength machine that is capable of sewing many layers and, what’s more, is blessed with miraculous walking feet. These feet help slippery fabric (such as sailcloth) move evenly through the machine’s feed dogs.
By acquiring this monster machine we shot down one of my best reasons for avoiding serious sail work. More miles of stitches followed: winter tarps for both boats, upholstery and further interior and exterior knick-knacks for Sunflower, and innumerable tarp and sail repairs.
On his own, Jerry took on a couple of major sail modifications that I would never have tackled: he added a foot reef to one jib and hanks to another, replaced a series of batten pockets in the mainsail, modified the Flying Scot jib we use in a blow, and converted a couple of roller furling sails that came with the Mega into hanked-on jibs. (I know. Most people go the other direction when it comes to hanked-on sails and roller furling. But Jerry’s approach is more “retro.”) Working together, we inserted vinyl telltale windows in all of Mystic’s jibs.
You can tell someone’s resolve is weakening when she says, “I’d never build a new sail. But if I ever had to build one, I’d want to start with a spinnaker. That’s a nice starter sail, because the sailcloth is light . . . and our lives don’t depend on the quality of a spinnaker.”
Over the years, I have said those words. More than once. Jerry recognized that chink in my armor for what it was.
But Mystic didn’t need a spinnaker. Not with our huge 170 genoa that is a great light-air sail. Spinnaker? Mystic never had one. Never will, we figured. That is, until the summer of 2009 when we crossed Lake Superior from Isle Royale to Duluth, Minnesota, about 150 miles to the southwest. The relative wind direction was too far abaft the beam for a clever combination of main and jib. The main masked the jib. But a wing-and-wing setup wasn’t quite right either. There was no drive in the jib and the slatting caused by miles of rollers provoked a certain amount of grumbling among the skipper and crew.
Jerry became an overnight convert, and I became a somewhat unwilling accomplice. (Isn’t that the way accomplices usually plead?) Some of the worst disasters on our 20-foot Flying Scot involved spinnaker fi re drills and usually wound up with an unplanned swim. One tends to recall these events vividly. My motto remained: “We don’t need no stinkin’ spinnaker. Besides, I’m never going to sew a sail.”
But the die was cast. Jerry suggested that perhaps we could take on a little asymmetrical spinnaker kit project during that quiet week between Christmas and New Year’s. He said we’d sew this one as a team. So we selected the colors for the panels and ordered a kit from Sailrite. Perhaps Christmas had something to do with it; before I knew it, I was completely in the spirit of the thing.
A special package
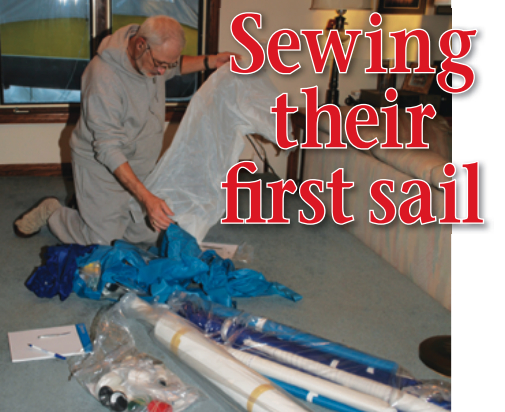
A week later, a really big box arrived. Weighing in at 25 pounds and standing taller than I do, this box was my first clue about what we’d gotten ourselves into. A nice touch is that the box included a sample copy of Good Old Boat magazine as part of a promotional program we’ve had with Sailrite for years. It’s one of our many ways of spreading the word about this magazine to do-it-yourself sailors. And there were personalized instructions with our names, our kind of boat, the type of spinnaker we’d ordered, and other personal details with a note, for example, that we had not ordered sail numbers for our cruising chute.
Unpacking the box and checking the packing list was easy. But then the work began in earnest. Each panel in the spinnaker had been computer-generated and cut on a flat-bed plotter, complete with seam markings and inked-on labels about which panel was which. This was a good idea, since there were 41 panels, all looking very much alike. No worries, mate. This is the “insert tab A into slot A” approach to sailmaking.
And if that weren’t clear enough, some good fairy had hand-written further information on a flurry of little white stickers and stuck them all over the panels. Each little note was extremely useful. There was no wasted effort there. The same thoughtful sprite had also supplied us with a bunch of scrap sailcloth left over when the cutting was completed. We could use this scrap to check our sewing machine tension and to make as many test strips as we needed. We would also now have a lifetime supply of telltales (so long as we aren’t hung up on the need for red and green telltales, since this spinnaker’s color scheme is two shades of blue and white).
More strength, less stretch
The sail design that Jerry — in consultation with Sailrite’s sail designer, Jeff Frank — selected for us is an SKR cut, a Sailrite proprietary design, which stands for Sailrite Kit Racing, even though this is an asymmetrical cruising spinnaker and we don’t intend to race. Just to prove that it’s asymmetrical, it’s 40 feet at the luff, 38 feet at the leech, and 22 1/2 feet at the foot. Sailrite also has an SKR mainsail and genoa cut. According to Matt Grant at Sailrite, all three designs have the panels and rows of stitching arranged so “the thread lines run with the load path” to minimize bias stretch.
He points out that the SKR cut is more expensive than the typical tri-radial cut because there are more panels to sew together and more wasted fabric. (Wait a minute! Did he say more panels to sew?) The other factor in this sail cut is that the design itself is able to take more stress, so lighter fabric can be used for spinnakers on larger boats or, alternatively, racing boats can carry a sail of their usual weight cloth in a bit more wind. Although it didn’t start out that way, these days the folks at Sailrite recommend their asymmetrical racing cut to cruisers as well as racers.
Sewing in sections
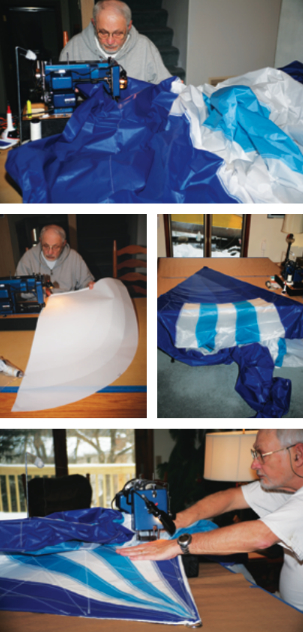
The design of this spinnaker allowed us to build the sail in four subsections: top, middle, and two bottom pieces. We started at the top. That was when we got our first inkling of the true size of this sail. There was no room in our house — not anywhere — that was long or wide enough for laying out even one subsection of this mammoth sail. Dragging each long, very long, triangular section of crinkly 3/4-ounce ripstop cloth through the house was somewhat akin to having a long train on a wedding gown.
We sewed these long pieces together while carefully following the diagram that came with the kit. We followed the guidance offered somewhat like a paint-by-numbers plan, since we lacked the space to see even a part of a subsection laid out flat. Some things you have to simply accept on faith.
Each panel was to be attached to the previous one with a double row of zigzag stitches. With this project, I learned to appreciate the sticky two-sided Seamstick tape as never before. This repositionable tape took the place of pins, holding each seam in place perfectly while we attached each new panel and sewed it to the previously assembled section of sail. I had previously disliked Seamstick because in other canvas projects it had gummed-up the sewing needles and made them sticky, but the fine #10 needles we used with the thin ripstop fabric did not get gummy enough to be a problem.
The second time we became aware of the gargantuan proportions of this sail was when we neared the ends of a subsection and had to maneuver our ever-growing creation around in a tight space.
Home-loft limitations
We did our sewing in the dining room, which we cleared of all furniture except for two large tables, side by side, that served as our sewing platform. Even with that arrangement, the large spread of cloth caught on table corners and required constant repositioning as we worked our way from one end of a seam to the other and back again.
Picture that you begin with the entire sail or part of a sail in your lap. Then, as you sew up to the other end, this large wad of fabric must move off the floor at your feet and across the table to the far side. When finished, you “merely” flip the whole thing over and sew back up the same seam on the back side in the other direction, starting once more with the whole pile in your lap. We could have put the sewing machine on the floor. That would have simplified some of this, but I don’t think either of us would have ever walked again if we’d done two weeks’ worth of sewing while crouching over a sewing machine on the floor.
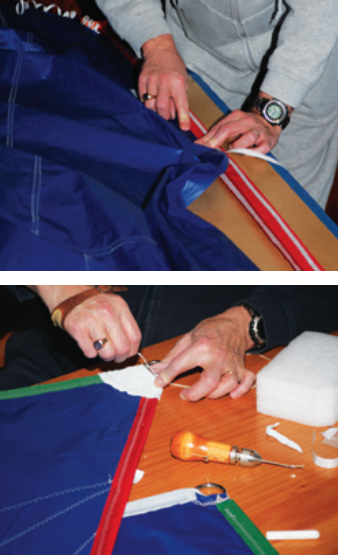
Eventually, all the subassemblies were completed and we moved on to the multi-layered corner patches. Jerry did this work by himself as the quiet week between Christmas and New Year’s Day had vanished and magazine deadlines began competing for my attention. When he’d completed that heavy work, we sewed all the subassemblies together. Now we’re really talking about a monster sail!
The big picture
Before completing the edging and the final corner protection, we thought we should find a way to spread out the whole sail somewhere in order to see visually if we had made any mistakes. But where could we find a clean, empty space more than 40 feet long and 22 feet wide?
I thought of the gymnasium in our area community center. This was a request that they apparently don’t get every week, judging by the dumbstruck looks on a couple of faces when we showed up with an enormous bag and said, “We’d like to spread our sail out on the floor somewhere, if you please.” That gave us the chance to tiptoe all over the sail, removing little white stickers and assuring ourselves that Mystic’s newest, largest, and most colorful sail was assembled correctly.
To finish, Jerry sewed on the red, green, and white edging and then completed the final chafe protection on the corners, hand-sewing leather patches on each.
Kit and kaboodle
The Sailrite kit included all the right pieces, perfectly cut and carefully labeled. It also included good directions. We found their online video to be very helpful as well. Since seeing the process is an effective way to understand a project of this type, we watched the video a half dozen times at least as we arrived at each new stage of the process.
We found it valuable to load up a number of bobbins at one time so that, when one ran out in the middle of an 18-foot seam, we could easily pop in a new one without having to get a formidable ball of sail out of the way first.
We were tripped up twice by a couple of items that were not supplied in the kit but were called for in the directions. The first was #10 industrial sewing needles for the Ultrafeed machine. These rather fine needles are used with thin ripstop nylon. Since our usual canvas projects require sturdier needles, we didn’t have industrial needles for our Ultrafeed machine of this size on hand (my Singer sewing machine needles were not sized for the Ultrafeed). Since we could have been sewing this spinnaker on any kind of machine, I understand why the kit couldn’t supply these needles, but we were caught unprepared nonetheless.
The next thing called for that was not included was a 3M adhesive spray called Super 77. This was available in a local crafts shop, but it would have been much simpler if this had been supplied with the kit or if the kit specifically noted that this product should be purchased locally before beginning.
Even though we sewed yards and yards of seams, we never thought all that practice made perfect. Even by the end of the project, we thought our rows of stitching were somewhat unprofessional looking. They’re not bad. Not bad at all really, but I don’t think any sailmaker will offer either of us a job anytime soon.
There was just one more associated project. We still had to make a spinnaker sock. And — egads! — this kit did not come with pre-cut sections. It arrived with a great bolt of cloth, detailed instructions, and Sailrite’s best wishes (Oh dear!). They also sell a video about building a sock. We started with the video (watching it many times) before we began yet another daunting task.
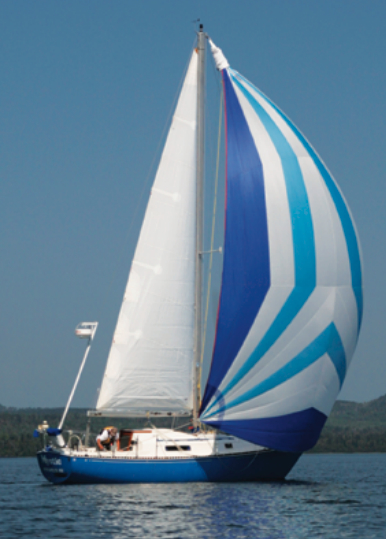
During our great summer vacation odyssey of 2010, we had a chance to fly the spinnaker several times. It performed amazingly well and looked great. My regrets about not having professionally perfect stitching all melted away. You can’t see our imperfect seams when that monster sail is flying.
Now that we’ve built one sail, we’re feeling much more worthy as sailmakers. Even while we were still sewing the spinnaker, Jerry began making noises about building a storm jib. They’re small, you know. How hard could it be? As for me, I’ve been rather taken by the Mainster light-air mainsail discussed in our January 2010 issue. You just never know when the temptation could come upon one of us again.
Karen Larson and Jerry Powlas founded Good Old Boat and live by the do-it-yourself creed they encourage through their magazine.
Thank you to Sailrite Enterprises, Inc., for providing free access to back issues of Good Old Boat through intellectual property rights. Sailrite.com