A tired saloon table gets a facelift
Issue 92 : Sept/Oct 2013
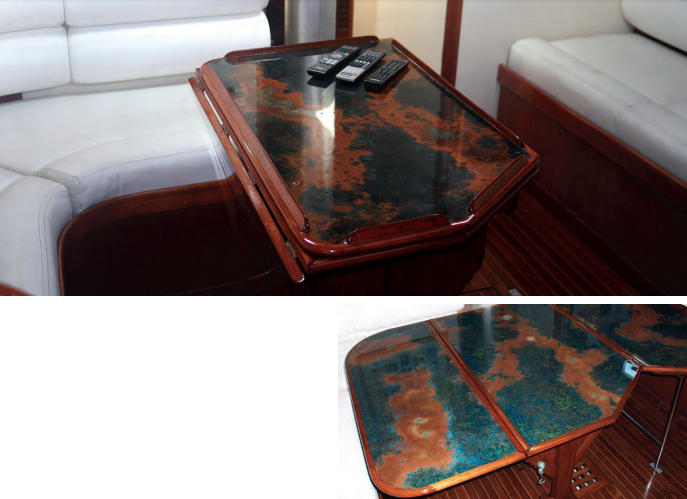
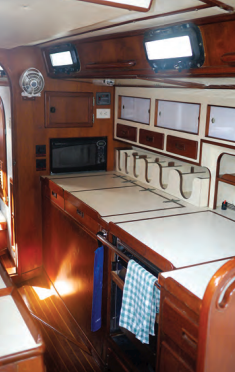
The tabletop and countertops on Jammin, my 1981 Stevens 47, are a lovely almond Formica that was the must-have material before Corian came on the scene. Formica is really tough stuff and surprisingly attractive (as long as you stay away from the crazy wood-grain patterns). However, it does wear out, and the surfaces on Jammin, particularly the saloon table, were no longer attractive.
The saloon table is an elegant three-leaf affair with four surfaces. Two of these are hidden when the table is folded up. The table is all teak save the tops, which were plywood with Formica surfaces and teak trim. I wanted to replace the Formica while preserving the rest of the table as much as possible — I revere teak and hate the thought of wasting it and I didn’t want to replicate all of the teak trim (which would have been hard to do).
My plan was to remove the Formica and replace it with something else. I initially thought a teak veneer, perhaps incorporating an inlaid compass rose, might fit the bill. However, I was concerned about the differences in thickness. The Formica was .045 inch, whereas a paper-backed teak veneer would have been .020 inch. Inlays were a different thickness altogether, .031 inch, and I couldn’t find an inlay I liked.
While doing my research, I came across an interesting material called patina copper. This material is a thin sheet of pure copper that has been treated with chemicals to create colorful patterns on the surface. A wide variety of colors are available, including one called azul that included a blue that matched Jammin’s topsides. While not traditional, I thought it might be an interesting choice.
The issue I faced was the difference in thickness between the Formica (.045 inch) and the copper (.005 inch).
In addition, the fragile copper would need to be protected somehow. The answer: bar top epoxy to level the tabletop with the surrounding teak trim and protect the copper.
Delicate disassembly
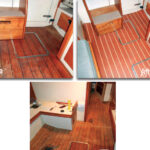
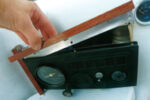
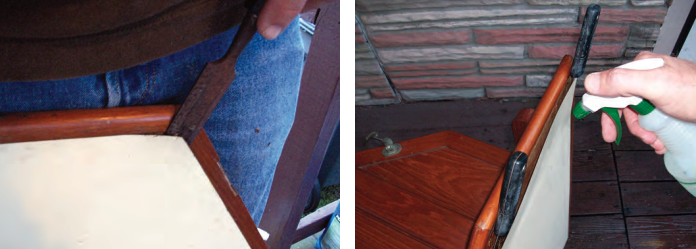
With the replacement material selected, the first step was to remove the Formica without destroying the teak trim that surrounded it. As well as the teak edges of the table, there were teak fiddles on the central portion of the table. Fortunately, the fiddles were only held in place by copper nails and varnish. I was able to pry them off easily with a chisel. One did crack, but I was able to repair it with a bit of thickened epoxy (I love that stuff!). Getting the Formica off was another story entirely. Formica is glued to its underlayment with contact cement, which does a seriously good job of holding it in place if done right. The Formica on Jammin was done right.
I wanted to remove the Formica in one piece, so I could use it as a pattern, while not destroying the plywood underlayment. To do this, I would have to dissolve the contact cement with lacquer thinner — lots and lots of lacquer thinner. To apply the thinner, I would need a spray bottle full of the stuff, preferably one with a stream-style spray so I would not fill the air with any more lacquer thinner than necessary.
My approach was to pry up one corner of the Formica with a sharp chisel, then follow up with 1-inch stainless-steel putty knives to consolidate my gains. I sprayed lacquer thinner in the void between the laminate and the plywood, waited a moment for the cement to dissolve, and broke the bond with the putty knives, working back and forth across the interface between the Formica and the plywood. Then I applied more lacquer thinner, and repeated the process. Did I mention that I needed a lot of lacquer thinner? Lots and lots. The work area needed to be well-ventilated.
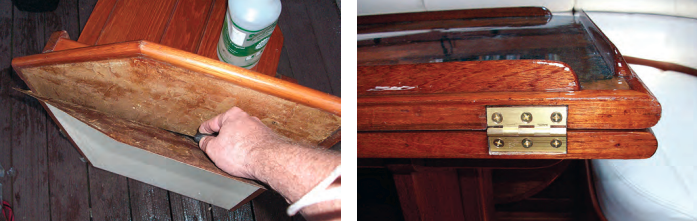
I succeeded in getting most of the Formica off in one piece with minimal damage to the underlying plywood.That’s not to say I achieved perfection. I did take divots out of the plywood (I filled them with Bondo) and the Formica did break, but I was able to use the substantially intact pieces as patterns for the copper.
Fitting the copper
Applying the copper was straightforward. After cutting the sheet to size using the Formica patterns, I applied standard contact cement to both surfaces (the tabletop and the underside of the copper) with a chip brush. To prevent the copper from sticking before I had aligned it, I laid five or six dowels across the surface and set the copper on them. Separating the work with the dowels allowed me to carefully align one edge before sticking it down. Once I had the leading edge aligned and stuck, I removed the dowels one at a time, sticking the copper down as I went. After the dowels were out of the way, I used a rubber roller to ensure the copper was firmly adhered to the plywood.
If I had the project to do over again, I wouldn’t bother with the patterns. The copper is easy to cut with a utility knife. I would simply cut the copper a bit larger than the work (say an inch on each side), glue it down, and then trim it with the utility knife. That would avoid alignment anxiety.
Topping it off
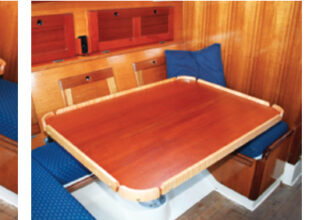
Coating the top with bar top epoxy was also straightforward, once I got over the notion that it had to be perfect. The issue was the rounded shape of the teak trim, essentially a 1-inch-thick bullnose that forms the edge of the table. One of the leaves was double-sided. That is, it would have copper on both sides, so there was no hard “edge” to mask. I would have to blend the seam at the apex of the bullnose. Would it work? There was only one way to find out.
To mask the single-sided leaves, I ran masking tape around the underside where the bullnose met the teak veneer on the underside of the leaf. For the double-sided leaf, I simply ran a strip of blue masking tape around the perimeter of the bullnose with only one edge of the tape stuck to the apex of the bullnose. This strip would allow excess epoxy to flow over the edge of the bull- nose and onto the floor without running underneath and creating ugly drips.
I realized that, once I had masked the edge, it was imperative to get the top perfectly level so the bar top epoxy would cover the top evenly. I did this with a good level, blocks of wood, and standard wood shims from a lumberyard. I spread newspaper over the workshop floor to catch the overflow. The next issue was to determine the volume of material to use. According to the label, 2 quarts of epoxy will cover 8 square feet of tabletop to a depth of 1⁄8 inch (.125 inch). I had about .040 to fill and each tabletop section is about 2.5 x 3.5 feet, or a bit less than 9 square feet, so I prepared one quart of epoxy for each section of the tabletop.
My advice to anyone trying this technique is, once you’ve figured out how much material to prepare, go for it. Mix the hardener and resin thoroughly and pour the mixture onto the tabletop. The material is self-leveling, but you can help it by pouring the mixture in a zigzag pattern over the length and width of the top and encouraging it to flow into corners and to edges with a popsicle stick. I used chip brushes to “paint” the bullnose edge of the table with epoxy.
You will have bubbles. Air trapped at the surface of the copper will form bubbles in the epoxy. To pop them, blow on them with a hairdryer set on hot/high. Don’t be afraid to push the epoxy around with the hot air to pop the bubbles. It will level itself again when you are done. You have 10 or 15 minutes to get the bubbles out before the epoxy starts to set, so be prepared with the hairdryer.
As the epoxy slowly leveled out, it continued to overflow the edges of the leaf, creating drips. I smoothed the drips with a chip brush and continued smoothing until the epoxy stopped flowing. This took a while longer than I expected, which is why I discovered drips the next day. Because of the drips (which I sanded off) and a couple of low spots, I put a second thin coat of epoxy on each leaf.
It’s important to note that, unless the second coat is applied within less than 10 hours, the previous coat will need lightly sanding with 220-grit sandpaper to ensure adequate adhesion. Epoxy makers say several 1⁄8-inch coats of epoxy can be applied in sequence. They don’t recommend thicker coats because it can cause yellowing and other bad things.
The time to remove the masking is once the epoxy starts to set but before it gets hard (the plastic stage). It is much easier to remove at this stage than after the epoxy sets really hard.
The seam at the edge of my double-sided table is not too bad. Most folks don’t notice it. I do, of course, but epoxy is not hard enough to wet sand and polish.
Finishing up
I varnished the base of the table with several coats of semi-gloss varnish. I also wanted to replace the copper hinges that connected the leaves to the main table since they were tarnished and bent. Finding the hinges turned out to be a pain. Since Jammin was built in Taiwan, the builders apparently felt free to use hardware in either metric or imperial sizes. In the case of the hinges, it was metric. I finally found hinges of the exact size I needed in England.
The last step was to reinstall the fiddles. I simply nailed them back in place with stainless-steel brads after coating their bases in bar top epoxy. I then brushed a coat of epoxy on the fiddles with a chip brush. They came out great.
Before I began this project, a few folks voiced skepticism about my choice of patina copper, thinking it might be too gaudy or busy, but I disagreed. The azul patina copper is in perfect keeping with Jammin’s blue color scheme and the pattern of the patina is almost chart-like. I like it.
Now, what am I going to do about the Formica in the galley?
Scott St. Clair was introduced to sailing as a teenager by a friend on his family’s Coronado 27. He’s been hooked on boats and sailing ever since. After many years of sailing on other people’s boats, Scott acquired a run-down Columbia 57 and commenced a massive refit. Now he’s working his way through a long list on his current boat, a Stevens 47. He lives in Charleston, South Carolina.
Thank you to Sailrite Enterprises, Inc., for providing free access to back issues of Good Old Boat through intellectual property rights. Sailrite.com