Vinyl restores the look and the footing
Issue 92 : Sept/Oct 2013
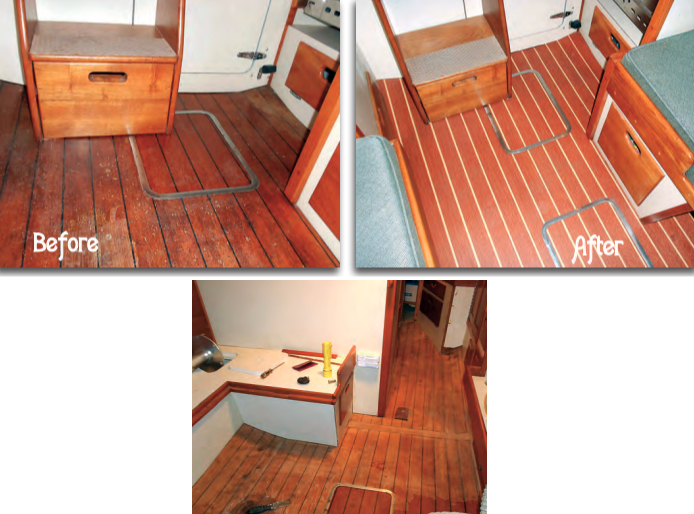
Back in the early days of Good Old Boat (March 2000), I wrote an article detailing my efforts to bring new life to the interior of our Allied Seabreeze 35. That upgrade has given us many years of enjoyment. Down below, Secret Water did not look her age so long as you didn’t look down. It was important to avert your eyes from the cabin sole.
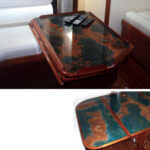
The original construction was teak-veneered plywood with black striping. After 47 years of wear and tear and dings and divots, the once attractive varnished surface had lost its luster. The truth was it looked like the devil. The Seabreeze has only a 24-foot waterline and the sole wraps up alongside the hull in the forward cabin and, to a lesser degree, aft in the galley. As you may imagine, Maine waters where we cruise don’t ever really warm up, especially around the outer islands. On a hot summer’s day, these surfaces will sweat, causing the varnish to blister and fail. Leaking chainplates in the area of the main bulkhead had contributed to localized sole damage. I decided an upgrade to the cabin sole was long overdue.
I considered overlaying the original material with a comparable teak-and-holly veneered plywood, but that wouldn’t solve the sweating issue. I also thought about simply painting the surface, but I couldn’t let go of the proper-yacht look of a wooden cabin sole. I kicked around the idea of using dimensional lumber about 3⁄8-inch thick. I could have made this option work but the shape of the hull would have made fitting it a challenge. Also, I didn’t want to give up any headroom. I’m 6 feet 4 inches tall and the boat has a clearance of just 6 feet 3 inches.
I came across another product line that consisted of vinyl planks about 3 inches wide and narrow strips about 1⁄4-inch wide. I nearly made this choice, but the idea of so many linear feet of seams worried me.
Then I discovered Lonseal, a company that manufactures industrial-grade flooring including a marine product line. I reviewed the options on their website (www.lonseal.com) and requested samples. Soon after they arrived, I received a phone call from a sales rep who told me they were there to answer any installation questions.
This looked like a challenging job even for a professional sheet-goods installer. I was getting into new territory here.
Prep and pattern
The first step was to strip the old varnish, then fill and fair the bare wood with epoxy fairing compound. Apart from a small area of rot, most of the damage was the result of dropped tools and who knows what. Wherever trim came into contact with the sole, I did my best to temporarily remove the trim or undercut it slightly so the new material could slip beneath it. This helped establish a crisp appearance and simplified fitting the flooring. After a thorough sanding, I surfaced the wood with epoxy to provide a good bonding surface.
At this stage of the project I had arrived at a point of no return. I began to doubt my ability to pull it off. I briefly considered calling in a flooring installer to bail me out, but my pride kept me charging forward. If my wife, Sandy, could figure out how to make interior and cockpit cushions, a sailcover, and a host of other canvas projects, I too could finish what I had started.
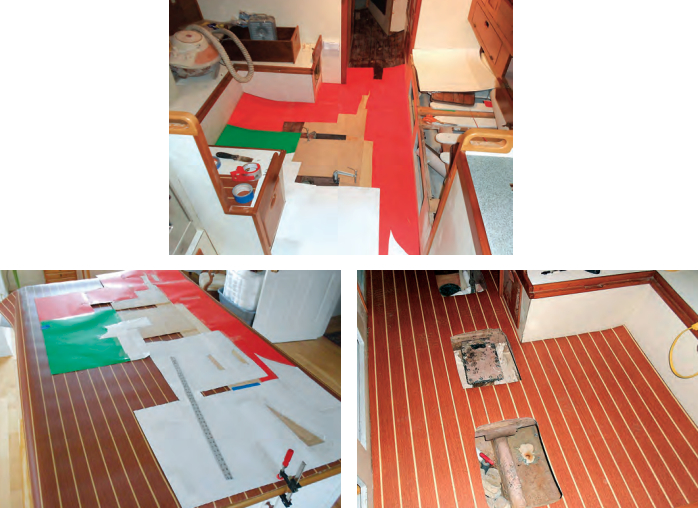
The trick was to make an accurate template. The main section, at 9 feet long, seemed like an impossible task. My approach was to make a paper template using poster board.
For the sake of stability, I used an 8-foot-long scrap piece of 1⁄4-inch plywood to give it some backbone. I clamped this firmly in position with a C-clamp at a bilge opening. This kept the template from skating around as I carefully fitted and taped poster board to the plywood. Once I was satisfied with the fit, I laid down a few intersecting reference lines with a straightedge. These gave me the ability to “sanity check” the template after I removed it from the boat and laid it over the material . . . before I started to cut it.
Using masking tape as a cutting guide, I transferred the shape of the template to the material. Once the tape was in place, I was able to set the template aside and make the cuts unencumbered. I had made reference marks on the template to ensure the stripes in the material would be parallel to the boat’s centerline.
Cut and glue
I had faith in my template. Using a straightedge and a new blade in my razor knife, I took a deep breath, made the first cut, and continued until I had replicated the template. Careful planning and cutting paid off as my dry fit was nearly perfect.
Lonseal recommended the use of its own two-part epoxy adhesive for the marine environment. Following directions, I laid the material down. To do this, I had to crawl up and over the berth surfaces, so I made sure to remove any miscellaneous items that would have been in my way. Getting the material in place and glued down was quite a challenge. After rolling the material out, I still had several spots that wouldn’t lie exactly flat. I solved this by placing sealable plastic bags filled with sand on the areas that had curled up.
After things had set up for an hour or so, I checked for lifting. Satisfied all was well, I waited for the epoxy to cure. Unacceptable gaps at the edge of the decking can be filled with quarter-round molding or a carefully run bead of colored caulk.
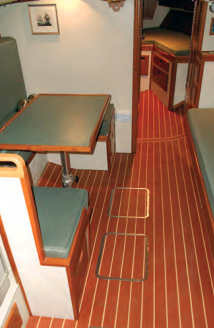
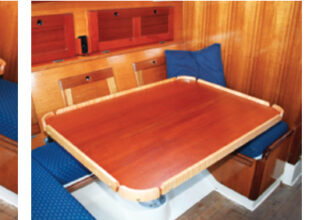
Boat interiors vary and any similar project will present its unique challenges. Vinyl sheet decking may not be suitable for all applications. However, since installing the Lonseal product, we’ve found it to be easy to clean with a damp sponge and it has just enough texture to provide excellent non-skid properties. While it doesn’t have the rich look and warmth of real wood, we find it to be a convincing alternative. It should serve well for the next 47 years of sailing.
Art Hall sails Penobscot Bay, Maine, with Sandy, his wife of 30 years. Together, cruising Secret Water, their 35-foot Allied Seabreeze sloop, they explore the endless possibilities of the coast. Each season, their objective is to spend a night in at least two or three new destinations that are off the beaten track.
Thank you to Sailrite Enterprises, Inc., for providing free access to back issues of Good Old Boat through intellectual property rights. Sailrite.com