Here’s how to keep those untamed line ends under better control
Issue 40 : Jan/Feb 2005
Periodically, I conduct a cursory examination of my running rigging. I make mental notes of those lines that need to be monitored, as well as those that are potential candidates for repair or replacement, and sometimes make corrections on the spot. By doing this often enough, I hope to avoid failures . . . I don’t like surprises.
I carefully inspect all of my cordage each year, usually in the fall prior to putting the boat away. I check the running rigging, of course, but also the docklines, mooring pendant, heaving lines, and anchor rode. If I discover anything significant, I have all winter to correct the situation.
During a recent inspection, it struck me that not all of the bitter ends of my lines were finished off in a proper seamanlike fashion. Most had been heated and fused rather than whipped. This was functional but not nautically acceptable. I vowed to use the winter months to correct this deplorable situation and to make a few changes and upgrades in my cordage.
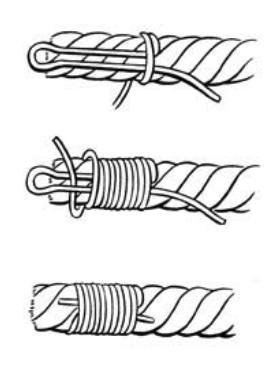
Common whipping
While whipping not only makes for a nicer appearance, its primary functions are to prevent the line’s ends from unlaying and to make them easier to reeve through blocks and eyes.
The simplest type of whipping and the one most often seen is common whipping. Whipping line (twine, waxed cord, and so forth) is laid along the line to form a loop. The whipping is then tightly wound around both the line and the loop for a distance equal to the line’s diameter. To finish, the working end of the whipping is passed through the loop and is pulled out of sight under the turns by pulling the loop end. Finally, both ends of the whipping are trimmed off. Consider this type of whipping temporary. To make it permanent, add a drop or two of super glue to the whipping. Common whipping can be used on three-stranded and braided lines.
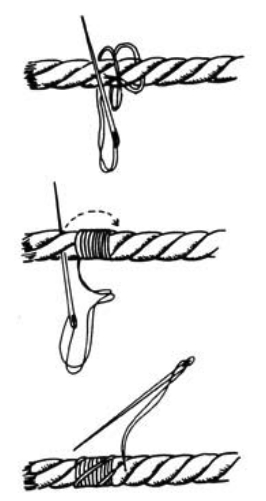
Needle whipping
The finest whipping is needle whipping. It takes a bit longer to accomplish, but its superiority justifies the extra time required. It is performed more easily on three-stranded line but can be can be used on braided line. A doubled length of whipping is passed under one strand of line or, in the case of braided line, a few braids. The ends of the whipping are tucked under the turns, which are put on doubled, rather than single, as with common whipping.
Once the desired length of whipping has been achieved, the working end of the whipping is brought under a strand (or a few braids) of line and follows the lay of the line back to the whipping’s start, where it is drawn under another of the line’s strands (or a few braids). After having followed the three lays back and forth over the turns of whipping (three or four times for braided line), the whipping is finished by bringing the working end up through the center of a strand and trimming it short. In the case of braided line, the whipping is finished by bringing the working end up through approximately 1⁄3 of the line’s body and then trimmed short.
When whipping a line, remember that all whipping should be started inboard and the turns wound toward the end of the line. Whipping should not be put on close to the line’s end, but rather several inches from the end. Once the whipping has been completed, cut the excess line off not less than 3⁄8-inch from the whipping. The width of the whipping should generally equal the diameter of the line to be whipped.
Back-splicing
Another way to prevent three-stranded line from unlaying is by back-splicing. This technique works well and looks great on docklines and some heavier lines. Since back-splicing almost doubles the end of the line’s diameter, the line may not pass through blocks and eyes. The advantages and disadvantages depend on how the line is used.
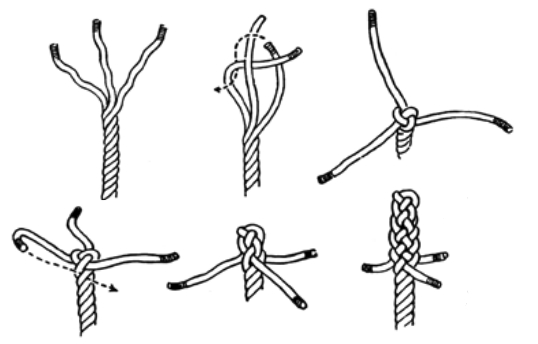
Back-splicing starts with a crown knot, which is very simple and is most easily described by illustration. Moving counterclockwise, each strand of unlaid line is crossed over its neighbor on the left, with the final strand enclosed in a bight. The strands are drawn tight and emerge from the bottom of the knot, ready for back-splicing.
To back-splice, working from left to right, one of the crown knot’s strands is brought over a laid strand of the standing line and under the next. This process is repeated with the other two remaining strands, completing a series of three over-and-unders. The working strands are pulled snug, and the series of three over-and-unders, with a snugging in between, is repeated until the strands are too short to work.
Rope-to-chain splice
In addition to finishing off three-stranded line in nautical fashion, a crown knot and back-splice combination is an excellent method for attaching rope to chain without the use of a thimble. A perfect application is a combination rope-and-chain anchor rode. If you have a windlass with a rope-chain gypsy, hands-free operation demands a proper rope-to-chain splice. Thimbles and shackles won’t go through without jamming. They also can hang up in bow rollers.
In this application, the crown knot is tied through the first link of the chain and the strands are back-spliced into the line. Properly done, the line is spliced tightly enough to the chain that movement is prevented, thus eliminating chafe. Any movement that does take place is between the other links of the chain.
Eye-splice
If a crown knot and back-slice combination is not employed, a properly executed and snug eye-splice is required around the thimble in a rope-and-chain anchor rode to insure that it doesn’t pop out. Also, an eye-splice is what makes the loop at the ends of docklines. It is the strongest rope loop and one that can easily be mastered with a little practice.
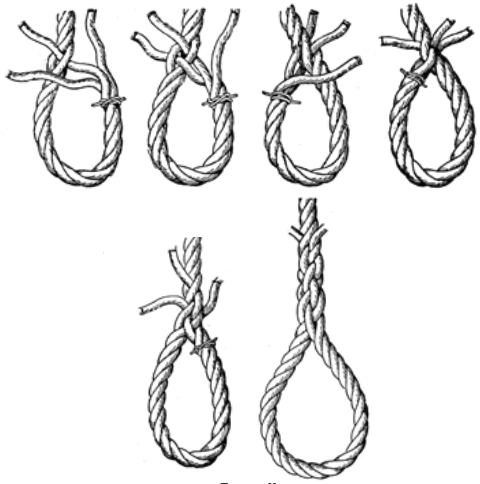
- Unlay the line for a distance of approximately 12 times the line’s diameter. To keep the line from further unraveling, it’s a good idea to put a temporary clove hitch or whipping at the point where the strands begin to unlay. This hitch or whipping should be removed after the splice is formed.
- Bring the unlayed, working end of the line up to form a loop. Untwist the standing part of the line at the point where the splice is to start. All tucks are made against the lay of the line.
- Pass the middle, unlaid strand under one of the strands in the line. Pass the left unlaid strand over the strand that the middle unlaid strand went under and then pass it under the next strand in the line to the left. With the loop turned over, pass the remaining unlaid strand under the last laid strand. With the loop turned back over to its starting position, pull all working strands tight.
- From this point on, working from right to left (with a right-laid line) in a series of three over-and-unders, with a snugging pull in between, the unlayed strands are braided into the line until they are too short to work. The ends can then be trimmed off and the splice made “fair” by rolling it underfoot or pounding it gently with a wooden or rubber mallet.
Thank you to Sailrite Enterprises, Inc., for providing free access to back issues of Good Old Boat through intellectual property rights. Sailrite.com